What have you fixed on your motorhome this week?

Well having only owned the Hymer for just over a week its been a fairly busy week of discovery work prep and planning! So far...

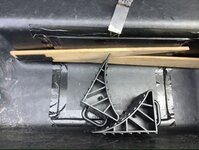
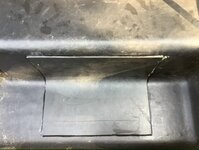
Poked out damp bits of wood under rear garage, dried, sealed, filled and uncoated.

Cleaned up underslung gas bottle, repainted, undersealed and fixed inboard level meter

Removed broken bike rack, started prep on the built in rack door to refit.

Gave up trying to source replacement wing mirror as I couldn't find a replacement and Hymer want rock star money for a new one so ordered a universal set from magnumvs for a third of the price of one new Hymer one.

Corrected polarity on water pump

Ordered new bathroom basin from Derek Justice (again for much less than Hymer!)

Removed kitchen tap and ordered new

Flushed through water system.

Cleaned out grey water tank and probes 🤢 Identified tank leak to inspection bung so awaiting new one.

Identified lots of other little jobs that could do with sorting!

I'm planning on doing a photo breakdown of the basin removal and replacement in the bathroom, should be interesting to see how much of the bathroom I have to remove to get it out!

Although it sounds like I have a wreck of a van, the mercedes side of things has been looked after and is running perfectly! Just appears that the previous owners were a bit heavy handed on the habitation side so some TLC should get it back to its former glory! 😁

Jake
 
1. Straightened up bent motor bike rack
2. Replaced broken tail light bulb
3. Installed motion-sensitive light above motor bike rack
4. Installed an extra set of tail-lights/indicators high on van, above motor bike rack.

Did the last one after repeatedly getting angry beeps from people for whom it seemed our tail lights/indicators were obscured by our bike, depending on what angle they were behind us, or how low their vehicle was, etc.

Now on the road to Malta!
 
Although it sounds like I have a wreck of a van, the mercedes side of things has been looked after and is running perfectly! Just appears that the previous owners were a bit heavy handed on the habitation side so some TLC should get it back to its former glory!

I'm completely the opposite Jake . The habitation side of my Hymer is fine , except were i broke the tap (guess that makes me heavy handed too) , hah , but my mechanical is in a terrible state . My main task was an overhaul of the cooling system , but it's descended into a full on , rebuild ! . I also have several other tasks in hand , mainly as a result of poor ownership , and a total lack of money (spent) . Plus , i've removed several what i class , bodges , and old crap , the previous owner couldn't be bothered with . I did have much more planned , but i'm not sure how much of that will even get started , let alone completed .
However like you i am winning , though strangely my biggest problem has been with Fiat themselves . They don't seem to know what they used , when they put the cooling system together on this van . I've also come across a couple of parts no longer available (in this country at least) , yet i've still managed to source originals from abroad , from as far away as Lithuania . My aim this week was , after 3 months , to have the engine running . But i'll be honest now , that's beginning to look touch and go . Though i have the parts , there's just too much work and access as you know is not great . My latest issue is a defective replacement alternator , a second radiator should be delivered this week .
The van is a millennial , so 20 year old .
Haha sounds like between us we have the perfect Hymer! Mine is a 2002 on the Mercedes base. I may have been a bit too optimistic on the mechanical front. I have noticed that the temperature creeps up on the motorway and slight inclines so I also have some cooling system investigation to carry out. It has coolant and the fan kicks in when getting hot but I think that maybe the radiator isn't as efficient or maybe a little blocked...
Yes, reversing bodges seems to be the majority of my work. Turns out the previous owners answer to most problems was a hot glue gun or some insulating tape!

I don't know about you but I keep going through waves of panic at what needs to be done then realise there's no rush and everyone loves a project right?! ;)
 
Fixed This Week
Rear Brake Cable
Longer HDMI leads to both TVs
4G Receiver Charger packed up. Made own.
Created external Water Barrel Pump to Water Inlet
New Water Inlet and lock.

Looking Into
Air Suspension
New Leaf Springs
More LED Lighting

Subscribers  do not see these advertisements

 
The main lighting in our MH is nearly 2 metres of LED ribbon type strip down each side over the top of the overhead lockers. We find this to bright and they draw 3 amps.
I found that each side was in two halves with link wiring at the mid point, so I have broken into the wiring at this mid point and now have each section individually switched, and find that just one of the four sections lit is just about the right light level for us plus it's only pulling .75 of an amp now. (y)

View attachment 425144

Wish I was clever enough to do stuff like that. :(

I havn't got enough years left to learn all the electrical/plumbing/ joinery I need to make my van perfect for me.
 
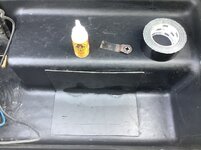
A rusty exhaust was an advisory on the MOT Just before lockdown. First time out, the end tip rusted away completely leading to hot exhaust gases pointed directly at the underfloor locker rather than downwards which resulted in a big hole melted in the locker and a load of stuff melted inside including a wheel chock which was welded to the locker by the heat. An emergency repair involving gun gum and a tin can, plus @shunter‘s expertise at Highlands End gave a temporary fix. A disposable aluminium baking tray was glues and taped in place as a temporary heat shield. It worked very well

91A17AA6-22C5-4BE9-BFDD-DE6739986411.jpeg


The new exhaust was on back order and did not arrive until last week.

0ACB382D-8F84-4393-8946-02CB02A12E6B.jpeg


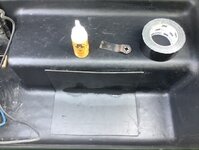
With the aid of a trusty multi tool the melted stuff and the chock was ground out

Before and after pics:

FCBF8606-AECA-4377-BA9B-FDF71A1E1249.jpeg


The heat shield was left there as it is underneath anyway
70F6DFFC-D0BC-48A6-B33B-A5FF691E2535.jpeg


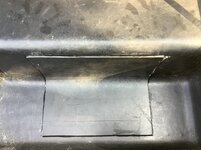
some thick plastic sheet was cut to size and then bent 90° with the aid of some heat and left to harden in shape

2A09581D-B44D-4E69-B51D-5C6BB495A9F9.jpeg


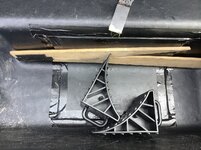
fitment checked and then glued and taped in place. Used Gorilla glue as it foams up and expands to fill the gaps as the locker side was warped a bit with the heat

4333243C-AEC9-449B-97D5-1058CCC9BC1A.jpeg

F0179394-C7D0-4825-B3C7-76EED458B4DC.jpeg


Finally finished off with a bit of silicone sealant

0CAA2083-F496-49AD-BD50-CD97A37789F2.jpeg


Yes, it is a botch but a reasonable and robust repair.
 

Attachments

  • C27B2A65-FB0C-4706-9D7C-1D2B0C5B6E38.jpeg
    C27B2A65-FB0C-4706-9D7C-1D2B0C5B6E38.jpeg
    224.1 KB · Views: 33
  • 4E508D50-0FF1-4472-89A1-8347A225AA5E.jpeg
    4E508D50-0FF1-4472-89A1-8347A225AA5E.jpeg
    306.8 KB · Views: 34
  • 7862F841-BC84-455F-B731-014AED0B34B3.jpeg
    7862F841-BC84-455F-B731-014AED0B34B3.jpeg
    347.9 KB · Views: 30
  • 28695B45-5FEF-480B-88C6-67B80AA2C2E3.jpeg
    28695B45-5FEF-480B-88C6-67B80AA2C2E3.jpeg
    27.5 KB · Views: 27
  • 18EF833C-6A6F-4109-BEBF-B966F6DAE2F5.jpeg
    18EF833C-6A6F-4109-BEBF-B966F6DAE2F5.jpeg
    34.6 KB · Views: 24
  • DFC5A873-F3EE-4563-B7A5-C9D086216F1B.jpeg
    DFC5A873-F3EE-4563-B7A5-C9D086216F1B.jpeg
    29 KB · Views: 23
Not on the motorhome, but on my new daily driver, a ford transit custom, so the same as a PVC.

Installed an OBD ports lock and relocation kit
Installed an OEM equivalent rear camera built into the high level brake light
Installed a monitor for the camera in place of the internal rear view mirror
Installed side steps/running boards
 
Hi all, fitting a champion dual fuel generator in my my garage, ordered a custom built exhaust to fit through floor, ordered a change over switch to select generator or EHU. need to run the LPG to the garage and fit isolater and valve, hope to finish this week.

Subscribers  do not see these advertisements

 
I don't know about you but I keep going through waves of panic at what needs to be done then realise there's no rush and everyone loves a project right?!

Personally i don't think about it . When i discover something needs attention , i prioritise the job based on it's function and the symptoms . After that depending on the severity , i start to source parts . With a 20 year old vehicle this can often be difficult . Mechanical parts are generally easier to source , than say trim .

In the case of my cooling system , i picked up an expansion bottle from ebay , shortly after i purchased my van . It didn't appear to be using water , yet it was clear there had been a problem at some point in the past . Being badly stained a muddy brown colour , it was impossible to see the water level , without dipping your finger in the top . Clean coolant suggested the original problem had been resolved , but it didn't look very pretty . Timing belt replacement and current events proved the ideal period to complete the job , so it was tasked , with a number of other jobs from the to-do this . The simple aim , was to reduce that list .
Now , i originally figured a cylinder head gasket was to blame , but during the overhaul it quickly became apparent it was a coolant sealer . I've used these things before and they generally cause more problems than they cure , they don't last , and the engine runs hotter . The hoses were date stamped 1999 , with one ready to let go , and a metal pipe in very poor shape , the overhaul was upgraded to rebuild , and here i am .
I enjoy working on motors , and get a great deal of satisfaction from keeping a vehicle original . But at just under 3 ltr , it's the biggest i've owned , plus it's got the added complexity of both a turbo and intercooler . I only had limited knowledge of the former , but knew virtually nothing about the latter , infact verging on not even being sure what it was , honest truth ! . I can tell you now , i know much more , courtesy of google , and my mate up the road , a mechanic . Who today covered the one job i can't do , weld . My manual leaves much to be desired , with the intercooler not even getting a mention .
Your coolant issue could be the radiator , but on a 15 year old motor , i would take a look at the thermostat first , actually for the price of the thing , just replace it . It's not often they go belly up , but they can , and compared to the cost of a rad replacement , it's small potatoes . Of course the state of the radiator may supersede that . Mine is literally falling apart , but not clearly apparent from what i could see of the radiator . Check the panel directly above while your at it , but you will need to remove the grill panel first . Rust in one area , could be indicting a leak under pressure . Fiat replacement is quite straightforward , but i do have the bumper off for repair and respray .
My bodger appeared to like 5 amp connector blocks , the household type . Their all over the place , god knows how many i've removed , and i still keep finding the dam thing's . On a more serious note , i've also discovered someone managed to melt the van's fuse block . I'm only the third owner , and the first was a german , until the vehicle was imported in 2006 , so i'm pretty sure who it was ! . The vehicles safe , and i've just sourced a replacement , which was no mean feat . But it took a couple of years and was not from this country .
It's now on the to-do list .
 
Your coolant issue could be the radiator , but on a 15 year old motor , i would take a look at the thermostat first , actually for the price of the thing , just replace it . It's not often they go belly up , but they can , and compared to the cost of a rad replacement , it's small potatoes .
Yeah that seems like a good first step. I plan on removing the thermostat anyway to flush the entire cooling system. As you say, go for the cheaper options first!

I can tell you now , i know much more , courtesy of google , and my mate up the road , a mechanic . Who today covered the one job i can't do , weld . My manual leaves much to be desired , with the intercooler not even getting a mention .
I think that is always the best way to learn. I think the most important thing is to be confident to at least have a go. Before buying ours, I spent a lot of time looking at common problems, things to look out for and more importantly what was involved in putting them right!
Personally i don't think about it . When i discover something needs attention , i prioritise the job based on it's function and the symptoms . After that depending on the severity , i start to source parts . With a 20 year old vehicle this can often be difficult . Mechanical parts are generally easier to source , than say trim .
This is true. My other half made me put everything that needs/wants doing down on a list then prioritise based on impending winter weather, roadworthyness, cost etc. This has made things seem less overwhelming and more manageable!

Good luck with the rebuild, it sounds like you've got it all in hand. It'll be good to know at the end of it all that there are no gremlins hiding anywhere waiting to spoil a trip away!
 
Also removed and cleaned out our whale water pressure switch. After months of random pulsing and various hunts for non existent pipework leaks it turns out that it was full of little black shavings. I’m guessing that when they fitted the black plastic water tank and had drilled out the various holes required for the pipe work, nobody bother actually removing the debris afterward. Lazy beggars
There's usually a filter fitted between the tank and an external waterpump. Worth fitting one if you haven't already.
 
Yeah that seems like a good first step. I plan on removing the thermostat anyway to flush the entire cooling system. As you say, go for the cheaper options first!
Good idea to flush the system with the thermostat removed, just remember that flushing an old radiator will remove sludge that has built up, but can lead to multiple leaks appearing from the core. The brass gets wafer thin and often it is the build up of muck in the core that blocks the leaks. Be prepared to replace it and if not, thats a bonus
 
Good idea to flush the system with the thermostat removed, just remember that flushing an old radiator will remove sludge that has built up, but can lead to multiple leaks appearing from the core. The brass gets wafer thin and often it is the build up of muck in the core that blocks the leaks. Be prepared to replace it and if not, thats a bonus
We did this and the result was the 'hole' in the radiator became 'unblocked' and water came out everywhere! Bought and fitted a new one. Quite cheap I seem to remember.

Subscribers  do not see these advertisements

 
Good idea to flush the system with the thermostat removed, just remember that flushing an old radiator will remove sludge that has built up, but can lead to multiple leaks appearing from the core. The brass gets wafer thin and often it is the build up of muck in the core that blocks the leaks. Be prepared to replace it and if not, thats a bonus
Yeah I'm hoping for the best this weekend! Plan will be drain and flush radiator to remove whatever deposits are in there then remove the thermostat and flush the whole system 👍
 
The key on our Fiamma Safe Lock, (You know, the one that swivels to cross the Hab. door opening) decided to go on strike half way through it's Lock/Unlock cycle.

Fortunately the fixture was in the unlocked position so it was merely a question of removing the item from the door jamb and removing the lock barrel.

A call to Johns Cross on Tuesday, resulted in a shiny new lock and two keys arriving today.

With MHF Discount, (thank you Johns Cross) Total cost £23.50
 
A call to Johns Cross on Tuesday, resulted in a shiny new lock and two keys arriving today.

With MHF Discount, (thank you Johns Cross) Total cost £23.50

I really dont think you can beat their services at all? Excellent bunch of folks ! We ordered some Mesh panels for the Awning from them on Wednesday evening. DPD delivered this morning! Excellent stuff!

Kev
 
plan on removing the thermostat anyway to flush the entire cooling system.

Yep , that's a really good move , and the very first thing i did . Before i brought the van back from storage , i poured some Holts rad flush in the header tank , then ran the vehicle back the long way . I then drained the system , removed the thermostat , and reverse flushed it until it it ran clear . Reverse flushing will clear anything that has become stuck due to a constriction , and i would also advise , reversing flushing the rad separately .

most important thing is to be confident

Absolutely .
10 year ago i knew what a diesel was , and that was about my limit , now i rip them apart quite happily . I was quite confident with petrol engines from my dad , so armed with a Haynes service manual , and a simple diesel car , i taught myself . The problem with the duke , is no such manual exist's , and technically speaking , it is a goods vehicle , not a simple car .

My other half made me put everything that needs/wants doing down on a list

Quite right , this keeps things in perspective , otherwise it will get on top of you . But even here i would exercise caution .
With an old vehicle , one job can quickly merge into another , or simply just get bigger . A good example of this is my own . What was going to be a water pump and hose change , based on the timing belt needing to be changed , quickly became much bigger , where pretty much the only original part left , is the engine . Other parts will need sourcing , and this can take time . Hence why my job is still on going , at three months , and i'm sourcing parts from all over europe .

But yes , your quite correct . Nothing beats the feeling , that you have done as much as possible to prevent a mechanical breakdown . The engine on the duke is bullet proof , it's the external bits that will let you down , and cooling is quite a common failure point . I don't know the Merk very well , but i do drive the heavy version quite regular ( when i say heavy , i mean 44 tonners) . I find them thirsty , but well founded , (touch wood) one has never let me down . I have driven the Sprinter , and can honestly say they are impressive .
Size for size , they are not thirsty like their bigger brothers but are , like the Vito before them , mechanically over complicated . Should a breakdown occur , it could prove expensive ! .
 
Did a temporary fix on the main roof light that didnt work.So had to take it out completely and reseal let's hope it works?

Subscribers  do not see these advertisements

 
found a leak on the shurflo pump between the head and body.only seemed to leak when pump running but had took a long time to shut off a couple of times, tightened the screws and it seems ok now but seems to have been put together with silicone so might need looking at again
 
Not so much a fix as a modification. After my last trip I found that a minor annoyance was having to refill the fresh water tank every day even though we had a water tap on our pitch. I thought how much easier it would be if i could just connect the hose to the water source on arrival at the pitch, turn the water tap on and then forget about it. So after some thinking about it I've fitted this extra water connector to the outside of the m/h and float valve inside the fresh water tank to make refilling automatic. Obviously i still have to empty the waste water manually but at least it's one less thing to have to think about. Very easy to do and cheap as well.

View attachment 424409 View attachment 424410 View attachment 424417 View attachment 424411 View attachment 424412 View attachment 424413 View attachment 424414
Now that is impressive!

Especially as your avatar says you don’t have a motorhome! :cool:

Nice job though.(y)
 
Replaced the rear crankshaft oil seal and while it was stripped replaced the cluch, be foolish not to, both parts were 23 years old and had covered 100,000 miles. The cluch still had life in it but you never know for how long
 
Today's task (on an ever growing list!) Was remove the Sat system and plate the holes in the roof prior to installing a solar panel...
20200919_184114.jpg

This was the mess that I was left with once it was removed!
20200920_114430.jpg

Some sealant remover gel and a bathroom sealant tool worked well, took a few rounds as there was a lot of sealant!
20200920_190222.jpg

After a good few hours finally finished! After looking around at different options to fill the holes, I settled on some conduit junction box covers (cheap and readily available) and used Puraflex 40 to seal them.

Whilst it looks a bit messy still, this will eventually be covered by a solar panel. The roof gland needs replacing but should save me having to drill yet another hole for the solar cables!

Jake

Subscribers  do not see these advertisements

 
Cured the Airbag warning light coming on on my Fiat based Hymer B678. Found and removed the Airbag ECU and sent it to CrashData in Liverpool on Tuesday. Had it repaired and returned on Friday and successfully refitted on Saturday. That route was a lot cheaper than going to a Fiat dealer who would have just fitted a new ECU and charged me upwards of £500 for the privilege.

The only hiccup was that I found at that it is very difficult to ensure that there is no electrical supply to the engine side. Needed to do that before refitting as I had heard of horror stories of the bags being deployed as you connected the ECU. Just removing the engine battery negative lead did not work, as charge was still coming in from EHU and solar. The easiest way was to make the final connections after dark with the EHU disconnected!

I had to remove the lower part of the centre dash to get good access to the Airbag ECU so I decided to fit a couple of QC3 USB ports into it while I had it all exposed. It became difficult when I decided to run them off the habitation batteries rather than the engine battery. Finally managed to find a way back to one of the existing circuits for the 12v sockets that kept all the wires hidden. Photo of the finished item
new usb socket.jpg


I chose that type because it has a built in switch so it uses no electricity when off.

I really must give the dashboard a clean though!
 
We're in Portugal and we had our offside mirror back cover destroyed by an HGV travelling on the white line, (not the first time it's happened) I couldn't get any further over without leaving the road so the mirror took the hit.
We stopped and I picked up the pieces, seven in all along with a couple of smaller pieces that I couldn't find.
So, not much chance of finding a replacement here in Portugal and £48.00 plus delivery from the UK. Ok, so I'll just repair it. 😁
Because I have been doing 3d printing with ABS, I happened to have a bottle of black ABS slurry which I made up before we left. It's made with small off cuts of ABS dissolved into Acetone to make a fairly thick glue. This makes for an exceptionally good ABS weld.
After sticking the parts back together I ran a line of slurry behind the breaks to reinforce it:

20200924_090207.jpg


Then I used the slurry to help fill out the cracks on the outer surface before more sanding:

20200924_101518.jpg


20200924_105643.jpg


Then sanded down to 400 grit before priming with a clear plastic primer and then grey primer:

20200924_111941.jpg


Then a satin black top coat after some more 400 grit sanding:

20200924_121532.jpg


It's not perfect by any means, but it will do until I return to the UK and order a replacement. 😬
 
Good job. I wouldn't bother with a replacement.
Phil

Here's the before and after pictures:
20200924_133209.jpg


20200924_133322.jpg


The cracks are still visible even after plenty of careful sanding but at least it's functional.

Subscribers  do not see these advertisements


Join us or log in to post a reply.

To join in you must be a member of MotorhomeFun

Join MotorhomeFun

Join us, it quick and easy!

Log in

Already a member? Log in here.

Latest journal entries

Back
Top