What have you fixed on your motorhome this week?

Well further to the earlier separate post about the Sargent EC200 PSU 2007 charger switch acting seriously badly.
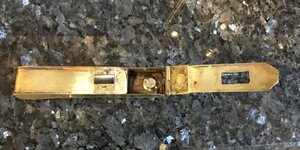
I have now removed the front of the case (by drilling out the pop rivets) and the switch - the switch itself is seriously corroded and worn badly

So a new one has been ordered surprisingly they are single throw double pole type so now awaiting the new switch arriving so I can reassemble the unit and refit it so we can use the van againView attachment 362927
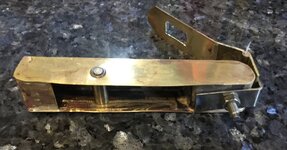
View attachment 362928 The rear of the switch and it's connections


View attachment 362929the back of the switch showing the four poles

Got it all back together now with new switch works Great but the fridge didn't work on 240v
the plug for it had dropped off the Sargant - -why? I have no idea as they are all clip lock plugs but re plugged in and all works fine now PHEW !!!!!!
 
Nowt exciting, cleaned up some locker handles that had seen better days. And adjusted and replaced dodgy screws in a couple of locker door hinges.
IMAG1228.jpg


After a lot of elbow grease with wet and dry, followed by some UV laquer.
IMAG1229.jpg


Happy though as been bugging me for a while and thought would have to replace them.
 
Strange that all four go together - hope it wasn't an attempt at the catalyser. Haven't heard of them for a while.

I reinforced my rubber hangers with a plastic tie, never any bother since.
The zip ties are a good idea. I’ll put some on this week.
 
Fridge fans fitted along with inkbird controller + digital display for internal fridge temperature. 12v relay wired in for fridge, just need to connect to cab battery & find a switched live.
3 x 12v leds fitted in shower & rear along with 2 x 12v sockets complete with usb's. Rea door stripped for window install.
 
I phoned them again yesterday and they have still not sorted the problem with the charging side of the e box. They where going to try something else yesterday afternoon and let me know today still heard nothing. Rest of box worked ok it was just the charging side.
If they can’t fix it might have to put extra charger in.
Did you pay extra for there priority service.

Steve
Finally received E box back from apuljack now working ok. Wallet £305 lighter. And just booked to have Alde fluid changed but 8week wait.

Subscribers  do not see these advertisements

 
Rebuilding the bathroom, the shower in an A520 is minute, the shower base is 33x45 cm. All now stripped out, new shower, wash hand basin, new wall covering, new floor. Should be finished by the end of next week.
photos to follow (when finished)
 
This morning I have finally got round to sorting out the lights in the garage.
I am now able to disco :dance2:View attachment 365852
I think I should try that. Lights in out garage are very dim. Where did you get the rope light from?

Subscribers  do not see these advertisements

 
I think I should try that. Lights in out garage are very dim. Where did you get the rope light from?
That is a good idea - the LED rope lights are readily available on flea bay so might give it a try as already existing lights in there and pretty easy to wire in
 
Be wary of the stuff on flea bay, there really is a load of rubbish on the market, try B&Q, Homebase or any electrical retailer.. I bought some from e bay and already two sets have failed
 
I think I should try that. Lights in out garage are very dim. Where did you get the rope light from?
Local builders merchants, but available amazon or eBay for under a tenner ??
 
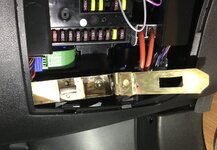
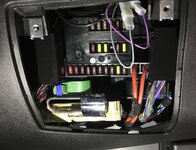
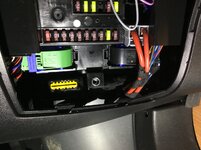
Not so much a fix but a security mod for the OBD port.

Subscribers  do not see these advertisements


Attachments

  • FB850D78-70DB-49E4-B6AF-2768BA02DECB.jpeg
    FB850D78-70DB-49E4-B6AF-2768BA02DECB.jpeg
    223.3 KB · Views: 147
  • 289A520D-2603-451A-B92A-39B58EF00FFC.jpeg
    289A520D-2603-451A-B92A-39B58EF00FFC.jpeg
    237.3 KB · Views: 149
confused, it looks like you have put a cover on a bolt.
tell me I’m wrong please
 
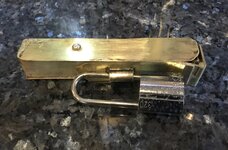
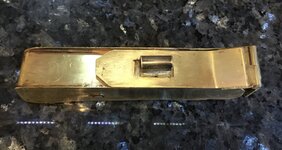
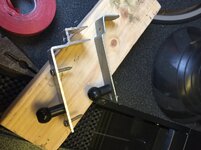
You’re wrong ?? It’s effectively a box that fits over the OBD and screwed in place. The cover then locks over the screw and is padlocked closed.
The bolt in the picture before it is fitted is just holding the hinge in place.
 

Attachments

  • 818B5CC0-25F7-40C4-B8AA-FC1127D315CA.jpeg
    818B5CC0-25F7-40C4-B8AA-FC1127D315CA.jpeg
    228.2 KB · Views: 96
  • FFE02426-B486-4400-B264-9C95FAEBF8A3.jpeg
    FFE02426-B486-4400-B264-9C95FAEBF8A3.jpeg
    189.1 KB · Views: 100
  • A9F34D0A-4838-4CC5-A1C6-BDE838469268.jpeg
    A9F34D0A-4838-4CC5-A1C6-BDE838469268.jpeg
    220.5 KB · Views: 101
  • A9C1C1B8-1076-4AB7-88D6-F06169CE3DDA.jpeg
    A9C1C1B8-1076-4AB7-88D6-F06169CE3DDA.jpeg
    182.9 KB · Views: 99
  • E8ACA8DC-0BE0-4664-8994-D9FB12F8BA15.jpeg
    E8ACA8DC-0BE0-4664-8994-D9FB12F8BA15.jpeg
    214.6 KB · Views: 116
Another layer of security. Although I have an alarm, tracker and secondary immobiliser, scumbags are cloning keys then overriding the Fiat immobiliser via the OBD port.
 
Forgive my ignorance but why?

A thief with access to the OBD port and the right equipment can do many a naughty thing with your van, including programming their own key for your van. :Eeek:

Subscribers  do not see these advertisements

 
Be wary of the stuff on flea bay, there really is a load of rubbish on the market, try B&Q, Homebase or any electrical retailer.. I bought some from e bay and already two sets have failed

IF you do use Ebay don't buy the cheapest - we bought on a 5m reel
We have some that are in the motorhome that I removed from the caravan and are now over 9 years old not one failed but
an outside set from TJHughes that cost an arm and leg are less than a month old and 2 of the 50 have died already
 
This week i have replaced a REMIS VARIO rooflight in our Autotrail.
The old one which has been in for some years decided to seize up while we were parked up on a site in Holland last year, at the time it was wide open when we were hit by a horrendous hail storm.
When i tried to close it, it had seized up so a frantic search for my tool box and hurried removal of the side mounted lifters.
When the storm had finished i dismantled the whole winding mechanism, the gearbox and the worm drives, cleaned and wire brushed them and greased the gearbox, all to no avail.
So ordered a new rooflight from Leisure Shop Direct who have given excellent service, and it has sat in the garage until this week when i found a break in the weather long enough to do the removal and refit.
For those interested, (and i will try and post photo's below the text, if i can fathom out how to do that) for me the fitting is very easy, first thing is to remove the inner ring inside the van, it's just a friction fit by way of Ball and Socket, once the inner ring is off you can see the clips that hold the frame in place, they simple screw off, and serve to tighten the rooflight down to the roof of the van.
You then work outside and have to break the "Seal" between the roof and the rooflight, it is sealed with a white Butyl Tape, this stuff never goes off or hard. It's just a matter of prising slowly and gently so you can cut the seal with a long knife with a snap off blade.
Once you have broken the seal you can lift the roof out.
The roof needs cleaning of all the excess adhesive that is left on the roof.
The new rooflight needs to have the new adhesive (the Butyl Tape) fixed to it, it comes on a roll and i could not get white i could only get Black, dont stretch it. Be careful not to let this adhesive touch anything as what it touches it sticks to, it's now just a matter of dropping the new roof into the big hole in the van roof and refitting the new clips and inner ring.
The new clips are slightly different from the old ones but fasten up just the same, grease the ball and socket to allow easier fitting when you push the inner ring on.
That was not the only thing that needed replacing this week but enough for now.
Just hope i have'nt bored you all to tears.
Now for photo's, fingers crossed.
IMG_2464.JPG


IMG_2460.JPG
IMG_0744.JPG
IMG_2470.JPG
IMG_2473.JPG

Subscribers  do not see these advertisements


Attachments

  • IMG_2477.JPG
    IMG_2477.JPG
    190.1 KB · Views: 43
Not on my motorhome but on my new to me car fixed door seal and replaced radio on mt land rover frelander.
weather permitting i will work on the back brakes
bill
 
Luckily for me, I have one of the best free storage and workshops a Funster could wish for.

Removing front wheels, cleaning and stonechip spraying the wheel arches.

Also checked the turbo vacuum variable vein was nice and free to operate.
D5D4CA37-1990-44A0-9F5B-00E8734E8C62.jpeg
 
Fixed one thing wrong, made something to fill a space and fixed an extra something to improve things a bit!
1. Elddis poor quality control again, number plate light modules fixed wrong way up so drain hole allowed one to fill up with water! Removed both, cleaned up greased and refitted.
2. Made a shelf for cavernous storage locker under rear bed.
3. Fitted additional TV mount in front salon with bolts through to a towel peg on the inside of bathroom panel to spread load This will allow us to lounge in the cab seats, put feet up on bench seats and doze in front of the TV on the rare occasions we watch it when away!
ADA6FEC6-6D12-4EAD-88A5-FEC40FF2FE45.jpegBBF7CAC0-4342-4475-BB9B-4DE3C4EB19A3.jpegC0144262-249C-411B-BE5F-1FC4E3F9BA40.jpeg282AB20D-89EC-4926-8EB4-06F03C65D484.jpeg9F79E01A-D7F4-4EB9-B773-83E62702CF21.jpeg
 

Join us or log in to post a reply.

To join in you must be a member of MotorhomeFun

Join MotorhomeFun

Join us, it quick and easy!

Log in

Already a member? Log in here.

Latest journal entries

Back
Top