What have you fixed on your motorhome this week?

Well, sort of 'temporarily fixed' ... we have had issues with the water spurting and spluttering and originally thought it might be a cracked filter housing letting air in but despite being wrapped in gaffer tape it had no effect, so I then used some electrical tape to go round the inlet from the tank to the filter housing and the outlet to the pump and since then its just about behaved itself so one of them must need tightening up but I can't really get at them easily so whilst it's working more as it should I'm not gonna do anymore until I get home.
 
Not so much a fix but an upgrade. The Labcraft awning light on my Cheyenne had the standard 21w autobulb so it was about time I replaced it with an LED (well, 90 LEDs actually). The existing lamp draws about 2A, not a lot but it all mounts up. I looked at new fittings but at £30+, I thought I might be able to do it for pennies or less, as I had a roll of waterproof LEDs for use in my modelling activities.
The bulbholder was easily removed and I used Sikaflex 512 to bond a rectangle of plastic sheet, angled downwards, in its place. The sheet was large enough to take 5 x 18 LED strips, all connected in series.
20200111_115118 (1024x576).jpg

20200111_121517 (1024x576).jpg
20200111_124825 (1024x576).jpg
20200111_180934 (1024x576).jpg


Seems to have worked!
 
Started on repairing known faults on my 2001 Pilote Galaxy 270.
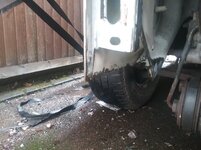
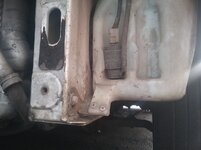
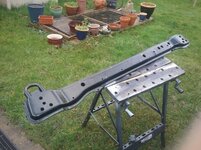
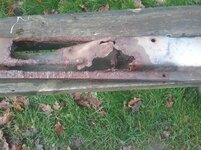
Front crossbeam/radiator support very corroded with large holes. Apparently not an MOT item!

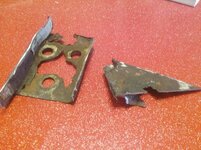
On removing the old beam the RH side anchor nuts tore loose from corroded section of chassis.
Further investigation shows the A Class fibreglass bodywork does not really handle rainwater from the front roof and windscreen, just lets it run past the headlights and onto the front chassis. The LH side seems OK, pleased about that as the towing hitch is on that side.

Made various measurements to determine correct position of replacement parts and cut off the corroded metal, treated ground back metal to deter rust.
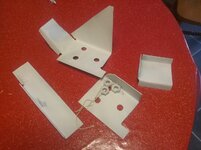
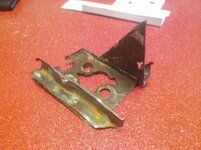
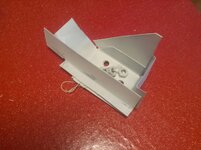
Made up repair plate, cut out the existing anchor nuts that were spot welded to the original rusted parts and treated them against corrosion. Gave all parts a spray with etch primer followed by white primer.
Then found my MIG welder buried in my shed, not been used for so long a bunch of terminals had corroded and fallen off. Not sure which wire goes where. Duh.
A mate has promised me the loan of a set so hope to get on semi assembling the repair parts this evening. Then just need a dry day to be able to finish the job.

Once fixed I will investigate making up fibreglass ducts and drains to run the water away safely.

5.jpg
6.jpg
7.jpg
8.jpg
2.jpg
1.jpg
 

Attachments

  • 20200113_104743.jpg
    20200113_104743.jpg
    214.8 KB · Views: 29
  • 20200113_104851.jpg
    20200113_104851.jpg
    256.6 KB · Views: 30
  • 20200113_105054.jpg
    20200113_105054.jpg
    223.2 KB · Views: 29
  • 20200113_105007.jpg
    20200113_105007.jpg
    151.5 KB · Views: 28
  • 20200113_105338.jpg
    20200113_105338.jpg
    347.9 KB · Views: 41
  • 20200113_105450.jpg
    20200113_105450.jpg
    340.1 KB · Views: 36
  • 20200113_104721.jpg
    20200113_104721.jpg
    213.5 KB · Views: 30
  • 20200113_104902.jpg
    20200113_104902.jpg
    286.2 KB · Views: 31
Just returning my new to me Chausson back to its former glory, The most simple easiest fix so far after a full reseal and polish is replacing the fiamma handle hinge caps, £15 and 2 minutes of time.
DSC_0406.JPG
DSC_0409.JPG
 
Actually nothing in my motorhome (sorry) but I have (very proudly) for the first time ever repaired an item of electronics in my home. I run a dual monitor system on my desktop PC at home and one monitor went black as though not working however if I moved my cursor as if over to that screen, it disappeared, so the system still saw it as working. I searched YouTube and found a repair for a similar issue; two of the capacitors on the circuit board had blown. So, rather than shell out £220 for a replacement immediately, I opened it up, dismantled it and saw the two suspect capacitors (it has loads of them in varying specs, sizes, colours etc.), I ordered replacements from eBay - £1.68 for 5 x 16V 1000 microfarad capacitors, with free postage, waited two days and unsoldered and replaced the offending items (Easily). Hey presto - one perfectly functioning monitor and only 1 extra part!!!:unsure: (Only kidding)
Anyone in need of 3 x 16V 1000uf capacitors? (smug face).:giggle:
 
Hmmm. definitely wired them in series as per this diagram? :unsure: :
View attachment 357572
No - they're in parallel. The + & - are commons running the length of each strip (ie they appear at each end). If they were series connected they'd all become dimmer as more were added. Like this (but may have components associated with each LED):

Drawing6.jpg

Subscribers  do not see these advertisements

 
Ah, that explains it, thanks. A nice large diagram like that makes it a lot easier to uinderstand than the LED strip... (y)
 
Went to the Manchester show today so picked up a new EHU socket to replace our faded & cracked one. £11 not bad, as cheap as ebay

Marks are just where I started removing it before taking photo.

Bit of a sod to get out as sikaflexed in
IMAG1188.jpg
IMAG1189.jpg
 
Not 'fixed' owt today but FINALLY put gas in the Gasit bottle I fitted back in Sept.. Its only take me 4mths to do it... A landmark day.. Lol. No more Calor prices ?

Subscribers  do not see these advertisements

 
welded on my repair plates to the RH front chassis of the Boxer base vehicle. I would like to say the welds looked prettier before I applied the seam sealer. After the coat of white paint drys and quick spray of black underseal should see it OK for the next ten years or until all motorhomes are banned on environmental grounds.
i blanked off the holes in the new cossbeam and poured in a tin of black paint, rolled it around for a while then poured it back out and painted the outside. Why could'nt the manufacturer have dipped it it at the start? Answer: So they can sell you another one.
20200119_131320.jpg
20200119_131335.jpg
 
Not exactly fixed but as we speak campervan is hooked up to mains electricity supply for its monthly session in an effort to keep the leisure battery topped up. Have to put cable through kitchen window, so house slowly becoming like a fridge. :crying1:
 
after all the rain we've had this year, I finally got round to changing the window rubbers on the large windows in the vans lounge, sometimes when the rain came from a certain direction water would get in past the seal and glazing, when took the old rubber off there was evidence of water calcification on the rubber where it fits into the widow channel ,

next job is to source the black shock absorber washers for the thule step, anybody know a stockist
 
Nothing !!!! Well it's not for the want of trying. I have some small blisters in the paint on the GRP pod over the cab. General suggestions are moisture under the paint (looks like it's been done some time in the past) rather than a serious GRP issue (I hope). Trying to find a reputable person to sort it out seems hard work. See a company, phone them up, no reply. E mail them.....out of business. Try again this week I suppose.
 
Not exactly fixed but as we speak campervan is hooked up to mains electricity supply for its monthly session in an effort to keep the leisure battery topped up. Have to put cable through kitchen window, so house slowly becoming like a fridge. :crying1:
Best thing I ever did was have a double outside socket Installed at the front of the house.

Subscribers  do not see these advertisements

 
Got a man in to reseal the bathroom/toilet area, put an isolation switch on the battery to stop it going flat and reseal the top of the Flammia awning, can't wait to get the invoice! :whatthe::whatthe::whatthe::whatthe::Eeek::Eeek:
 
Went to the Manchester show today so picked up a new EHU socket to replace our faded & cracked one. £11 not bad, as cheap as ebay

Marks are just where I started removing it before taking photo.

Bit of a sod to get out as sikaflexed in
View attachment 357636View attachment 357637
Snap! Replaced ours this week, though mine came from Hymer at rather more than £11. Mine needed replacing after I drove away with a cable attached last Spring :-) Fed up with “making do”, so pleased to have a new replacement.
 
This week we got our starting problem sorted, it wasn't the cab battery being dead after all, the starter motor needed replacing and the battery and earth terminals needed a good clean and fettling but it now starts like its new and we took it out for the first time for an overnight nearby. Chilly but loved it. Had got two nice dog walks in before 12.
 
Not exactly the motorhome but ...it does go on the back of it! Decided that the Fiat Lounge I had bought for my beloved was in fact .....Too slow! I know .....Its a bloke thing!
SO I bought this for her !
It is having the new RVi 3 Electronic system fitted this week and the A frame attachment done at the same time...New decals too being added to "Blend" in with the truck!

Kev :cool:

Subscribers  do not see these advertisements


Attachments

  • New car 2.jpg
    New car 2.jpg
    56.7 KB · Views: 58
Finally made the Privacy room fit ,which was sold to me by a member from Scotland said everything was there, which was to say the least a " Porky" . but another member from down south sold me some correct second hand parts which has done the job, thank goodness as I was getting it in the neck ! from my Darling wife
 
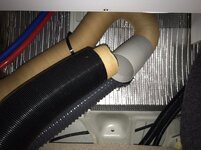
We have been trying to work out why we have no heating in bathroom. Cold air is always blowing.We have only had the van since July and despite going back to the dealers it has not been out to be solved. In one of the drawers I put some chocolate to discover that it had melted.This was the first weekend we really put the heating on. We were going out for a walk so I left it but it, but it really bugged me all day.
For some reason late last night, I started to go on my hands and knees looking behind drawers and I found the heating pipe not connected. Getting the drawer out was a struggle because when the drawer retainer had been fitted the screws have been mashed.? Finally, at 10:30pm last night the drawer came out? We’ve managed to join them together with good old gaffa tape. But it looks like we will need a larger piece of that white joiner as it appears the pipe has been cut short any idea where I can get some
 

Attachments

  • C086CBEE-9CF3-48A1-9B9D-FEA9442313BC.jpeg
    C086CBEE-9CF3-48A1-9B9D-FEA9442313BC.jpeg
    231.5 KB · Views: 116
It looks like Whale heating components. Any good dealership accessory shop should stock it or buy online!
 
Are you just trying to join the cream pipes in the photo back together? .

There looks to be plenty there to rejoin it. And the white tube is plenty long enough. You shouldn't need to buy anything.

Maybe re-route it a bit to give a smoother bend and get the pipe ends closer together. If the short bit sticking out of the black trunking is too short just trim the trunking back a bit more

Subscribers  do not see these advertisements


Join us or log in to post a reply.

To join in you must be a member of MotorhomeFun

Join MotorhomeFun

Join us, it quick and easy!

Log in

Already a member? Log in here.

Latest journal entries

Back
Top