Globecar Modifications

@Neckender I like the sliding door bar, unfortunately I can't do that as I remove the block to stop it getting jammed in the dog gate ... but then again anyone trying to get in would do themselves serious harm trying to get in past the gate! :D2
 
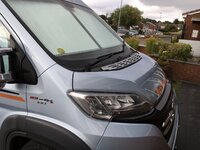
New bling
2018-05-23 12.58.56.jpg
2018-05-23 12.59.01.jpg
 
Nice. Eye catching and individual (y)
 
I know it's one of those mods that you either like or dislike. I prefer it from the back, the side is slightly OTT.

Nice looking van ( I am very biased as it is the same as ours) and as long as you like the look of the mods it’s great.. I won’t be adding it to mine
 
@jezport

You'll be wanting a silver version of one of these next ... :D
 
Today I’ve done @Minxy Girl mod I’ve cut away the timber front of the electrics compartment and fitted a door and frame plus a shelf,we’ve now got lots more storage in the under bed area, The last picture is how it was before the mod, Thanks Mel for the info.

John.


0D438156-1729-44DB-9596-C0DCF4723C65.jpeg
7A18FD43-59FE-44B2-A48E-90D1BE7E6471.jpeg
D12AE9B7-4C32-4F55-8BBF-4C69192F5D17.jpeg
 
@Neckender are you gonna do the 'step drop' too? It don't half improve the storage for bottles etc.
 
Pat has made new nets today for our van,

BFECD655-FB01-427E-8FD7-32F94FC3CD2A.jpeg


I also fitted polished stainless steel air intake a lot easier to keep clean than the black.


7CCC093F-7187-49C7-A050-E252126BADD1.jpeg


John.

Subscribers  do not see these advertisements


Attachments

  • 281B84C8-B0E8-46F9-BB60-3E34449A703C.jpeg
    281B84C8-B0E8-46F9-BB60-3E34449A703C.jpeg
    196.8 KB · Views: 43
Just bought my Globe car could you tell me where you bought your washing up bowl and do you know where I can buy a cutlery draw please.

We got our bowls from "Go Outdoors" and they now have a sale on. Will post an image of our cutlery drawer modification, and first storage drawer mods, when we get home. Maybe useful for someone.
 
Cutlery drawer modification made using 42 mm x 8 mm pine Knock free and 25 mm x 4 wood screws. The base was covered with heatstop (remains of same purchased to make a dining table cover/protection) and the dividers therefore are fitted over the heatstop.


The first full width drawer has been divided up to contain our glasses/mugs/cups etc. For this I used 6 mm MDF with comb joints at each intersection. Screws were not necessary.
P1080714.JPG
P1080719.JPG
P1080718.JPG

 
I've done a few minor things on the Campscout today, having been away in it 3 times now I'm getting used to what it needs.

First fitted a Fiamma Omni stop in a cupboard to stop plates bouncing around:

WIN_20180901_16_03_00_Pro.jpg

I also cut some corex board to fit the rear windows to protect the blinds and attached it with Velcro. I had first tried hanging one from a hook but it was a pain when opening the door

WIN_20180901_16_03_22_Pro.jpg

Finally I realised that the S hook I had previously used for the corex board would be ideal for hanging tea towels by the door.

WIN_20180901_16_03_43_Pro.jpg
Better than a permanent hook there as it can be moved if it fouls the fly screen.

I've previously put in a smoke detector and CO alarm, and the previous owner had put in a multi-outlet USB connector next to the passenger seat. I've also fitted an 11kg Gasit cylinder which was much easier than anticipated.

Paul
 
Took the table out and used a small folding table for recent trip to give more room for drinks for 4

2018-09-29 14.12.10.jpg
2018-09-29 14.12.04.jpg

Subscribers  do not see these advertisements

 
It looks well Jez, but we prefer our standard table and use the extension quite a lot.

John.
 
IMG_20181111_160348.jpg
IMG_20181111_160359.jpg

Inspired by Minxy Girl, today I added an LED light strip above the beds, along with a dimmer control. The short strip of lights isn't massively bright, but I think it'll be nice to be able to change the brightness. They were pretty easy to install, tapped into the lighting 12v supply in the top cupboard.

I've also put in some wiring ready to add some lights to the garage, and a cutout switch for the water pump.

Link Removed
Link Removed
 
Last edited:
View attachment 266850 View attachment 266852
Inspired by Minxy Girl, today I added an LED light strip above the beds, along with a dimmer control. The short strip of lights isn't massively bright, but I think it'll be nice to be able to change the brightness. They were pretty easy to install, tapped into the lighting 12v supply in the top cupboard.

I've also put in some wiring ready to add some lights to the garage, and a cutout switch for the water pump.

Link Removed
Link Removed

That looks to be a very useful mod Paul - nice job (y)
 
P1080783.JPG
P1080791.JPG
P1080788.JPG
P1080784.JPG
P1080804.JPG
P1080802.JPG
P1080801.JPG
Having had an under slung LPG tank fitted the gas cylinder box is surplus, and it has just under eight cubic feet of space which is available, and also the wheel jack case is designed for storage under the passenger seat, when used by white van man, so How to shrink it!

First of all I made a template of the inside bottom and cut two shelves to fit. Then removed the inner base gas bottle holder, four screws inside, and four horizontal screws, screwed in from the outside, a devil to get out, without damaging the outer faces slightly.

The base shelf is screwed down with four screws, not really needed, it can't go any were. The gas supply pipe enters this cupboard through what was a drop hole, so it is necessary to fit a guard, for this I used 18 mm square box section aluminum, see image above.

The upper shelf is supported by bearers, and fitted to pass over the gas on/off valve, the underside of this shelf is fitted with guards to protect this valve, see image.

Both shelves are ex 6 mm plywood, and the upper shelf has an aluminum u section on the front to improve the appearance, and stabilise the shelf.

For the wheel jack I made a box with internal dimensions as follows 535 mm long x 130 mm wide x 120 mm internal depth. I used off cuts so a mixture of materials, the bottom is 18 mm chipboard, the ends 18 mm softwood, sides are 9 mm MDF and the top is 12 mm chipboard, but it works.

In one end a 23 mm hole is positioned to accept the jack end, and a positioning plate holds the base in place, I also put two holes the other end to facilitate removal of the box.
P1080783.JPG

Subscribers  do not see these advertisements

 
Hi guys,

I was wondering if anyone has fitted a front mounted roof spoiler to their Globecar.

Here's a pic of the front roof area of my van and as you can see the roof light is quite steep which in turn creates wind turbulence and noise at 60mph.

The second pic is a 110cm long (12cm tall) universal spoiler by Fiamma which can be had for sub-£30. I would paint it to match the van.

Cheers,

Andrew

20181125_111646.jpg


UNI12037009__1.jpg
 
Hi guys,

I was wondering if anyone has fitted a front mounted roof spoiler to their Globecar.

Here's a pic of the front roof area of my van and as you can see the roof light is quite steep which in turn creates wind turbulence and noise at 60mph.

The second pic is a 110cm long (12cm tall) universal spoiler by Fiamma which can be had for sub-£30. I would paint it to match the van.

Cheers,

Andrew

View attachment 269242

View attachment 269244
I wouldn't bother painting the spoiler, it will just look naff and tatty. Our PVC, not a globecar, has something similar although it isn't by Fiamma but it looks fine in the original cream - it matches the window.
 
We fitted the functional design one as well
Costly but I would go with the same again if I ever replace the van
Not difficult to fit but could get messy if you are not careful

Subscribers  do not see these advertisements


Join us or log in to post a reply.

To join in you must be a member of MotorhomeFun

Join MotorhomeFun

Join us, it quick and easy!

Log in

Already a member? Log in here.

Latest journal entries

Back
Top