What have you fixed on your motorhome this week?

Busy lad here again, C250 toilet cassette, had the MH since May and only done a typical emptying routine, empty, flush out and restock chemicals, after our recent outings I thought it's about time to give the cassette a good going over o_O
out it comes, emptied and flushed then outside to near the hose pipe and the removed the flap mechanism, now I have read that someone broke the sliding flap grooves on theirs by using a lever and the reply was to use something that is a snug fit between the grooves and then twist out, so I whittled bit of wood down to fit, twist and out it pops no damage :)
Out with the bleach and scrubbing pad and give everything a good clean, all mating faces and rubbers seals seem in good order, all is good or so I thought, I noticed the float was not moving so I gave it a bit of attention cleaning crud off all areas, took the float out to do this, it is then I noticed the magnet embedded in the float had some build up on it thus causing it to rub on the cassette body, scraped this off and it now moves freely so I popped it all back together and primed it up ready to go back in.
At this point I am thinking so what does the float do? after a bit of research I find I have a light on the toilet flush panel that should light when its full, further investigation reveals the reed switch that should be in the cassette housing was missing, all the mountings and wiring are there so I can only assume previous owner must have removed it because the light was on all the time :o I found a reed switch on Ebay and have one ordered due next Tuesday and we shall then see it it works.

<Broken link removed>​

 
Sorry it's me again, that's the trouble with being retired with a working wifey, so today was cleaning wind out Awning day, on our first awning out trip we were almost ashamed at the state of it, it was stained and marked to hell, some of it looked like mucky finger marks daubed all over and what looked like algae marks from a damp storage issue, we are lucky to have a double share driveway with non car users next door, we we are able to get awning out over their drive (just) , I bought some Awning cleaning fluid from GO outdoors (first born works there, great for staff discount :) ) , first off try the old pressure washer on it, got some of the looser stains of and then it was down to muggins to spray solution and scrub the whole underside and wash off, top side the bits I could reach deemed to be underside anyway just needed more scrubbing and rinsing, well after repeated sessions it is now reasonably clean - not spotless some of the stains seem embedded.
Another issue that arose with our first outing was that on winding back in it would not go all the way in, now in the garage was a piece of skirting board with foam taped to one end, being a logical kind of guy (engineering type) I figured it was to push the awning up into its housing and so by using it it went to where it should be, not happy with performance but it worked, so whilst cleaning I noticed a piece of alloy profile that had a curved shape to it that matched an area on the housing, the profile seemed out of shape so with a pipe wrench (right tool for job :) ) I reshaped the profile and now it pops back in like a goodun.
Looking forward to tomorrow, I'm due delivery of skirting to stop draughts that needs fitting Oh and after today I'm going to get the air con regassed as it was nigh on non existent on our last trip home and now don't do owt, the joys eh :)
 
Endless things that's needed to keep a 18year old van turning...flyscreens, mirrors and rear view camera... I'd call it a reversing camera, but it's on permanently, I like to know who is tailgating me...
 
When we ordered our new MORELO I was worried that I might not have anything to fix or fiddle with :unsure: well no such problems;)

IMG_0957.jpeg


This is the recessed fuel filler made out of cheap plastic:LOL: so the screws pulling away with the weight of pipe behind.

IMG_0966.jpeg


Being a MORELO though I repaired it with some upmarket carbon fibre(y)
 
Sorry it's me again, that's the trouble with being retired with a working wifey, so today was cleaning wind out Awning day, on our first awning out trip we were almost ashamed at the state of it, it was stained and marked to hell, some of it looked like mucky finger marks daubed all over and what looked like algae marks from a damp storage issue, we are lucky to have a double share driveway with non car users next door, we we are able to get awning out over their drive (just) , I bought some Awning cleaning fluid from GO outdoors (first born works there, great for staff discount :) ) , first off try the old pressure washer on it, got some of the looser stains of and then it was down to muggins to spray solution and scrub the whole underside and wash off, top side the bits I could reach deemed to be underside anyway just needed more scrubbing and rinsing, well after repeated sessions it is now reasonably clean - not spotless some of the stains seem embedded.
Another issue that arose with our first outing was that on winding back in it would not go all the way in, now in the garage was a piece of skirting board with foam taped to one end, being a logical kind of guy (engineering type) I figured it was to push the awning up into its housing and so by using it it went to where it should be, not happy with performance but it worked, so whilst cleaning I noticed a piece of alloy profile that had a curved shape to it that matched an area on the housing, the profile seemed out of shape so with a pipe wrench (right tool for job :) ) I reshaped the profile and now it pops back in like a goodun.
Looking forward to tomorrow, I'm due delivery of skirting to stop draughts that needs fitting Oh and after today I'm going to get the air con regassed as it was nigh on non existent on our last trip home and now don't do owt, the joys eh :)
You don't need to apoliges for posting on my thread the more ther is the better
Well done on sorting the awning
Bill
 
The CBE light switch for the light over the sink was working intermittently. I removed it to purchase a replacement, but noticed it was a 2-way switch. I connected the wires to the alternative terminals and it's now working fine.
 
Slide out bed mysteriously lost two bolts which meant that when you slide it out the slats fall out - need two bolts to put back in, goodness knows where the originals went.

Anyway, the wonders of the cable tie (never ever travel without a good selection) - managed to fasten the two halves together with a cable tie - not even sure I need new bolts as it slides perfectly (y)

Subscribers  do not see these advertisements

 
Todays first task after postie finally delivered it was the Thetford reed switch, a doddle of a job to fit, slide in and connect wire, so in wanting to try it I placed a bit of magnetic rubber strip you have lying around against it popped inside expecting to see the light on - nah, back outside check things out and seeing fuse in there I thought its blown, it wasn't but the blades were a tad crusty, fettled up with a bit of emery cloth and popped back in and we have a light on
1657817746843.png

Next jobby was to fix the garage door lock, one of them has been a bit loose on the screws, took a bit of planning this one, as like most of the body the doors are only fibreglass skin on foam, it was obvious the holes were shot so I bought a rivnut tool as mine had walked years ago, still had the M4 rivnuts. after removing it and cleaning all the previous incumbents mastic repair off I popped the rivnuts in and with a bit of sealant on the lock body whizzed it altogether.
1657818246700.png

That will for part one, lets say Postie is on first name terms today
 
Part two was easy as the Awning tension pole and tie down kit arrived also, so I had the awning out to give the tension pole a try out and as there was a gentle breeze I could see how it help with the flapping, I gave the tie down kit a quick look over to see how it connects to legs and then popped it all away.
 
Part three, this one has been bugging me for a few weeks, again I relied on Rivnuts to help fix it, The Truma water heater vent, as it is a vent with removable cover if your using gas to heat the water (not needed if on EHU), it is held on by two pegs on the top and a clippy bit on the bottom, with use the lower 2 holes had pulled out and 2 chuffing great wood screws driven in that were no longer holding, I had taken it off when we did a night off grid and was reluctant to put it back on.
Today was the day then, started off by removing the vent, thats when I found the under the vent there were supposed to be 4 screws holding the metal backplate to the water heater outlet, only 2 were in and loose, I took the backplate off and cleaned all the old mastic off it and the MH side, then had a little search for some 4mm set screws, found a few, then I cleaned out the holes with a 4mm tap as the missing 2 were a bit fluffy, popped the rivnuts in the lower 2 holes and then applied sealant to be back of the plate popped the four 4mm screws in with washers to spread the load and put the vent back with its 6 screws and jobs a goodun.
1657821386623.jpeg
1657821405122.jpeg

Its got to be right hasn't it :)
 
Not fixed yet but B2B not playing nice. Leisure battery gasping for charge after a shortish run. Lots of chin rubbing before this one surrenders.:unsure:
 
Todays a new day and todays jobby was to turn the toilet cassette door the other way up, for some reason mine hinged at the top which made getting the cassette out a bind with having to hold the door up at the same time, there is even a lip on the hinge side to deflect the weather, I have been looking at others and they hinged on the bottom, strangely on removal it looks like it fitted like that from new !! as there are 4 screws on the hinge edge and no extra holes in the body, I cleaned off all the old mastic and then not liking the self tappers into the body I put 4 rivnuts in the bottom, now the hinge edge and then using a adhesive sealant to keep rain out and stick it in place as well, put all back together, happy days.
ya bored yet :)

Subscribers  do not see these advertisements


Attachments

  • 20220715_133807.jpg
    20220715_133807.jpg
    607.6 KB · Views: 73
  • 20220715_133757.jpg
    20220715_133757.jpg
    660 KB · Views: 70
Not fixed it personally, but having a brand new fridge freezer fitted today, after my rmd 8505 (which has been a pita ever since we bought the van) decided it didn't want to work anymore. The control panel was corroded and is no longer available. 💴💴💴
Oh and cam belt water pump etc last Friday, it's been an expensive week 🥺
 
Not so much fixed as refitted, after our first proper outing it was decided as we sat outside for tea that a draught skirt was needed, a previous owner had a rail/track fitted, I went and purchased 6 metres from
I went ahead and slid it in and made a wheel cover from the offcut fastened on with already fitted pop studs, I stood back and admired it, then it struck me that its on the door side and the step was in, DOH, so (and its cooler) now it is in 3 pieces with pop studs joining it together either side of of the step, happy now
 
Fixing the pop out step that finally decided that hubby was just too heavy 😁😁😁. Just thankful it didnt happen when I stepped on it with 2 mugs of tea in hand! Hubby now on the hunt for replacent bolt. As you can see, had to apply some heat to get the broken remains out.
16584114300505681104024532250247.jpg

Subscribers  do not see these advertisements

 
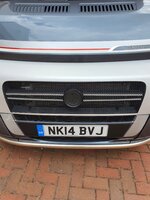
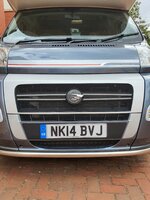
Done this, this afternoon and just need a way to fit the badge back on and it took just over half an hour.


Discount code for 15% off - 100646919
Oh I likie liking that, what did you use to secure the mesh on the inside.

Think I might have another project to add to the tidying up of the front end.

Is it a Halfrauds piece of mesh or from somewhere else ?
 
Not so much fixed as refitted, after our first proper outing it was decided as we sat outside for tea that a draught skirt was needed, a previous owner had a rail/track fitted, I went and purchased 6 metres from
I went ahead and slid it in and made a wheel cover from the offcut fastened on with already fitted pop studs, I stood back and admired it, then it struck me that its on the door side and the step was in, DOH, so (and its cooler) now it is in 3 pieces with pop studs joining it together either side of of the step, happy now
Any piccys 👍🏻
 
Oh I likie liking that, what did you use to secure the mesh on the inside.

Think I might have another project to add to the tidying up of the front end.

Is it a Halfrauds piece of mesh or from somewhere else ?
It come with its own fittings but the main grill is a pain to fit as it didn't fit my grill very well as I only have the two fins on the front grill as you can see but its made for a grill that has four fins

But I managed to fit it to the inside outer edge using their fittings but I would ask them for the longer secures

The middle ans bottom fit like they are ment to and was very easy to fit
 
Last edited:
Rear view camera packed in on Thursday. It was working perfectly, we stopped for lunch and then we "no signal" message as we set off again.

All connections were nice and firm so I thought either a break in the wire (it's a wired system) or the camera had packed in. Tried the IT reset (switch off, wait and switch back on) and realised it came up as AV2. I reset the monitor to AV1 and all is good again :) the button must have been caught at some stage when the monitor was being re-positioned.

Also did a temp fix on out leaking kitchen tap but it will need to be replaced as the plastic has cracked :(
 
Not so much fixed as refitted, after our first proper outing it was decided as we sat outside for tea that a draught skirt was needed, a previous owner had a rail/track fitted, I went and purchased 6 metres from
I went ahead and slid it in and made a wheel cover from the offcut fastened on with already fitted pop studs, I stood back and admired it, then it struck me that its on the door side and the step was in, DOH, so (and its cooler) now it is in 3 pieces with pop studs joining it together either side of of the step, happy now
Photo as requested, might trim depth yet will see how it performs on it's first outing, oh and sorry about the un level arch cover, previous incumbents fitted the poppers and I didn't want to leave any holes trying to level it
Mo Home skirt.jpg

Subscribers  do not see these advertisements

 
Photo as requested, might trim depth yet will see how it performs on it's first outing, oh and sorry about the un level arch cover, previous incumbents fitted the poppers and I didn't want to leave any holes trying to level it
View attachment 645464

You may want to leave a bit of length in your skirt to allow for the extra height required if you are up on leveling ramps. (y)
 
Nuffing just yet, but went to close the rear roof light and the blooming thingamajig that locks it all closed, decided to break.

Did a bodge technical repair to keep it shut in high winds, glued the old bit, but it won’t hold, so found a new one on fleabay for £14 squiddlies and it’s on the way.

More to follow 👍🏻

6369830A-47B1-466B-9F92-834C8BF58CD2.jpeg
 
Last edited:
Adjust handbrake
Grease Alko axle
Take MH over for new cambelt tomorrow (Lancing Commercial)
 
Drilled out and re-riveted the top of one of the wind out awning legs.
Fitted a new regulator so I could use my recently acquired half full Spanish gas bottle
Finally found the fault with my cooling fans, tiny red live feed wire broken, probably when the starter motor was replaced last year.

Subscribers  do not see these advertisements


Join us or log in to post a reply.

To join in you must be a member of MotorhomeFun

Join MotorhomeFun

Join us, it quick and easy!

Log in

Already a member? Log in here.

Latest journal entries

Back
Top