What have you fixed on your motorhome this week?

Greenway . As above posts .... reckon LPG alarm @ / or co2 ... Not enough info on the product to determine the noxious gasses used to knock you out ... So as precaution , take it as LPG ... That's what I'm doing unless further info says otherwise ... cheers ....
 
Today I’ve removed the main light from our Globecar because it was not bright enough, and I replaced it with a more modern light with 4 different settings.
I’m also going to fit one which is half the size over the cab and bedroom area’s.
John.

C93782BA-066A-4329-A3A8-649FDCB9E00A.jpeg
3E6FC189-196D-4EAC-87C8-E3B1D3939684.jpeg
19E0A72F-9326-4C66-A929-FAE941D5691A.jpeg


0C89FB44-B165-4540-BD28-76BE5448CB71.jpeg
 
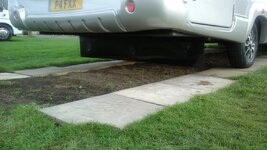
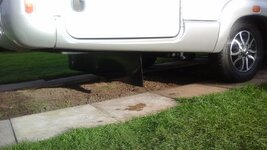
This morning aftet rain ......Thought I would fit , well , we would fit as took two of us, a rear mud guard /flap . Ordered from Truck store , made to measure 5mm rubber .... Had to supply own brackets etc but easy from B&Q...
I suppose it will stop some of the road spray / muck being flicked up to the rear panel of he van ....
Also prevent road muck etc from wheels coming into contact with the deck of the van directly behind the wheels . I did observe some wear on the black / underseal &some visible wood exposed. ..
All fitted & sprayed underseal on those exposed bits whilst I was under the vsn ....
Also ... Cosmetically ... it hides the rear wheels & waste tank from view if looking at the vsn from the rear ... That's just me being fussy ... Oh ... all secured with many rivetts ... Cleahwr job thsn bolts .. Should be strong enough with the down brackets to minimise flapping ...
 

Attachments

  • 20171105_134630.jpg
    20171105_134630.jpg
    248.4 KB · Views: 86
And this one
 

Attachments

  • 20171105_134617.jpg
    20171105_134617.jpg
    227.6 KB · Views: 56
Info . That truck store can emboss any letters etc on the mudflap but a bit expensive . I thought of Rapido but thought I don't want to draw attention to the mud flap . Ta

Subscribers  do not see these advertisements

 
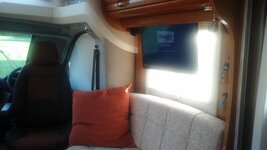
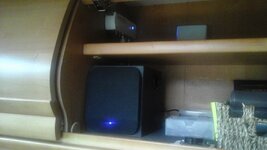
As a matter of interest . I've seen so many vans with the TV being mounted in some really awkward areas of the van ... On sliders ftom cupboards. ... near the entrace door etc etc ... & mainly getting in the way ...or positioned too high ...
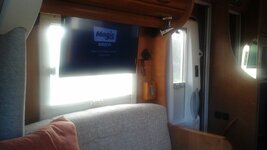
I always mount mine under the cupboards at tge window area . If ya not that concerned about losing some window space then this may be for you ... plus all cables can be hide in the cupboards . Sorted . My TV is 24" built in dvd ...
it's fitted permanently so fix & leave ... & as it's window hight , ideal viewing ... .See pic ...
I'm going for a 32" in a week or so . & yes that will take up more window space but i rekon worth it ...
For your perusal . Cheers
 

Attachments

  • 20171105_151408.jpg
    20171105_151408.jpg
    125 KB · Views: 93
From passenger cab seat . The tv is on the offside lounge window . 2 x pc speakers mounted either side for a better sound . Simples
 

Attachments

  • 20171105_152211.jpg
    20171105_152211.jpg
    116.9 KB · Views: 42
Just to add... sorry ... Base box & signal booster in cupboard . It's just easy & un complicated ... ta
 

Attachments

  • 20171105_152945.jpg
    20171105_152945.jpg
    139.6 KB · Views: 39
I have re-calibrated the meter that displays the fresh water level on our Elddis Autoquest so it's not reading full as soon as you put any water in the tank.
How come Elddis seem incapable of doing this or is it that they just can not be bothered to do it in the factory.
 
well it looks like the gear box i going to have to come out of the van bit of a rebuild on the cards think third gear sincro is on the way out:(
bill

Subscribers  do not see these advertisements

 
Spent 2 entire days doing a deep valet and clean of the entire motorhome.

Started off with the Autoglym motorhome cleaner and did the entire vehicle, including the roof.

Then, with the help of my latest ladder platform acquisition, I used a 3 in 1 Colourfast T-Cut and removed all the grim from the vehicle, including the roof and boy was it grimy.

I then finished off applying a complete tin of Collinite wax to the entire vehicle, again including the roof. Honestly felt like my arms were going to fall off after basically polishing 4 times over, but I'm really pleased with the results.

Next I fitted new mirror guards and then changed the faded and chipped decals on the bonnet for a new one.

Looks nice and shiny all over again:)
IMG_0588.jpg

New platform allows me to reach almost half way across the roof. Very happy with that.
IMG_0599.jpg

Emptied all 3 of these, blooming hard work.
IMG_0589.JPG


IMG_0590.JPG


IMG_0597.jpg


IMG_0608.jpg


IMG_0600.jpg
IMG_0603.jpg

IMG_0604.jpg


IMG_0606.jpg


As a heath robinson fix for a faulty door alarm John gaffer taped a pebble to the inside of the garage door !!! (Engineer by profession)
 
I have re-calibrated the meter that displays the fresh water level on our Elddis Autoquest so it's not reading full as soon as you put any water in the tank.
How come Elddis seem incapable of doing this or is it that they just can not be bothered to do it in the factory.

Wasn't aware that was possible, certainly don't recall any mention of it on the various posts on the subject.
How do you do it please?
 
Just bought a new battery for my Bessacarr E560 and got a decent price at Euro car parts £199.99 reduced by 33% to £133 with an online code. Result!
Now wondering whether I should swap it now or leave it until after winter as the current battery (pardon the pun) still starts her but is a bit sluggish?
My auto-electrician said it was about to give up the ghost soonish 4 months ago so thought I’d better get one in.
 
Wasn't aware that was possible, certainly don't recall any mention of it on the various posts on the subject.
How do you do it please?

Ok, I calibrated my fresh water meter using the following method. Our motorhome is a 2013 Elddis Autoquest but I imagine Elddis are likely to use the same or similar control panel across their range.

I wanted to know when the fresh water was likely to run out, so on this basis I wanted a reliable reading at 1/4 full.

Make sure your on fairly flat ground and then drained down the fresh water tank. Don't just chuck the water away, do something useful with it like use it to flush the loo, water the plants or rinse off the motorhome after you have washed it. While it's draining the tank down, prise off the control panel fascia,

calibrate1.jpg


the remove the 6 screws,
calibrate2.jpg


and gently pull the panel away to reveal a printed circuit board that has on it a little blue rectangle with a brass screw head in one corner of it.

calibrate3.jpg


When the tank is empty, shut off the tap (yer, all right you would have done that anyway) and add water to the tank to 1/4 full. Our fresh water tank hold 90 litres so in our case I put 22.5 litres in then have a look and see what the meter reads. In my case it read full against the stop. Now you need a small flat bladed screwdriver that will fit the slot of the brass screw.
If your meter reads high then wind the screw clockwise to bring the meter needle down to the 1/4 mark and you guest it wind the screw anti clockwise if your needle reads low.
Give the van a bit of a wobble and let the needle settle. If your happy with the reading the add more water to half the capacity of your tank and check the meter reading. I our case it was pretty well on the mark for half full. I added water to 3/4 full and the meter was reading slightly low so I noted the reading for future reference. I then filled the remainder of the tank and again it read lower than full and again noted the reading for future reference. If your happy with how the meter reads than carefully push the panel back in place, screw back and clip the fascia back in place.

Make a well earned cup of tea and show the other half how clever you have been.

Subscribers  do not see these advertisements

 
Spent 2 entire days doing a deep valet and clean of the entire motorhome.

Started off with the Autoglym motorhome cleaner and did the entire vehicle, including the roof.

Then, with the help of my latest ladder platform acquisition, I used a 3 in 1 Colourfast T-Cut and removed all the grim from the vehicle, including the roof and boy was it grimy.

I then finished off applying a complete tin of Collinite wax to the entire vehicle, again including the roof. Honestly felt like my arms were going to fall off after basically polishing 4 times over, but I'm really pleased with the results.

Next I fitted new mirror guards and then changed the faded and chipped decals on the bonnet for a new one.

Looks nice and shiny all over again:)
View attachment 196217
New platform allows me to reach almost half way across the roof. Very happy with that.
View attachment 196208

Emptied all 3 of these, blooming hard work.
View attachment 196214

View attachment 196216

View attachment 196210

View attachment 196205

View attachment 196206 View attachment 196209
View attachment 196211

View attachment 196207


Looks great.... nice to be able to do all that under cover especially this time of year....(y)
 
Spent 2 entire days doing a deep valet and clean of the entire motorhome.

Started off with the Autoglym motorhome cleaner and did the entire vehicle, including the roof.

Then, with the help of my latest ladder platform acquisition, I used a 3 in 1 Colourfast T-Cut and removed all the grim from the vehicle, including the roof and boy was it grimy.

I then finished off applying a complete tin of Collinite wax to the entire vehicle, again including the roof. Honestly felt like my arms were going to fall off after basically polishing 4 times over, but I'm really pleased with the results.

Next I fitted new mirror guards and then changed the faded and chipped decals on the bonnet for a new one.

Looks nice and shiny all over again:)
View attachment 196217
New platform allows me to reach almost half way across the roof. Very happy with that.
View attachment 196208

Emptied all 3 of these, blooming hard work.
View attachment 196214

View attachment 196216

View attachment 196210

View attachment 196205

View attachment 196206 View attachment 196209
View attachment 196211

View attachment 196207


By the way is that TNT box a new type of engine power delivery system......:LOL:
 
My son's van had sprung a leek on one of the hard lines could not source one so decided to find a solution to the problem.
Cut out as much of the rot as possible
Adapt a fitting so it will work stekaflex and a bit of bogging wit Plate whasers and and job done

IMG_20171108_121912.jpg
IMG_20171108_165520.jpg

Bill
 
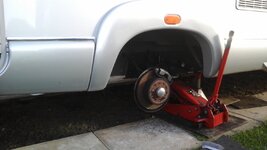
Removed rear wheels to get good access to trailing arms .. Wire brushed them to remove road grime & sprayed.
Very cold under side of van . Shower .... pub In half hour . 'appy days.'
 

Attachments

  • 20171110_103929.jpg
    20171110_103929.jpg
    122.4 KB · Views: 56
Had to pop another gearbox in the van will rebuild the one i have taken out unusual falt the diff started slipping taught it was fifth gear problem.
Any way just puled the engine and poped another gear box on
bill
 
  • Fixed the sons gas locker door he left it open and bent the hinge removed the door straiten the hinge job done
  • On my van we continue to re fit the engine and make sum modification to pip work and engine mounts job i didn't get done when i put the engine in up in Scotland with not having assess to all my tools and equipment.
  • Had just left the small thing that kneaded doing till i had more time.
  • I kneaded to sort out a few wiring issues i had done temporary fixes on hoses with limited asses that would be better sen to with the engine out.
  • Pressure washed the engine as i didn't have asses to a pressure washer looks better now that Ben done
  • Modification to top engine mounts so the engine sits a bit lower in the engine bay now siting at correct high
  • Replaced the vacuum pipe to the turbo as it was a pit perished
  • Re rooted the gear change cabals so look better
  • worked on the fuel lines to get them looking a bit more tidy
Things that i nead to do

Modifications to the inter cooler and air filter as this just a bit tight in the engine compartment as i used the air filter box from the 2.8iTD engine i think i will get away with the filter box from the 2.5 TD engine this will make aches to head light bulbs far better as at the moment when a bulb goes i have to remove the the filter box to Chang a bulb that in tales removing the spare wheel bracket as well.
BILL
 
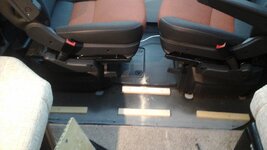
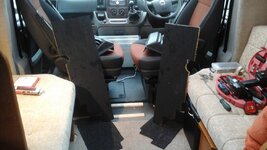
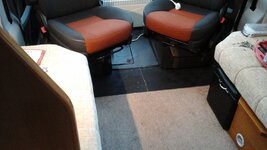
In prep ' for new carpets ...Removed the wood deck partition from cab to lounge... Bit if a job as could only get it out but removing one of the seats ...Too much ....!!! . So managed to saw in half & easy to remove ....
Cleaned off all old carpet which was glued & tacked. ..
Sprayed both panels .
Hoovered & checked gap now present between cab / accomodation . All good ... dry ... All electrics well insulated good quality finish ...
Replaced both panels fixing extra screws to deck batons for better fixing .... Job done

Subscribers  do not see these advertisements


Attachments

  • 20171116_130721.jpg
    20171116_130721.jpg
    157.9 KB · Views: 72
At home in the last few weeks we have:
Replaced the rear skylight for a mini heki (and discovered I ordered cream instead of white IDL99 oops)
All the blinds are back in and working after cleaning, dying, sewing up/gluing and new strings.
Most lighting has been replaced with LEDs, some cupboard lighting not yet connected though.
Fixed up the armrest end caps as best as I could (£51 for two new end caps! :eek: Not paying that!)
Replaced a freezer hinge
Sterilised and flushed the water system, turns out not well enough, it still tastes of chemical. Needs flushing again.
We converted the two singles into one massive bed.
Repainted sat dish.
Cleaned and waxed the roof.

It also went to Dave Newell today for:
Cambelt
Auxiliary belts (both)
Brake fluid
Gear box oil
Grease alko chassis
Replaced a dodgy LPG filler pipe
Fridge service
Removed some front running lights

Next things on the list are boiler service, replace bonnet cable, fridge fans (we've got the kit), aftermarket reversing lights (got them too), more lighting to sort out, a bit of Fiamma guttering, replace extractor fan, replace fire extinguishers, first aid and smoke alarm (got carbon monoxide), fix/replace door flyscreen, make cupboard ends and shelves, fit mifi aerial, polish and wax the body.
We have a couple of weeks left until we move into it and then a few more weeks before travelling. Spent our first night in it last weekend (locally, pouring rain and dark!).

Moose :)
 
788738CE-2C13-43B4-AEAD-F200F34ABAE3.jpeg
5D8860A7-D8AA-4953-B001-FD3FA5E580F4.jpeg
Gray water valve
12v valve and a bit of plumbing just a bit of insulation to put around
And it’s finished.
Cb fitted and ready for our hols as we always travel with my brother so simple to communicate between MH.
 
Yesterday we brought the van home, The pebble fix for the door alarm has been modified, we now have a milk bottle cap in place, it is flatter and lighter so hopefully wont keep slipping, the joys of having a retired design engineer as a partner. I would have used double sided sticky tape instead of gaffer tape, had to replaster part of a wall after I used that for a christmas decoration.

Subscribers  do not see these advertisements


Join us or log in to post a reply.

To join in you must be a member of MotorhomeFun

Join MotorhomeFun

Join us, it quick and easy!

Log in

Already a member? Log in here.

Latest journal entries

Back
Top