Where to put the Maxxair fan?

Googlebot
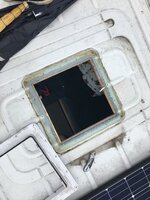
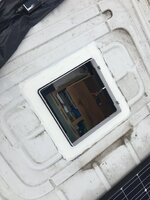
Congrats on a nice clean install. Back in August 2019 we did the same and Installed the fan in the same manner. Last night it sprung a leak. Less than two years. Se my tread with maxfan leak. I managed to take it of today and found where it failed. You guessed it, screw holes, the heads been covered with sealant, but not enough. I have re sealed it and covered the screws with white gaffa tape, tree layers staggered to shed water away. If the screws would been from inside frame to outside frame, sandwiching the sealant and roof, it would been better. Like seitz windows. No holes just compression. Making a good seal then whack 15-16 screws through its not good. The water will track down the screw shaft after few seasonal cycles of expansion and contraction, guaranteed. No epdm washer no screw caps nothing to stop the water capillary. I’m going to build a curb frame, screwed from underneath, then screw the fan to the curb, without full penetration and in staggered sequence, so the screws don’t meet.
Have a look at the tape over screw heads, and before tape what I found under the frame. Water went in by the screws location.
 

Attachments

  • 362E721E-9360-496D-BE19-E9370C25516A.jpeg
    362E721E-9360-496D-BE19-E9370C25516A.jpeg
    491 KB · Views: 156
  • 0BDEBC27-90C6-42A8-950C-4C6A94C2E8C6.jpeg
    0BDEBC27-90C6-42A8-950C-4C6A94C2E8C6.jpeg
    408.1 KB · Views: 153
I must admit I wasn’t that happy wit the fixing method of it, and would have preferred not to screw through the roof.
 
Would Sikaflex (or similar) be OK to fix it without screws? Seems to hold on the solar panels OK, and they aren’t screwed down.

Or how about pumping the screw holes full of Sikaflex before putting in the screws? That may seal the holes more efficiently than topping off the screws with sealant.
 
I recon it would, and almost did that but then thought best to use the screws too. Now annoyed at myself for doing it.
 
A better design might be for it to be fitted like a stainless kitchen sink in a worktop with some clamps onto the inside of the roof pulling it down onto the sealant, and then covered with a trim panel on the inside.

Subscribers  do not see these advertisements

 
Yes that would be similar to the other roof vents.
 
I did think it was an appalling design of frame for the money.

I was going to Sikaflex it and not use screws but decided if it did then leak, the frame would be destroyed getting it off.

I still have half a tube of the mastic, might be worth making sure the screw heads are all saturated in the stuff.
 
I have used those many many times, the self drilling is for metal, and double slash point is for metal sheating to wood, without the drill point. There are ones with plastic cap as well, and the epdm compression washer slightly larger. I have seen some on YouTube, they cover the screws with flash band. But if you don’t use primer and heat, the flash band will fail. Any air trapped will gas and blister later.
 
I'm planning to install a Maxxair in the next few days in place of an existing roof vent. Are there any tricks regarding the roof tunnel , yes I can make the tunnel but how do you accurately drill the exit point in a cupboard. My current thoughts are accurate measurement using a long drill bit hoping I'm heading at 90 degrees to the sidewall . I do have a very strong small magnet, just wondering if that will help pinpoint the drill, provided it's magnetic of course

Subscribers  do not see these advertisements

 
I assume you are talking about running the cables?

How far do you have to go to the cupboard?
 
Sorry yes the cables , probably no more than 45cm.
 
I did mine a couple of weeks ago....i have a foam sandwich roof ...the distance i had to go to get inside a cupboard was around 18in.... i cut a 2 inch rectangular section out of the bottom of the roof plate and then used an extra long masonry drill bit to bore through to the opening....it really is a case of using Mk 1 eyeball to judge you are going the right direction.... luckily i had it spot on...
 
Mine's a similar structure , planning to keep tight on to the plywood.
 
I would use metal masonry drill bit turned by hand through the insulation. You know that will go in a straight line to where you want to be, and by using a blunt (masonry) bit turned by hand it won’t damage anything if you happen to be unlucky.

Subscribers  do not see these advertisements

 
I'm hoping they may have run a cable for future air con too but not found anything unconnected elsewhere.
 
Best way to trace cables into foam core, is a copper pipe. A 8, 10,12 or 15mm pipe, straight cut, and de burred, push in and the pipe by rotating, cuts and it fills. Pipe out, stiff wire in to clear it and go again. Once the pipe is in, push a pull wire in the pipe, and remove/ pull the pipe, leaving the pull wire in to pull your conductors for the circuit.
 
That's weird ..how come i can see the innitial post on this with the photo of the van roof but cant see any posts after that of it installed ...but going by other comments i assume it has been installed

Subscribers  do not see these advertisements

 
Liked reading this post as it gave me some good pointers on what to do and more importantly not to do could I ask what brand of non setting mastic you used and has anybody out there not used screws and have they had problems with it lifting
 
It was seamseal CV I think.

From Amazon, so far so good. No leaks and no issues with it. Used extensively since fitted and still quiet and effective.
 
I have fitted 2 to my van...I used Tec7 sealant adhesive which I've used for years and highly rate it.. as for not using screws I think you will struggle to get it clamped down enough...I sealed and screwed mine..just make sureyou have plenty of sealant around and also on top of each screw.. I personally think there is a lot of hype about not using screws on a roof...nothing wrong with it if installed correctly..
 
I have fitted 2 to my van...I used Tec7 sealant adhesive which I've used for years and highly rate it.. as for not using screws I think you will struggle to get it clamped down enough...I sealed and screwed mine..just make sureyou have plenty of sealant around and also on top of each screw.. I personally think there is a lot of hype about not using screws on a roof...nothing wrong with it if installed correctly..
I’ve put gazillions of screws on roofs, with epdm washer and screw cap. No leaks, touch wood. However, if a self tapper is exposed at frost extensively, Without cover over the head, it will leak. Just a matter of time. No hype what’s whatever, just personal experience.
 
I’ve put gazillions of screws on roofs, with epdm washer and screw cap. No leaks, touch wood. However, if a self tapper is exposed at frost extensively, Without cover over the head, it will leak. Just a matter of time. No hype what’s whatever, just personal experience.
Hence why I said put plenty of sealant on top of the screw..😉

Subscribers  do not see these advertisements

 
I’ve put gazillions of screws on roofs, with epdm washer and screw cap. No leaks, touch wood. However, if a self tapper is exposed at frost extensively, Without cover over the head, it will leak. Just a matter of time. No hype what’s whatever, just personal experience.
I’m mounting it on a standard Motorhome roof ie: hail proof fibreglass could you suggest the correct screw and cap and would you then suggest a non setting mastic over that
 
Something like tek roofing screws with washer and plastic cap. A non setting mastic is not good on outside, just under the frame.
 
I really like and rate mine. i wish I hadn’t screwed mine down, but I did. I don’t think there is a need to if the vent is glued down and left long enough to cure.
 
This might be of use as a tried and successful method
 

Join us or log in to post a reply.

To join in you must be a member of MotorhomeFun

Join MotorhomeFun

Join us, it quick and easy!

Log in

Already a member? Log in here.

Latest journal entries

Back
Top