What have you fixed on your motorhome this week?

I just ordered some glue like the dentist use which is activated by a UV type light wand, looks impressive.

Previously I have used the adhesive silicone grips really well.
Thank you
Sounds interesting whats it called. Or link if you have one.
Regards
 
So how is the remap...or have I missed an update 🙂
I’m impressed by it. 200bhp and 400 torkies. Professionally done with a full diagnostic before it’s mapped. He takes a copy of the engine msp and emails down to the map people who have all the rules of maps for all cars/vans. Asked if I wanted more power or economy I asked for a bit of both. 20 mins later the new map came by email and put in the van. Instant power increases all around you can feel the extra torkies. Fuel economy so far brim to brim and I’m getting 29mpg. So far impressed and it changes the van for the better 👍🥃😷
 
Nothing major in the way of fixes but it stopped the fridge door opening on roundabouts.
Leaving Scotch Corner services the fridge door swung open. Management closed the door again but would not stay shut.
This being the third time the crappy plastic catch has let go in five years I had a think about a permanent fix. A new catch is about £18 so that wasn’t going to happen again.
On the top of the door is the bracket for swapping the hinge to the other side with a matching hole in the top of the door. For now I put a screw in there. When I get home I will make a posh version of this a lot cheaper than £18.
If you still haven't sorted out a 'posh' version a golf tee does the trick! :giggle:
 
Replaced one snapped string on the habitation door fly screen with 20lb fishing line. Quite straightforward, but looking at the other strings I think others may go eventually.
 
Working through a little list prior to longer journeys. Biggest job was to dismount the Heki, repair some minor cracks and holes and then refit with new sealant (thanks Terry for advice). The heavy rain over the weekend has not exposed an issue (yay).
I also resealed a side window that I was suspicious of.
Fixed a Tambor door that had started to come open while driving.
Removed the Tyre monitors which have not been a success.
Ordered a new starter battery (arrives tomorrow)
Still have to replace favourite paring knife that has sadly gone missing.
Checked oil, water and air.
Amended pre-travel checklist


Evening,
Can I ask what you did to the Tambor door to stop it opening whilst driving?
Thanks.
 
Some more odds and ends.
Extractor van in toilet room. No photos

And some bling wheel nuts , valve caps and front mudflaps.
Yes
7B951FBA-08B9-4509-9C63-ED62D8E51213.jpeg
33BD876A-0D80-4255-B591-F710C0ADD845.jpeg
 
Last edited:
Evening,
Can I ask what you did to the Tambor door to stop it opening whilst driving?
Thanks.
Sure Glenn.
Here's the door, it opens right to left. Odd that it's started doing this after so long?
DSCN6379_21reduced.JPG


My original idea was to fit a small bolt on the front lip that could be simply operated whenever we are moving. Something like this

ae235.jpg

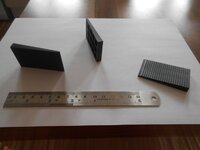
While searching my parts bin to see if I had one I came across these wedges

DSCN6383_26reduced.JPG

They are the spacers you use when fitting floating flooring.

So I tried pushing one into the closed tambor like so, the ridges face towards the door for grip
DSCN6381_23reduced.JPG

Hey presto, holds it well.
It's a bit Heath Robinson and I might eventually find a mini bolt as above for something more permanent but I'm happy so far and it's certainly an improvement on the gaffer tape first used while travelling...

Hope this helps.
 

Attachments

  • DSCN6383_25reduced.JPG
    DSCN6383_25reduced.JPG
    100 KB · Views: 29
Last edited:
Working through a little list prior to longer journeys. Biggest job was to dismount the Heki, repair some minor cracks and holes and then refit with new sealant (thanks Terry for advice). The heavy rain over the weekend has not exposed an issue (yay).
I also resealed a side window that I was suspicious of.
Fixed a Tambor door that had started to come open while driving.
Removed the Tyre monitors which have not been a success.
Ordered a new starter battery (arrives tomorrow)
Still have to replace favourite paring knife that has sadly gone missing.
Checked oil, water and air.
Amended pre-travel checklist


But did you kick the tyres, can't go anywhere without first kicking the tyres 😀👍🏻

Subscribers  do not see these advertisements

 
Some more odds and ends.
Extractor van in toilet room. No photos

And some bling wheel nuts , valve caps and front mudflaps.
Yes View attachment 513693View attachment 513694
I fitted bling dust caps, but they corroded on, due to dissimilar metals.

Had to use mole grips to remove them, but luckily no damage to valve. Think I'd use a smear of copperslip if I did it again.

Looks good by the way 👍🏻
 
Hi PP Bear
Good point. I did use anti seize on all of them … been there done that.
Daniel
 
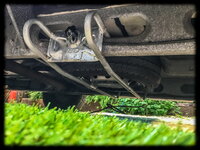
Our 7095DF came with no spare Wheel. The dealer gave me a rim, I’ve fitted a Continental Camper tyre and had an Alko spare wheel carrier kicking around, left over from my trailer shop days!
it took a bit of faffing about but I’ve made a new support plate and adapted to fit our chassis. It’s now neatly hung, amidships, between the axles.
Not much ground clearance lost, the chassis depth is the same as the tyre width! 👍
 

Attachments

  • 73645D88-9454-4F88-AEE9-06033DDE4D2F.jpeg
    73645D88-9454-4F88-AEE9-06033DDE4D2F.jpeg
    443.6 KB · Views: 43
The continental version of our McLouis doesn't have the cooker/grill fitted under the worktop, but in the UK they pop in a Thetford one. However it sits beneath a 3” worktop overhang that also includes a led strip light. Quickly realised the likelyhood of heat damage, or possibly much worse from the rising heat coming out of the grill, proper hot. Popped along to B&Q, 1mm sheet of steel bought, cut to size and shaped to fit. Bespoke heat shield

CA5A6E15-7D49-4EEF-8891-E9F18897F4D5.jpeg
 
Fitted fine mosquito netting on the inside of the two small roof vents which only had a grating and let mosquitos in!! Gave them a good clean at the same time. Why would Hymer fit such vents when they go to the trouble of fitting flyscreens to every other aperture on the motorhome. It’s a bit like writing a back door script on software for mosquitos to take advantage of :ROFLMAO:
 
Our 7095DF came with no spare Wheel. The dealer gave me a rim, I’ve fitted a Continental Camper tyre and had an Alko spare wheel carrier kicking around, left over from my trailer shop days!
it took a bit of faffing about but I’ve made a new support plate and adapted to fit our chassis. It’s now neatly hung, amidships, between the axles.
Not much ground clearance lost, the chassis depth is the same as the tyre width! 👍
What ground clearance to you get beneath the wheel?

I can’t make up my mind to underslung mine or not due to clearance.
 
Fixed the sliding insect blind on the habitation door. Thought there was a screw proud stopping it sliding but turned out to be some weather strip it was having difficulty getting past. Then discovered a missing screw on the entire frame at the top causing the top channel to pop up.

All fixed, screw added, weatherstrip replaced and siliconed the runners for good measure. :giggle:
 
Replaced the scuttle trim under bonnet and adjusted Hab door.
 
What ground clearance to you get beneath the wheel?

I can’t make up my mind to underslung mine or not due to clearance.
I can measure it exactly, but I’d guess at 200mm. It’s a fraction lower than the exhaust. .. ..

Subscribers  do not see these advertisements

 
What ground clearance to you get beneath the wheel?

I can’t make up my mind to underslung mine or not due to clearance.
I’ve had the tape measure on it! The carrier has 130mm clearance, the exhaust is 150mm, the chassis is 180mm.
 
I’ve had the tape measure on it! The carrier has 130mm clearance, the exhaust is 150mm, the chassis is 180mm.
Thanks for that. I like the idea of storing under the van, but don’t like the idea of ripping it off on a road bump.
 
Thanks for that. I like the idea of storing under the van, but don’t like the idea of ripping it off on a road bump.
Neither did i .
When i fitted mine i took the van upto the highest local road hump stradelled it and stopped just before and got out. A car appeared from nowhere with a driver rather bemused by my antics of lying on the floor and trying to measure the gap, then getting in driving 2 foot and repeating the measurement. All is well and wheel is higher than axle.
 
I thought the satellite dish had blown a fuse when I put it up. Couldn't open the box because I didn't have a square head screwdriver in my MH toolkit so we drove into town with the dish up. Got lots of strange looks and hand signals from passing motorists. Bought a new screwdriver. Opened the box. Fuse hadn't blown. Jiggled a few things. Dish came down and is working fine.... until the next time!

Subscribers  do not see these advertisements


Join us or log in to post a reply.

To join in you must be a member of MotorhomeFun

Join MotorhomeFun

Join us, it quick and easy!

Log in

Already a member? Log in here.

Latest journal entries

Back
Top