Sprinter Build. Very Nice Spec.

Wissel

Free Member
Joined
Sep 16, 2013
Posts
2,220
Likes collected
8,044
Location
Horncastle, UK
Funster No
28,132
MH
Van Conversion
Exp
Since 2006
I know a lot of people loved the threads Terry put up when doing his builds (I know I did), so I thought I'd do the same.

This build is a 2010 Mercedes Sprinter that was converted in a hurry a few years ago. The guy who owns it is a full-timer who works online from his van.

It's a full rebuild, with a very nice spec including a high end electrical system, instant hot water with UV sterilising, trick lighting and so much more. The van needs to be very minimal but with a lot of hidden tech.

This van needs to look like TnG painted white, with light wood surfaces and floor. I won't be using actual TnG though. It's going to be a tricky build but should be fun to do. I won't post pictures of the van how it arrived, I'll just show the progress.

To start it off, here's a rough plan:

RSprinter-New-Layout-Master.jpg
 
Looking forward to seeing the build photos here, is it a LWB?
Yeah, it's the huge one (7.5m I think?).


First building job - the van needs a bulkhead.

I know most people like to be able to get from the cab area into the back, but on this van the back needs to be completely separate. The guy likes to park up, lock the cab, then get into the back via the sliding door.

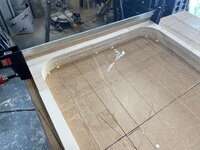
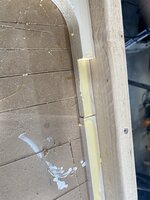
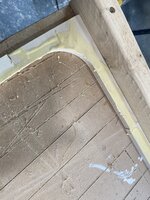
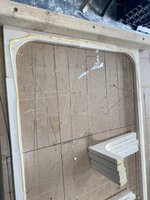
As with most of this build, the bulkhead is made from lightweight Poplar plywood. because of it's size, it's two pieces biscuit jointed together:

20220330_101128071_iOS.jpg


20220330_101149368_iOS.jpg


The right hand side has antibacterial PVC as it will be part of the bathroom (the blue is just a protective cover). There's then a space for a cupboard, then the left side is visible. As with most of this van, any visible bits need to look like TnG, so I've routered it out.
 
Watching with interest and looking forward to seeing photos and maybe videos!
Ray
 
Look forward to this David. Remember to send me a link if you start another thread 😉
If it's got to look like T&G why not build it from T&G ? Can you remember the mini bus I did in T&G ? Personally I found it very easy to do ( no messing about with big 8 X 4 sheets 😁) but hate vans done in it. Always looks like a shed and in my opinion would take 000s of sale price. Then again there are some people who like it😳

Subscribers  do not see these advertisements

 
Hi David there is a sprinter bulkhead on eBay for £100,put that in and clad over it 😉
 
Hi David there is a sprinter bulkhead on eBay for £100,put that in and clad over it 😉
The new one is now fitted Terry (y)

Regarding TnG, I know a lot of people really like it, but I personally hate it. It can look okay when first fitted, but will move around over time where it expands and contracts, knots will fall out and if painted (like this van will be) will look awful after a while. In my opinion :LOL: . I know a really good TnG would be fine, but it would weigh a ton.

The guy who owns this van wants it perfect and it to stay perfect. Even the paint work is being sprayed to get a really high quality finish. I also can't use anything like edging or radius rails - the angled walls need to be mitred and biscuit'd. It's being built more like a hand-built kitchen than a normal motorhome (which is a lot of work, but loving doing it).

I've stopped early for the day now as it's minus 3 here, pouring with rain and about to start snowing. Besides, I turned 50 today so think a few hours off is okay :cool:
 
Happy birthday! 🎂🎶

The new one is now fitted Terry (y)

Regarding TnG, I know a lot of people really like it, but I personally hate it. It can look okay when first fitted, but will move around over time where it expands and contracts, knots will fall out and if painted (like this van will be) will look awful after a while. In my opinion :LOL: . I know a really good TnG would be fine, but it would weigh a ton.

The guy who owns this van wants it perfect and it to stay perfect. Even the paint work is being sprayed to get a really high quality finish. I also can't use anything like edging or radius rails - the angled walls need to be mitred and biscuit'd. It's being built more like a hand-built kitchen than a normal motorhome (which is a lot of work, but loving doing it).

I've stopped early for the day now as it's minus 3 here, pouring with rain and about to start snowing. Besides, I turned 50 today so think a few hours off is okay :cool:
T & G if you use 3/8s match board it actually works out lighter than LW 15mm ply 😃 Still hate the bloody stuff
Happy Birthday
 
Happy Birthday:party:(y)

Subscribers  do not see these advertisements

 
Will enjoy the thread, thanks for sharing and Happy Birthday.
 
Just a little update today. It's been freezing, so I've spent my time doing lots of little jobs.

With the bulkhead in and knowing the exact size of the bathroom and bed, I've been able to design the kitchen:

Rob-Kitchen.jpg

On the left is a fridge with freezer above (integrated), the oven in the middle with a couple of drawers below, then a pull down flap on the top right (sink behind) and two further drawers below. In total in kitchen is almost 1.5m long - nice size for a motorhome.

I also did a very quick mock up of the door design to make sure it all works:

20220331_133652489_iOS.jpg


I've not made a proper joined Shaker door out of ply before. Think it's going to work well (y)

The doors will be white and the inset handle in the image matches the black oven.
 
Just one more small detail, the doors and drawers in this build all lock automatically when the vehicle is started, and unlock when the engine is off.

When the vehicle is stationary, the locks use zero power. They are triggered via the vehicles D+ signal (same as an electric step etc) and use 0.1A when driving.


Behind the lock in the video you can see a small yellow strip. These are tiny (but very bright) LED lights that come on inside cupboards/drawers the they are opened.

Subscribers  do not see these advertisements

 
Thanks for the lock video,my Son is currently doing a Sprinter conversion on a almost new Van so could help him sourcing.
 
Just one more small detail, the doors and drawers in this build all lock automatically when the vehicle is started, and unlock when the engine is off.

When the vehicle is stationary, the locks use zero power. They are triggered via the vehicles D+ signal (same as an electric step etc) and use 0.1A when driving.


Behind the lock in the video you can see a small yellow strip. These are tiny (but very bright) LED lights that come on inside cupboards/drawers the they are opened.

Love those locks.

Always annoys me when I'm driving down the road and the bathroom doors open obscuring my rear view!!
 
What fridge freezer are you using?
Using a 230v domestic one Tam.

I've been running one in my own van for 3 or so years and really like it. Keeps a better temperature and silent, not to mention the cost. With mine, it's power consumption is so low that even with the inverter overhead it still uses less than a standard 12v compressor model. After initially installing with a small Victron inverter, I swapped over to a larger model as figured I may as well have 230v on tap.

This van's electrics work the same as my own, in that there will be 230v always on via an inverter.
 
Just one more small detail, the doors and drawers in this build all lock automatically when the vehicle is started, and unlock when the engine is off.

When the vehicle is stationary, the locks use zero power. They are triggered via the vehicles D+ signal (same as an electric step etc) and use 0.1A when driving.


Behind the lock in the video you can see a small yellow strip. These are tiny (but very bright) LED lights that come on inside cupboards/drawers the they are opened.


Locks are cool. Have you got a link? Do they include a diode for back EMF? Could be dodgy if there are a lot of them...

How are the lights switched?

Subscribers  do not see these advertisements

 
Belated :birthday:
I used mdf mock t&g in my utility room it is painted but in a small space like a van, yuck. At least it's painted.
 
Locks are cool. Have you got a link? Do they include a diode for back EMF? Could be dodgy if there are a lot of them...
If you do a search on Amazon/eBay for electromagnetic lock 60kg, loads will come up. All the same.

No diode, but they are all controlled via a relay (with the D+ as the activator), so should be fine. I've been testing them in the workshop for 4 months and been flawless.

How are the lights switched?

The lights use these little things. Again, been testing them (and the lights) for months to make sure there's no surprises.

Belated :birthday:
I used mdf mock t&g in my utility room it is painted but in a small space like a van, yuck. At least it's painted.

Cheers Lenny.

Thank god different people do like different looks in a motorhome though. I wouldn't have much to do if everyone wanted the same as could be bought from a dealer ;)
 
I have to say that im planning to use t&g in my vario build because i like the look of it. I'll also be doing different colours inside other than the traditional white or plain wood etc .
 
I didn't get much done over the weekend as felt rough as hell. But fine again now.

Todays job was one I wasn't looking forward to - design and build a composting toilet.

The main parts were already here as he had one already in the van, so first job was spend a few hours with disinfectants etc (the glamour of my job :LOL:).

The design ideas I had were:

1. Covered, so it can't get wet from shower. Cover should be slanted so water rolls off.
2. Storage either side of the bowl. One side for loo roll and spray, the other for sawdust.
3. Silent extraction
4. Solenoid dump for liquids (dumps into a Tote outside, rather than lift the thing out when it needs emptying)

Here's the basic design:

20220405_145711394_iOS.jpg


Shown with the start of the shower tray, which will be fibre glassed. The toilet itself is now ready to shape with a router, fill and apply finish. Here it is with the sides off to show the storage:

20220405_145745857_iOS.jpg


Quite pleased with the design tbh. It's a sentence I never thought I'd say or write, but it's lovely compared to the Thetford in my own van :LOL:

Northernraider I can see why you like these (y)
 
I didn't get much done over the weekend as felt rough as hell. But fine again now.

Todays job was one I wasn't looking forward to - design and build a composting toilet.

The main parts were already here as he had one already in the van, so first job was spend a few hours with disinfectants etc (the glamour of my job :LOL:).

The design ideas I had were:

1. Covered, so it can't get wet from shower. Cover should be slanted so water rolls off.
2. Storage either side of the bowl. One side for loo roll and spray, the other for sawdust.
3. Silent extraction
4. Solenoid dump for liquids (dumps into a Tote outside, rather than lift the thing out when it needs emptying)

Here's the basic design:

View attachment 603000

Shown with the start of the shower tray, which will be fibre glassed. The toilet itself is now ready to shape with a router, fill and apply finish. Here it is with the sides off to show the storage:

View attachment 603001

Quite pleased with the design tbh. It's a sentence I never thought I'd say or write, but it's lovely compared to the Thetford in my own van :LOL:

Northernraider I can see why you like these (y)
I think the proper sized seat makes a big difference to comfort. And easier to dispose of . Nice design are you covering the wood with pvc panels or just varnishing?

Subscribers  do not see these advertisements

 
I think the proper sized seat makes a big difference to comfort. And easier to dispose of . Nice design are you covering the wood with pvc panels or just varnishing?
Yeah it's so much nicer than mine.

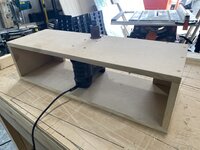
I've got to router it all over the place so it's nice and curved, fill it, then I'm spraying it (very tough paint). The lift up top (shower cover) will be fibreglassed to match the shower tray. Should look nice when done. For a toilet :LOL:
 
Yeah it's so much nicer than mine.

I've got to router it all over the place so it's nice and curved, fill it, then I'm spraying it (very tough paint). The lift up top (shower cover) will be fibreglassed to match the shower tray. Should look nice when done. For a toilet :LOL:
Ahhh so your putting a top over the whole thing?

Thats a good idea , i was wondering how to make mine water proof and i never thought of that
 
T &G can look a bit fussy but I think the way you have made them they look great. I would probably have left them as plain wood rather than painted but I guess if the finish is really smooth and tough it would be okay.
 
Really interesting looking forward to seeing it grow. I like the idea of the electric door locks.
 
Just a small update.

The van is coming on nicely, but one job has taken some time. The window surrounds.

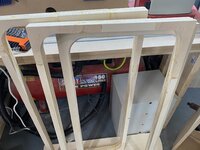
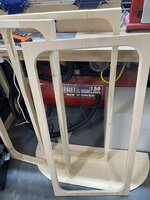
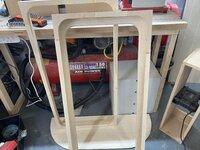
The owner wants something a little different from the norm. He wants a wooden surround that follows the window curves, no blinds and magnetic blinds. This is what we came up with:

20220412_093240782_iOS.jpg


Each window has a back, 4 magnet strips and 24 frame parts.

20220412_093333028_iOS.jpg


These are set into a brace I made up, then the gluing begins

20220412_093610312_iOS.jpg

once a layer is down, a layer of glue is added and the next layer is added, offset for strength

20220412_093737591_iOS.jpg


Until all 3 layers are glued

20220412_093943529_iOS.jpg


Then braced to set

20220412_094125887_iOS.jpg


Once dry it takes a ton of sanding to get this

20220412_130556727_iOS.jpg


I have a little more work to do with these, then a little filling before priming tonight for install tomorrow.

The wall then goes over the top and is routered to match.

Subscribers  do not see these advertisements


Attachments

  • 20220412_094116533_iOS.jpg
    20220412_094116533_iOS.jpg
    674 KB · Views: 68
  • 20220412_094215987_iOS.jpg
    20220412_094215987_iOS.jpg
    530.4 KB · Views: 67
  • 20220412_094227139_iOS.jpg
    20220412_094227139_iOS.jpg
    544 KB · Views: 66
  • 20220412_094241772_iOS.jpg
    20220412_094241772_iOS.jpg
    567 KB · Views: 72
  • 20220412_093742174_iOS.jpg
    20220412_093742174_iOS.jpg
    639 KB · Views: 66
  • 20220412_093726914_iOS.jpg
    20220412_093726914_iOS.jpg
    746.6 KB · Views: 67
  • 20220412_093647507_iOS.jpg
    20220412_093647507_iOS.jpg
    708.1 KB · Views: 79
  • 20220412_093113708_iOS.jpg
    20220412_093113708_iOS.jpg
    550.1 KB · Views: 81

Join us or log in to post a reply.

To join in you must be a member of MotorhomeFun

Join MotorhomeFun

Join us, it quick and easy!

Log in

Already a member? Log in here.

Latest journal entries

Back
Top