
I have learned after we bought the motorhome that Buccaneer motorhomes were very expensive when new. I have seen 3 others on the road and 2 in Facebook. So not all that popular.
All seemed ok with it until looking at it September when getting ready to take for an MoT. Noticed that a roof panel at the rear appeared to have bowed slightly downwards with a very small stain on the vinyl on the join.
Post photos later.
Decided it was a project in the New Year.
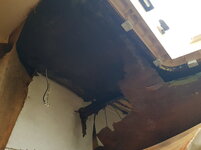
Come January I decided to investigate the panel further, it seemed to be spongy and moved quite easily. I thought 'go for it' and ripped the vinyl from the panel and discovered absolutely rotten and waterlogged timber, the polystyrene was wet but not holding water.
The vinyl is wrapped all around the panel so water had got in but could not get out or dry out
Get my head round what I had found. Apart from this bowing there was nothing to give any indication of what lay in the roof. No damp smell at all.
Previously I had found water coming out by the side of the skylight and traced that to a loose connection and poor seal around the the Truma gas fire vent, Fixed that problem, looked at the skylight, although wood was wet, did manage to dry it out.
Thinks, this wet panel needs further investigation, take down the cupboards on the sides and the rear. Take more vinyl off roof panels, timber just as wet or rotten.
Have a look at the driver side rear wall, start pulling at the the vinyl wall covering, I think it was held in place by the cupboards because it came off very easily and revealed rotten and delaminated plywood.
The rear wall was as bad as the side wall. Hadn't started on the passenger side wall yet.
Well the plywood peels off like paper leaving all support battens soaking wet and rotten. The batten along the top of the wall is rotten because again this wrapped in vinyl and water has got in. This is where the title comes from, I have had water running down my arms removing ceiling battens.
Have a look at the passenger side wall, pull off a bit of vinyl to reveal the back corner plywood rotten and a lot of water stain with the top few inches rotten. Again the top of the wall batten is rotten.
The vinyl has played a major part in the destruction of the plywood walls but appears to have protected the floor, that seems solid with no discernable movement.
I have read the posts with regard to the repair of a motorhome and find them very interesting but I will be along with some questions of my own. I was going to do this project in a barn/workshop but that became unavailable.
I need my motorhome on the road for when we are allowed to start travelling again so taking advantage of lockdown to get on with the project outside my house, unfortunately out in the open.
With the removal of most of the ceiling and one sidewall, would I be better putting a temporary batten across walls?
The next job is to remove the toilet/shower cubicle to check on the state of the roof and wall as well as the horizontal wall battens.
Amongst the many tips that have been provided and I am thankful for are a reciprocating multitool (Lidl special, a couple of weeks ago) and the extending panel supports from Screwfix.
I will add some photos later (as soon as I can get them off my phone. Back up and sync aren't bringing them onto laptop).
Thankyou to every one who has posted on other restorations and takes the time to read this post.
Any hints, tips and suggestions truly welcome. My wife has already suggested 5 litres of petrol and a match.
All seemed ok with it until looking at it September when getting ready to take for an MoT. Noticed that a roof panel at the rear appeared to have bowed slightly downwards with a very small stain on the vinyl on the join.
Post photos later.
Decided it was a project in the New Year.
Come January I decided to investigate the panel further, it seemed to be spongy and moved quite easily. I thought 'go for it' and ripped the vinyl from the panel and discovered absolutely rotten and waterlogged timber, the polystyrene was wet but not holding water.
The vinyl is wrapped all around the panel so water had got in but could not get out or dry out
Get my head round what I had found. Apart from this bowing there was nothing to give any indication of what lay in the roof. No damp smell at all.
Previously I had found water coming out by the side of the skylight and traced that to a loose connection and poor seal around the the Truma gas fire vent, Fixed that problem, looked at the skylight, although wood was wet, did manage to dry it out.
Thinks, this wet panel needs further investigation, take down the cupboards on the sides and the rear. Take more vinyl off roof panels, timber just as wet or rotten.
Have a look at the driver side rear wall, start pulling at the the vinyl wall covering, I think it was held in place by the cupboards because it came off very easily and revealed rotten and delaminated plywood.
The rear wall was as bad as the side wall. Hadn't started on the passenger side wall yet.
Well the plywood peels off like paper leaving all support battens soaking wet and rotten. The batten along the top of the wall is rotten because again this wrapped in vinyl and water has got in. This is where the title comes from, I have had water running down my arms removing ceiling battens.
Have a look at the passenger side wall, pull off a bit of vinyl to reveal the back corner plywood rotten and a lot of water stain with the top few inches rotten. Again the top of the wall batten is rotten.
The vinyl has played a major part in the destruction of the plywood walls but appears to have protected the floor, that seems solid with no discernable movement.
I have read the posts with regard to the repair of a motorhome and find them very interesting but I will be along with some questions of my own. I was going to do this project in a barn/workshop but that became unavailable.
I need my motorhome on the road for when we are allowed to start travelling again so taking advantage of lockdown to get on with the project outside my house, unfortunately out in the open.
With the removal of most of the ceiling and one sidewall, would I be better putting a temporary batten across walls?
The next job is to remove the toilet/shower cubicle to check on the state of the roof and wall as well as the horizontal wall battens.
Amongst the many tips that have been provided and I am thankful for are a reciprocating multitool (Lidl special, a couple of weeks ago) and the extending panel supports from Screwfix.
I will add some photos later (as soon as I can get them off my phone. Back up and sync aren't bringing them onto laptop).
Thankyou to every one who has posted on other restorations and takes the time to read this post.
Any hints, tips and suggestions truly welcome. My wife has already suggested 5 litres of petrol and a match.

")


 Luckily you are linking in with some of the best people on this forum who’s advice will get you back on the road. As others have said find the source of the leak or leaks (in my case). Take each step at a time and ensure you support the structure well. Good luck with your repair
")