I see some Steam Enthusiasts on here!

After another trip to the Calor shop I had a productive afternoon in the workshop. The new big nozzle works well apart from using gas rather rapidly. I should have kept to the 13 kg bottle untill the boiler was finished then swapped to a 6kg.
The last part of the boiler is finished. I have 6” of silver solder left. I have ordered some more for the after test leak fixes. It has been a challenge to build. I thought I knew about brazing welding and things like that. It is different if it’s some thing you are building for you’re self at home with limited equipment.
Some one said build the boiler first it will teach you a lot. I can see the logic in that now. I fancy building a steam roller next so that would be boiler first.

Hi Dave, and glad to hear your news. I imagine that you will have done a good job with no leaks!
I've been busy on the loco. It is finished all but the relining of the cab. The tender is 90% complete so I can start on my Stuart Major beam engine soon!
20200725_173715.jpg


20200727_174538[1].jpg
 
I did a boiler testing course down at Cheddar Models many moons ago. At the top end of their workshop, all the fluorescent light fitting shades were discoloured and uneven. They said they were brazing up a 10 1/4" gauge boiler with propane torches and the heat given off distorted all the light fittings in the vicinity. Once they noticed it happening, they had to ignore it as they were committed to the boiler build !
 
A Few Pic`s from the 80`s.
Steamers.jpg


The two small engines where at Beer, Devon, I used to get to play on them. "Pride" had just been restored at that was the steam test!. The Rusty Fodens where in a shed On a site Near Taunton, along with a collection of Sentinel Wagons. Which I was asked to "look at"?. Wether any ever got near to restoration I have no idea!.
 
Last edited:
Thanks for the encouragement John. I wont promise no leaks, but I can cope with fixing leaks after what I have learnt so far. The only leak that will be hard to sort is the top of the fire box above the stoke tube . I intend to test the boiler myself because it is not going to be run in public. The safety valves will be set at 80psi rather than 100psi as designed. It seems rather high for 2x 1” cylinders.
After the excitement of boiler building I might carry on with the trailer. Our next door two up the street is a chippy and he has some nice ply for the floor and sides squirrelled away for me.
Your Stirling must be getting towards the end. You’re workshop will look empty when it’s gone. My workshop seems to be getting rather messy recently. I normally clean up after every session but I have let it slip for a while. I can’t work untidy.

Subscribers  do not see these advertisements

 
I remember the very last of those at Newton Heath sheds Manchester. There were a few tenders there that were converted to weed spraying.
When they lifted the tracks on the line behind my grandparents house they used a crane towed by a Black Five . The wagons were behind a 7000 class.
In the late sixties I managed to visit Barry Island. Even then it was sad to see so meany locos being hacked to death.
Gosh that brought back memories we used to go down to Newton Heath on Saturday or Sunday mornings when they were scrapping the steam trains and we got loads of dials, gauges and name plates off the engines with the blessing of the staff there. Biggest regret is not keeping any! Traded them along the way as you do and then see the prices fetching today!"
 
I have a Platform 1 sign from Newton Heath sheds. There were piles of burgundy coloured sighs dumped in a corner amongst lots of other station signs.
My school mate that used to visit the sheds with me brought a shutters pole home on the train. No one even blinked as he walked through Oldham Mumps station. The only person that noticed was the bus conductor, he had to stand on the back platform with it up the stairs.
Last time I heard from my mate he was moving to Peterbourgh to drive the 125,s into Kings Cross.The shunters pole was in his dads garage.
 
It works!
Just a few seconds of video to prove it with my good friend David at the controls. The blower and regulator work perfectly, my own design drop grate drops as it should, and it goes like the clappers. There is a slight leak on the sight tube glass top joint, and that's about it! Please excuse the jerky handwriting...😍

DSC00329.JPG


Your videos gives me inspiration to keep me motivated with my boiler marathon.
One thing that has caught me out is the amount of silver solder I have used. I don’t think it is any fault on my part I just miss calculated my needs.
The foundation ring and blow down bush were the last bits to solder. Once again I have run out of solder but it should only be needed for chasing leaks now.
I have seen test pumps for about £60 so that will be something to think about buying soon.

Hi Dave.Yes, it does feel good to see it running. However, I'll feel even better when I've sold it and used the proceeds on more frivolous pursuits, like a long winter rental in a villa in Spain!
I don't have a test pump, I just make some blanking plugs, fill the boiler with water and warm it up. You'll soon see any leaks.
John

Subscribers  do not see these advertisements

 
I was all set to have a day in the workshop whilst management is out for the day. The silver solder was due in the post today. It did come today. Posty turned up at half four. Our normal post lady is on holiday and they hadn’t put any one on her round so they added her post to the nearest posty after he had done his own round.
Too late to start now so I will have a full day tomorrow.
I actually have a pressure gauge that will go to twice boiler pressure and I suppose I could use the boiler feed pump. Me thinks that sounds cheaper than a test pump.
 
A productive day in the workshop today. Blanking plugs fitted, adapter for pump feed fitted and test gauge fitted.
I got to 100PSI and I have two pin prick leaks from the foundation ring so far. Considering that was the hardest bit of the boiler to solder taking the most heat I am ok with that.(y)
I have re soldered them and the boiler is now in the pickle bath to clean up. I will call it a day and continue tomorrow. Our son is due here tomorrow so he can help find leaks.

That's a very good result, especially for your first attempt. Is 100psi twice working pressure? Here's today's effort. All sides gloss and dark green, with black 3/16" thick line on this side only, waiting for the white lining. l'll do the other sides tomorrow. The suspension links were an easy fix as I was able to squash the end of the 1/8" copper tube and curl it round the spring. They will be painted black! The 'nuts' underneath will be held on with loctite. The brackets and weights are 3D printed, and will be painted chocolate as on the tender in the NRM.
Progress!

DSC00351.JPG
 
The amount of silver in my boiler it will need hallmarking. The front axle weight with a full boiler will be higher than the back.
The working pressure should be 100 psi but I am going to set the safety valves to 80 psi..
With this in mind I am getting close to twice working pressure already.
I have heard some people set one safety valve slightly higher than the other. Is this normal practice.
 
  • Funny
Reactions: DBK
I have heard some people set one safety valve slightly higher than the other. Is this normal practice.
One valve on my Sweet Pea lifts around 5psi higher than the other, but I don't know whether this is by design or accident, as I didn't set them. Quite a few locos in the club with twin valves will blow off on one valve first.

Subscribers  do not see these advertisements

 
Not exactly steam, but this IP Engineering Jessica kit is one of my latest lockdown projects. Most of it is laser cut steel sheet with whitemetal detailing parts. I have added extra detail and refinements and then airbrushed it with enamels. It is a radio controlled battery electric.

IMG_0888.jpeg
 
I think setting one safety valve about five psi above the other seems common practice. The idea I suppose it is a back up if one sticks.
At one of the running sessions at a local club I saw someone hit his safety valve with his shovel whilst driving. When he stopped in the station he was frantically taping his injector, presumably he couldn’t get water into the boiler. To think he was hauling passengers most of the day. The club rules said “You must have a current boiler test certificate to run on the club track”.
No one seemed to notice this guys antics or the state of his loco.
 
After a bit of a break I am back in boiler testing testing mode today.
I have improved my test rig slightly by putting a stop valve between the boiler and the pump. Now I can disconnect the pipe to the pump whilst looking for leaks.
So far this morning at 160 psi I have one tube with a pin prick at the smoke box plate and one of the boiler mounting brackets is weeping slightly along its top edge. The area that would case issues, the fire box, seems dry. A leaking blanking plug that has no copper washer isnt a leak really I suppose.:oops2:
A re-heat for the top plate and the bracket. A brew whilst things cool a bit before another soak in the pickle bath. And then another try after lunch. :happy:
i would try some Loctite hydraulic sealant and a vacuum cleaner!
 
Even with loctite 542 sealant the lack of a copper washer is asking a lot. Copper washers are good at taking up any difference between the faces but as you said the loctite will seal the threads.
Meany years ago the gun fitters I worked with started using PTFE tape to seal oil level plugs on the guns. The storeman gave an electrician PTFE tape in lue of insulating tape. The electrician was baffled by this none sticky tape. Neither of them were the brightest of the bunch.
Later locite started to appear in the stores. Thread lock and sealant looked the same to a dozy gun fitter. Trying to get oil level plugs out caused us some agro.

Subscribers  do not see these advertisements

 
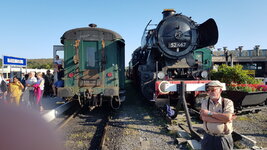
Anorak steam special last September, through the Belgian Ardennes, thanks to a Google maps suggestion.
Stayed in the rural car park of this nearby restaurant for 2 nights.....for the food & beer as well, you dine next to the brewery!
20190921_194016.jpg
20190921_142804.jpg
20190921_161007.jpg
20190921_165746.jpg
20190921_163619.jpg
20190921_170213.jpg
20190921_165920.jpg
20190921_154115.jpg
20190921_154921.jpg
20190921_144938.jpg
20190921_152817.jpg
20190921_145615.jpg
20190921_151316.jpg
20190921_170045.jpg
20190921_170328.jpg
20190921_155159.jpg
20190921_151142.jpg
20190921_145012.jpg
20190921_143010.jpg
20190921_211443.jpg
20190921_193300.jpg
 

Attachments

  • 20190921_165130.jpg
    20190921_165130.jpg
    327.2 KB · Views: 30
My other main hobby is model engineering: boats, stationary steam engines and miniature locomotives. Here's my 3 1/2" gauge Britannia that I finished last year. The build took ten years, but it was interrupted regularly by full size boating and our previous motorhome!
View attachment 364075

I'm working on this one: a 5" Stirling Single. It is clad in 26G Titanium: I had some lying around and it looks so much better than wobbly thin brass! I'll restart it when I've finished updating our Hymer E510.
View attachment 364077
It is truly great what the British can do in their sheds just think what we could achieve as a Nation
Amazing 👍👍👍
 
Another step in the right direction John. The clinker door on my truck took two attempts because I didn’t like the look of the first one. The hinges were out of proportion looking more like hinges on a cell door. There can’t be much more now to finish you’re Sterling.
My boiler leak chasing seems to have stoped so I am having a bit of time on the boiler fittings, clacks and safety valves. I made them before I had the milling machine. The clacks were a bit crude and dribble more than I would like.
Another Clayton builder said as designed the safety valves struggle to get rid of the excess steam. Typical Clayton, most of the build will do but could be better.

Subscribers  do not see these advertisements

 
I have had an interesting afternoon making new innards for the clack valves. I have a few different ideas to try other than the ball type.
I fancied trying making wing valves to replace the steel ball. I made a jig to hold the valves in the milling machine. The results were successful. At 80 psi there was no leakage.
In the mood for further testing I am going to try a type with a shuttle and an “o” ring tomorrow.
I have found two safety valves that were amongst the bits from my fathers workshop. He might of bought them to use on his Crampton. Not quite how the Clayton safety valves should be but they will be more reliable hence safer.
 
Nice work, well done
 
The shuttle valve with an "o" ring instead of a ball works. I had to slightly countersink the seat for the "o" ring a little. I need another two now so after our weekend away I will soon alter the others.
The safety valves have a pipe up the side of the chimney to keep the blow off steam out of the cab. I need to think how to adapt these safety valves I have found. In theory the pipes ned to be big enough not to restrict the safety valve blow off pressure. Any thoughts any one?.
The real test will of coarse be under steam. I can check the safety valves settings then.
 
The clacks and the water gauge are done. The water gauge bit back, all my fault. After trimming the glass to length I missed the off cut on the bench until I dropped the pliers on it. I found the last bit when I put my hand on it.
The take off for the drier coil in the smoke box proved a bit of a challenge mainly because the pipe is too long. It has to go under the blast pipe and then coils round to line up with the manifold on the other side. Tomorrow I will take it out and anneal it again. The new big nozzle should soon get that hot.
I am tempted to get everything fitted and perhaps raise steam with the gas torch to check things. I can control the torch easier than a lit fire.
What paints have you used John. I know some people recommend Phoenix Paints with there etch primer. They have a good choice of colours from all the companies, road and rail.
The GNR colours are nice. My local company Lacs and Yorks were mostly black.
A Clayton I have seen was Crimson Lake and a black chassis. The wheels were yellow making a bit too traction engine for a wagon. Plenty of time to think about that. Keep up the good work.

Subscribers  do not see these advertisements


Join us or log in to post a reply.

To join in you must be a member of MotorhomeFun

Join MotorhomeFun

Join us, it quick and easy!

Log in

Already a member? Log in here.

Latest journal entries

Back
Top