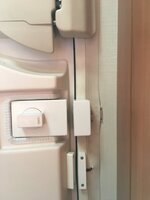
Dead locks for Hymer

Like the plates, I’ve been searching for something similar on eBay for ours.
In view of getting two locks I’m replacing the cheapo one I fitted earlier, luckily I never cut the cover.
I got them cut from brushed stainless 1.2mm 32id x 70mm square if you want some I can get them cut they cost £15 for two I can get some more done, if I had say 100 they would be £2 each but it is the set up fee ie loading the machine.
Have you noticed the amount of insulation in the front door of this fully winterised Hymer ? NO! that is because there isn't any just the outer skin a whole 1mm of alloy sheet! (y)
I would like a couple please, though it’ll be a while before I get around to doing ours as the Poppy Appeal is about to start. Not made a hole through for the lock bit yet so don’t know what our insulation is like on the door panel.
PM me and I’ll send you a cheque or do BACS if you prefer.
Thanks
 
A good company for those who constantly lose their keys
 
Oops

Subscribers  do not see these advertisements

 
Can someone tell me whether the deadlock is "lockable" from the inside?

What I mean is that, if someone on the outside breaks my plastic door window, it's easy to reach the door handle and lock on the inside. If they can simply unlock the deadbolt as well then it's pointless.

I'd want one that needed a key on the inside as well so you couldn't just twist it open.
 
Last edited:
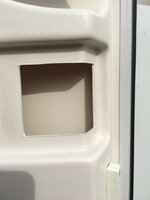
I know I’ve been pratting about since last year with this, had other stuff to do but today I cut out the hab door to start the process of fitting my Abus 4010 dead lock.
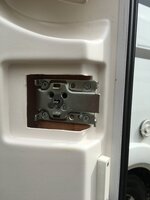
What did I find? Nothing, no metal lock plate or key hole like others appeared to have, just the insulated panel.
Looks like I’ll have to use a piece of wood or something else that’s 18-20mm thick to fit it.
66B168B1-0E9D-431E-887C-E4D5111C9EF7.jpeg

Subscribers  do not see these advertisements

 
On our van there was a piece of wood although it was factory fit in our Hymer, that is said to be built with no wood in the body.
 
Worth reading this if only to remember about offset for the outside lock http://www.motorhomelocks.co.uk/lock-fitting-guide/

Look forward to your next instalment @Hettie's Crew. Not sure whether the 4010/4025 are still available now.
I wish I had that type of door so I could have surface mounted it. I’ve not seen the type of door we have with an Abus 4010 fitted, which appears to be still available from abuslockonline.
I’ll have to pack it out to bring it level with an 18mm piece of marine ply or something. Lowdhams were useless when I enquired if a fitting kit was available for this type of door. I got a better idea by looking at new and used motorhomes in Campirama when we were in Belgium.
 
That looks extremely neat - well done. How did you get the cuts in the plastic so neat? Looks like deep scoring with a Stanley knife to mark the edge and then cut out up to the score line? My hab door looks identical to yours.

Abus 4010 is still available and now ordered. @Steve and Denise kindly sent me a plate some time ago.

Subscribers  do not see these advertisements

 
That looks extremely neat - well done. How did you get the cuts in the plastic so neat? Looks like deep scoring with a Stanley knife to mark the edge and then cut out up to the score line? My hab door looks identical to yours.

Abus 4010 is still available and now ordered. @Steve and Denise kindly sent me a plate some time ago.
I used a multi tool a bit like a vibrating saw then a file.
 
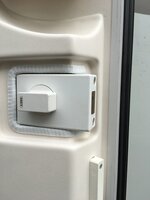
I marked it out using a steel rule and a sharp pencil, with the cover off and the lock in place. Pencil marks all over the surrounding plastic trim. Then very carefully drew where the hole should be using the reference points I had marked. Once I had what I thought was the rectangle I needed to cut out I reduced the size by a couple of mill and used a small steel rule and a Stanley knife. The plastic trim is quite hard and brittle compared to the hab door plastic which is easier to cut. If you lightly score the line then you just keep cutting, but don’t try cutting to the end of the line as you can slip and cut further than needed. Once there was a hole I had the cover on and off many times, shaving a little more off each time. The edges can be sanded, though I forgot to take any.
Finished the hab door today. Had to insert a piece of ply, stuck in place with two sided tape then marked it out and drilled through using a 32mm core bit until it just appeared at the other side, then drilled back from the outside. Surprised to see the door is ply and not insulated board.
 

Attachments

  • 9250B052-688D-4CA1-8293-4475FAE805BA.jpeg
    9250B052-688D-4CA1-8293-4475FAE805BA.jpeg
    63.5 KB · Views: 83
  • 5D4EAD4D-9E3C-4918-A9E8-A46F36F28A54.jpeg
    5D4EAD4D-9E3C-4918-A9E8-A46F36F28A54.jpeg
    51.7 KB · Views: 78
  • FC191813-4AD3-4940-A124-FD6DC39831A6.jpeg
    FC191813-4AD3-4940-A124-FD6DC39831A6.jpeg
    79.8 KB · Views: 88
  • 7647694D-5349-41F5-80E0-8F1F3E1AB359.jpeg
    7647694D-5349-41F5-80E0-8F1F3E1AB359.jpeg
    53.5 KB · Views: 85
  • 2F697C1E-9904-43ED-AC5F-0EA9571615BA.jpeg
    2F697C1E-9904-43ED-AC5F-0EA9571615BA.jpeg
    84.7 KB · Views: 86
Last edited:
I marked it out using a steel rule and a sharp pencil, with the cover off and the lock in place. Pencil marks all over the surrounding plastic trim. Then very carefully drew where the hole should be using the reference points I had marked. Once I had what I thought was the rectangle I needed to cut out I reduced the size by a couple of mill and used a small steel rule and a Stanley knife. The plastic trim is quite hard and brittle compared to the hab door plastic which is easier to cut. If you lightly score the line then you just keep cutting, but don’t try cutting to the end of the line as you can slip and cut further than needed. Once there was a hole I had the cover on and off many times, shaving a little more off each time. The edges can be sanded, though I forgot to take any.
Finished the hab door today. Had to insert a piece of ply, stuck in place with two sided tape then marked it out and drilled through using a 32mm core bit until it just appeared at the other side, then drilled back from the outside. Surprised to see the door is ply and not insulated board.
Looks good.
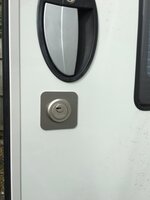
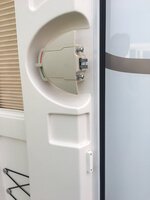
At Campirama today had a look at some locks. The factory fit ones have a different moulding around the lock.

IMG_20190326_174557-800x600.jpg


IMG_20190326_174624-800x600.jpg
 
Last edited:
From memory @Lenny HB i think the plastic covers were only about £300 ea from the UK dealers:eek:

I did price the whole kit at £1100!
 
I enquired through Lowdhams and got nowhere regarding covers/kit for our hab door which appears to be unlike others I’ve seen. Should have asked Maria at Campirama when we called in last year, I bet she would have known.

Subscribers  do not see these advertisements

 
From memory @Lenny HB i think the plastic covers were only about £300 ea from the UK dealers:eek:

I did price the whole kit at £1100!
Not sure exactly how much, haven’t kept too close a tally but I think the whole lot cost me under £160, including the two locks I ended up not using.
 
Last edited:
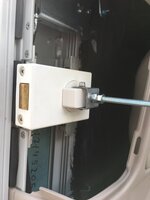
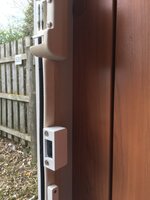
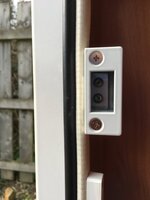
Thought I’d finish off the hab door today by fitting the keep. Used a piece of 3mmx20mmx20mm angle alloy secured to the internal wall with five self tapping screws and silicone, plus a 4mm bolt through the metal trim frame.
The position allows 16mm of the bolt to enter the keep rather than just butting against the frame.
 

Attachments

  • 632A26E7-D46E-45F2-B7E6-AAA4D7BFF9CF.jpeg
    632A26E7-D46E-45F2-B7E6-AAA4D7BFF9CF.jpeg
    88.6 KB · Views: 93
  • 0AD9E66A-A12C-45F4-8733-B54D78FCC51A.jpeg
    0AD9E66A-A12C-45F4-8733-B54D78FCC51A.jpeg
    68.6 KB · Views: 88
  • 684CF9BC-C85B-40F4-98EC-3E0E2CAD1799.jpeg
    684CF9BC-C85B-40F4-98EC-3E0E2CAD1799.jpeg
    62.1 KB · Views: 94
Hi can anyone give me the dimensions of the 4010 lock please.
Kate x
 
If you have a flyscreen (see my post #48 and attached pictures) fitting the Abus lock requires an extra degree of precision, as I found out the hard way!

The lock bolt is 15mm wide and the width of the cutout is 16mm which is as wide as possible without compromising the integrity of the nylon brush which sits in a groove in the frame. This means that when the door is shut the bolt has to sit up against the (black) inner part of the door trim. After cutting a hole in the door panel and fitting an 18mm plywood spacer to the door with double sided tape I just couldn't get the bolt to fit in the gap I had cut out with the Dremel. This was because, due to limited access I hadn't at that stage cut out the outer part of the flyscreen frame.

Having concluded that the spacer was too thick I then found it was so stuck it would no longer come away from the door without risking damaging the plastic door panel. Fortunately, being plywood it was possible to chisel a layer away - had it just been an ordinary wood block this would have been a right royal pain.

The frame is fitted to the wall with some serrated wedges and pulling firmly from the middle lets it bow out whilst remaining fixed top and bottom. This then allows much better access with a burr on the Dremel. Probably best to get some practice by cutting out the door panel first because even marking edges with a Stanley knife on the frame it's a freehand operation with limited space.The last photo shows the hole more clearly.

Fitting the key block and the backing plate is a pedant's nightmare if trying to keep the Abus name on the lock at 90 degrees to the plate and the door frame is important to you because each time I tightened the securing screws it twisted slightly!

EDIT: photos duplicated but not sure how to delete - sorry.


20190601_123147.jpg
20190601_123212.jpg
20190601_123212.jpg
20190601_123115.jpg
20190601_123147.jpg
20190601_123212.jpg
20190601_123228.jpg
20190601_123228.jpg


20190601_123115.jpg
20190601_123147.jpg
20190601_123212.jpg
20190601_123228.jpg

Subscribers  do not see these advertisements


Join us or log in to post a reply.

To join in you must be a member of MotorhomeFun

Join MotorhomeFun

Join us, it quick and easy!

Log in

Already a member? Log in here.

Latest journal entries

Back
Top