- Sep 7, 2021
- 253
- 597
- Funster No
- 84,021
- MH
- Benivan 120
- Exp
- Since 2021
Well today I have been making additional storage space in the van 
AutoTrail (who build the Benivan) just box in the space fore and aft of the wheel arches - presumably because it's the simplest way to deal with it rather than try to do carpentry around complicated shapes. From my point of view, while we haven't run out of storage space, more would be good to avoid having to pack so carefully every time, and the van has a fair amount of payload (~600kg), so it's worth doing a bit of work to open up those spaces. I've seen a few posts on doing this on various sites (including Autotrail v-line ones, since the Benivan is pretty similar).
Here's a picture of the rear bench seats - cushions removed - showing that no access to the space fore and aft of the wheel arch...

The first thing to do is obviously to get the wooden panel behind the hinged seat base up. It's held in by about 9 screws on the top which are all under adhesive cover stickers. Using a hair dryer on hot lets you remove the stickers without any damage to the veneer of the panel (and put them on a plastic bag for re-use). Remove the screws from the top, and also remove the two covers and screws from the end adjacent to the rear doors.
The timber panel is now being held in by two screws at the front end (which you can't unscrew because either the oven or the fridge is in the way - depending on which side you are doing) and some staples at the back (both front and rear). Starting at the middle of the panel, get something underneath and prise gently upwards. I have a slim pry bar which does the trick. Work towards the rear of the van, lifting the front of the panel until you reach the part next to the rear doors. Keep prying - this should dislodge the staples at this end, so now you can lift the rear of the panel.
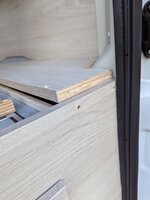
Lifting the rear 2 or so inches will start to pull on the screws that you cannot get at at the front end of the panel, hopefully making a gap of a millimetre or two. Once you have a bit of a gap, slip a fine tooth hacksaw blade into it (not junior hacksaw - those have bumps on the side - a full size hacksaw blade has smooth sides). You will find the two screws easily enough and within a few minutes be able to cut through them.
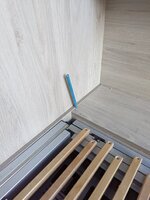
Once you have cut both screws, the only thing holding the board in will be the staples at the back of the board towards the front of the van - a little wriggling will work those free, revealing a good deal of space behind the wheel arch (more in a 6.36m van) and a bit of space in front of it...
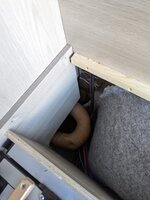

You might notice that there is limited (ie practically no) insulation below the seat level, but there is a heating duct down there. Nice design - something else to fix...
I've seen approaches using hinges along the front of the board so that the whole thing hinges up towards you, but wasn't really keen on that. Instead I decided to split the board into 3 - a central fixed section around the wheel arch and removable sections fore and aft to allow access to the new storage space. Obviously a little reinforcement is in order to make sure that the new, smaller, sections of board can support any required load. Off to the offcuts bin in the garage to find some bits and pieces of scrap wood and a few metal brackets...
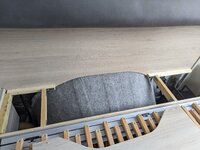
The old sliding compound mitre saw made short work of cutting the board into 3 (possibly the most useful DIY tool I've ever bought behind only a battery drill/driver). Pop a couple of 1 inch holes in the middle of the removable panels and you are nearly done - note that the screw cover stickers have been put back into place.
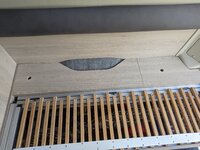
Actually, I also put some plastic blocks on the back of each removable section, carefully placed so that it sits snugly in the gap rather than rattling around.
As a bonus, I discovered that the larger, rear space is perfect to take the new LiFePO4 leisure battery that I am about to fit.

This will free up more space in the main under seat storage (where the current lead acid battery is). A bit of re-wiring required, but that will have to wait for another day. Anyway, I've got the same to do to the other side of the van first
cheers,
Robin
AutoTrail (who build the Benivan) just box in the space fore and aft of the wheel arches - presumably because it's the simplest way to deal with it rather than try to do carpentry around complicated shapes. From my point of view, while we haven't run out of storage space, more would be good to avoid having to pack so carefully every time, and the van has a fair amount of payload (~600kg), so it's worth doing a bit of work to open up those spaces. I've seen a few posts on doing this on various sites (including Autotrail v-line ones, since the Benivan is pretty similar).
Here's a picture of the rear bench seats - cushions removed - showing that no access to the space fore and aft of the wheel arch...

The first thing to do is obviously to get the wooden panel behind the hinged seat base up. It's held in by about 9 screws on the top which are all under adhesive cover stickers. Using a hair dryer on hot lets you remove the stickers without any damage to the veneer of the panel (and put them on a plastic bag for re-use). Remove the screws from the top, and also remove the two covers and screws from the end adjacent to the rear doors.
The timber panel is now being held in by two screws at the front end (which you can't unscrew because either the oven or the fridge is in the way - depending on which side you are doing) and some staples at the back (both front and rear). Starting at the middle of the panel, get something underneath and prise gently upwards. I have a slim pry bar which does the trick. Work towards the rear of the van, lifting the front of the panel until you reach the part next to the rear doors. Keep prying - this should dislodge the staples at this end, so now you can lift the rear of the panel.

Lifting the rear 2 or so inches will start to pull on the screws that you cannot get at at the front end of the panel, hopefully making a gap of a millimetre or two. Once you have a bit of a gap, slip a fine tooth hacksaw blade into it (not junior hacksaw - those have bumps on the side - a full size hacksaw blade has smooth sides). You will find the two screws easily enough and within a few minutes be able to cut through them.

Once you have cut both screws, the only thing holding the board in will be the staples at the back of the board towards the front of the van - a little wriggling will work those free, revealing a good deal of space behind the wheel arch (more in a 6.36m van) and a bit of space in front of it...


You might notice that there is limited (ie practically no) insulation below the seat level, but there is a heating duct down there. Nice design - something else to fix...
I've seen approaches using hinges along the front of the board so that the whole thing hinges up towards you, but wasn't really keen on that. Instead I decided to split the board into 3 - a central fixed section around the wheel arch and removable sections fore and aft to allow access to the new storage space. Obviously a little reinforcement is in order to make sure that the new, smaller, sections of board can support any required load. Off to the offcuts bin in the garage to find some bits and pieces of scrap wood and a few metal brackets...

The old sliding compound mitre saw made short work of cutting the board into 3 (possibly the most useful DIY tool I've ever bought behind only a battery drill/driver). Pop a couple of 1 inch holes in the middle of the removable panels and you are nearly done - note that the screw cover stickers have been put back into place.

Actually, I also put some plastic blocks on the back of each removable section, carefully placed so that it sits snugly in the gap rather than rattling around.
As a bonus, I discovered that the larger, rear space is perfect to take the new LiFePO4 leisure battery that I am about to fit.

This will free up more space in the main under seat storage (where the current lead acid battery is). A bit of re-wiring required, but that will have to wait for another day. Anyway, I've got the same to do to the other side of the van first
cheers,
Robin


