Damp motorhome project - Roof repair

Hi Argar

Sorry to hear of your dampness issues, as others have said take your time and aim to complete a small area at a time. You will get some great advice on this forum, it helped me complete my two projects!

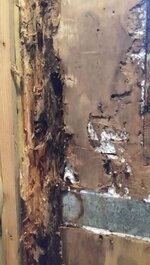
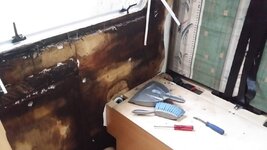
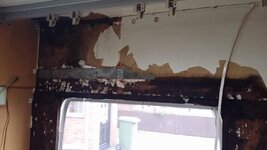
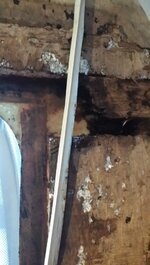
I brought a pin damp meter from Amazon, not the most expensive one but has helped me. Search for Brennenstuhl Moisture Detector, you can of course spend lots more money on a more sophisticated detector. You can usually tell if the wood is rotten by the look and feel, I would cut back approx 2-3" beyond the damaged area and there are various methods of joining. A simple lapjoint with decent glue and screws can work or a biscuit joint again glued. I used my multi tool to cut various joints on my repairs.

Don't rush and good luck with your repair
 
Hi Funsters,

Earlier this year we went into our 2007 Eura Mobile Integra (A class) to find the back of the motorhome damp with water dripping from the roof in the back. At this point, it didn't look too bad and we thought we'd caught it early enough. we did a temporary fix and tapped over the edge seals of the van and left a dehumidifier on inside. We left the van like this for a couple of weeks before making the decision to investigate further as the ceiling was getting softer.

Having removed the cupboards at the rear (nightmare job due to how the vans are built) and removing the ceiling boards we realised the extent of the damage. A number of the beams are rotten, the plywood on the top of the beams is delaminated over half the van. We'd got to the point of no return as we now couldn't take the van anywhere to be worked on so starts the job of repairing the damp.

Having read through various of the threads on the forums we like many others are now finding the more we strip out the worse it gets, water gets everywhere! We knew the van had a leak before we purchased it which had been professionally repaired (although we're now not sure of the quality of that repair!)

We've found the source of the leak is the seals around the top edge of the van most of which are degraded and split :(
View attachment 433774

At the moment, before the weather turns, the plan is to get the rotten beams of the roof replaced and then get new plywood on the roof. The roof is covered with tarpaulin to avoid any further damage.

We've managed to lift the roof for now allowing access to remove the plywood.
View attachment 433773

Help and support on how to proceed will be greatly appreciated.
I had a water ingress problem with my integra. I bought some special roofing paint and painted 4 coats on the edge seals and all the roof and heki lights to seal it, then later on I did the whole roof and jobs a gud un!. You have to protect your investment marra.👍
 
I had a water ingress problem with my integra. I bought some special roofing paint and painted 4 coats on the edge seals and all the roof and heki lights to seal it, then later on I did the whole roof and jobs a gud un!. You have to protect your investment marra.👍
Thanks for that bobski interesting you've had the same issue with your's what age is your van?

Can you remember what you used?
 
I feel your pain, we discovered our leak through a stain on starting above the window.
It didn't seem bad until i got into it, it made my wife cry when i tore the wall boards off.
But steady step by step progress soon fixed it, it was a miss drilled hole during manufacture and a long term steady water leak that caused all that damage, when i got to it i could seen daylight!
Its stronger than original now, especially with the 1.5mm galvanized brackets and good old fashoined wood joints and Cascamite furniture glue,
You will feel a real sense of achievement when its done.

Subscribers  do not see these advertisements


Attachments

  • received_3652989854754657.jpeg
    received_3652989854754657.jpeg
    101.7 KB · Views: 241
  • received_381404822993666.jpeg
    received_381404822993666.jpeg
    84.6 KB · Views: 253
  • received_1001645850304377.jpeg
    received_1001645850304377.jpeg
    139.4 KB · Views: 242
  • received_663368244319173.jpeg
    received_663368244319173.jpeg
    113.3 KB · Views: 234
  • received_381404822993666.jpeg
    received_381404822993666.jpeg
    84.6 KB · Views: 228
  • received_395542711851986.jpeg
    received_395542711851986.jpeg
    87.7 KB · Views: 238
  • received_1448404298683695.jpeg
    received_1448404298683695.jpeg
    102.5 KB · Views: 230
  • received_4450683538340280.jpeg
    received_4450683538340280.jpeg
    80.7 KB · Views: 227
  • received_476254123258552.jpeg
    received_476254123258552.jpeg
    70.5 KB · Views: 226
  • received_641087516576165.jpeg
    received_641087516576165.jpeg
    56.6 KB · Views: 216
  • received_3385507424817604.jpeg
    received_3385507424817604.jpeg
    67.6 KB · Views: 214
  • received_738709383401107.jpeg
    received_738709383401107.jpeg
    71.3 KB · Views: 224
  • received_694164474852363.jpeg
    received_694164474852363.jpeg
    73.7 KB · Views: 213
  • received_800124383890224.jpeg
    received_800124383890224.jpeg
    76.3 KB · Views: 217
  • received_973619846452810.jpeg
    received_973619846452810.jpeg
    53.4 KB · Views: 222
Thanks for that bobski interesting you've had the same issue with your's what age is your van?

Can you remember what you used?
My van is 2006 810 integra. The paint that I used is called, ACRYPOL + SOLAR WHITE. It has fine strands mixed in with it. Cost around £45 for large tin, enough to do the roof.its worth doing when you finish the inside ceiling.
 
Johnthebike50 - respect on that repair looks huge - can be soul-destroying as we ripped out more and more ceiling and trims 😭
 
bobski - that would be the same imported batch of Integra's our's is the 710 with a single rear axle.

Was there much interior damage?
 
As above, sorry I forgot to mention tanking paint, like acypol which contains rubber fibres. It is regularly used in a number of applications from sealing swimming pools and water tanks to sealing roof leaks.

With older aluminium skinned vans, they develop loads of pin prick holes and so become porous and have proven to be really unsuited to building motorhomes. The outer skin is a 1.5mm layer protected by the original paint. Any scratches and oxidisation quickly allow the panel to be eaten away. A couple of coats of tanking paint will be good for 10+ years unless it gets damaged

Subscribers  do not see these advertisements

 
I'm no expert either but after making sure the seals are now good, tanalised timber would be preferable, its injected to reduce risk of rot if it gets wet.
You could use recessed galvanised jointing plates for timber joints and sikaflex gor bonding.
Some of the threads on rot are quite informative if you do a search.
Good luck, it'll be worth the effort.
Better still use aluminium mouldings as it is light in weight but as strong as steel (which rusts)
 
As above, sorry I forgot to mention tanking paint, like acypol which contains rubber fibres. It is regularly used in a number of applications from sealing swimming pools and water tanks to sealing roof leaks.

With older aluminium skinned vans, they develop loads of pin prick holes and so become porous and have proven to be really unsuited to building motorhomes. The outer skin is a 1.5mm layer protected by the original paint. Any scratches and oxidisation quickly allow the panel to be eaten away. A couple of coats of tanking paint will be good for 10+ years unless it gets damaged
Eura-Mobil gave up wood and the use of aluminium outer skins some years back as far as I am aware. Certainly the roof on my own 2009 model is not alluminium skinned having installed satellite dish and a solar panel up there
 
bobski - that would be the same imported batch of Integra's our's is the 710 with a single rear axle.

Was there much interior damage?
no damage at all. It started leaking through the roof and dripping inside whilst we were away and the weather was very bad. the water was leaking into the cable troughs in the top of the cupboards. i had to drill a hole to drain off the water and i sealed it all up the first dry day that we got. Ive just had a Habitation service and the damp results were normal. suppose we got lucky because we keep the MH in storage and it could have gone on for a long time without us knowing. It may be that the leaks occur when the van gets to a certain age?. Good luck with the repair.
 
Apologies Kraken quoted you on a few posts when it should have been The_Kraken. :(

No problem at all.

Yes, I can confirm that the wallboard adhesive I used (purchased from Magnum Motorhomes) is an all or nothing mix. You can't part mix it.

It is really good stuff.
 
No problem at all.

Yes, I can confirm that the wallboard adhesive I used (purchased from Magnum Motorhomes) is an all or nothing mix. You can't part mix it.

It is really good stuff.

The Big1 has mentioned that with careful measuring / weighing it would be possible to use it in smaller quantities and I'm not going to argue with the Big1!

Subscribers  do not see these advertisements

 
The Big1 has mentioned that with careful measuring / weighing it would be possible to use it in smaller quantities and I'm not going to argue with the Big1!
The 2 part I have used previously allowed for partial use, but I have seen some that once the seal is broken must be used up quickly
 
The 2 part I have used previously allowed for partial use, but I have seen some that once the seal is broken must be used up quickly

Thanks for that - used to measuring Gelcoat so should be able to measure correctly.

Having trouble finding it at O'Learys and had no response from a query!

Many Thanks
Andy
 
With regards to bonding wood to wood, I used West System Epoxy(105). I used to slower hardener (206). You can buy a small kit, that should be plenty. Also grab some of the filler powder (406), this allows you to thicken to epoxy to make it easier to fill etc.

I bought the set of pumps that fix directly into the 105 and 206 bottles ( the numbers will become clear when you read about the system) 1 pump of each gives the correct mixture. I also got some plastic mixing cups, disposable small brushes and wooden spatulas ( Ebay and Amazon ). You will also want disposable gloves, a mask and plenty of blue roll.

The West System Epoxy is very easy to use, and I was shocked at just how strong it is. It is definitely stronger than the timber. However as mentioned above if you can create lap joints when cutting out your old timber then it will all help add strength.

<Broken link removed>

I got my stuff from the above place but on Ebay.

I also used a bit of polyurethane adhesive for replacing small areas of ply, it bonds very well to polystyrene and also foams up to fill gaps. Make sure you clamp etc as it will move the parts if you don't.

Most important thing is to find you leak/leaks. the water can track about a bit so have a good look around. also as said if the timber is just wet it will dry out fine. If it is rotted you will know, the multi-tool will removed the rotted stuff like it isn't even cutting.

I have not put all of my repairs into a write up yet but they are along the lines of Darrens (DL220). Take your time, drink lots of tea and i am sure you can crack it.

good luck

I used the West System when repairing a soggy caravan, brilliant stuff. Just remembered to support both sides of roof or wall that is being bonded unless you like curved walls & roofs.
 
Quick question - one job I need to do is replace the plywood on the roof, does anybody know a company where you can get 3mm plywood sheets delivered, just want to do a final check before I opt for 3.6mm as the closest match?

Also what type of plywood would people recommend?

Thanks
Andy
 
the best to use is the lightweight wall board used already, probably vohringer. Local delivery from a few suppliers, but having 8x4 sheets couriered would be silly money. A bonus with using wallboard is that it is already faced with vinyl and you can choose a board to match your original.
Where abouts are you based?

Subscribers  do not see these advertisements

 
Why not use a polymer based sealant / adhesive to glue to the aluminium exterior panels and a polyurethane d4 or modified pva d3 glue for the wood to plywood bond?

Cheers James
 
the best to use is the lightweight wall board used already, probably vohringer. Local delivery from a few suppliers, but having 8x4 sheets couriered would be silly money. A bonus with using wallboard is that it is already faced with vinyl and you can choose a board to match your original.
Where abouts are you based?

Hi this is the unfaced plywood used on the outer skin - our build on the ceiling is grp/plastic with a sandwich of plywood, insulation/wood and then the faced ceiling board. I'm ordering my ceiling/wall board from Magnums (enough to make it worthwhile), it's unfaced 3mm ply I'm looking for.

We're based in Loughborough!
I thought that was what you meant, but sourcing it unfaced although possible would mean that the ply would have no external damp resistance. I would use a sheet of the cheapest wallboard available, as nobody is going to see it when finished. Quality 3mm ply is little difference in cost and would mean another delivery charge. just add a sheet to the magnums order
 
Hi,

Been taking a rest for a week or so whilst waiting for deliveries!

Question on the bonding the plywood outer roof skin to the polystyrene - what's best to use for this. The inner skin will be bonded with the 2 part wallboard adhesive.
 
Hi,

Been taking a rest for a week or so whilst waiting for deliveries!

Question on the bonding the plywood outer roof skin to the polystyrene - what's best to use for this. The inner skin will be bonded with the 2 part wallboard adhesive.
I would use a skim of puraflex40 which is a cheaper option to sikaflex but still made by them. It is a urethane glue and sealant

Subscribers  do not see these advertisements

 
May I suggest you use Celotex rather than polystyrene. The Celotex has a skin that you can use a contact adhesive with, having that skin it also stronger and easier to handle. Using an contact adhesive means it is is place as soon as you put it up, speeding up the job and no need to use pit props etc to hold it in place while glue is drying.
 
Thanks TheBig1 and 68c for your advice - I have ordered Celotex for the insulation layer will look at the adhesives tonight!
 
Hello, I used contact adhesive on my repair, It works well, but the first batch i used tended to melt the polystyrene a bit, so I used it a bit more sparingly on the sheeting adjusting the spray pattern wide,
I dont know what they use in the manufacture of the main skin of the van but getting the old wet Polystyrene off the outer skin was the most difficult and time consuming process. Like a sponge in places even after 2 weeks of "drying" I bought a cheap oscillating Multi tool from Argos, Brilliant, removed old stuff, cut sheet in difficult places and cut the wood joints, I bought prettywell all the stuff from Magnum, they not the cheapest but helpful and prompt
 
one big disadvantage of contact adhesive, most will let go if you heat them up. The roof gets pretty hot in summer, if we get one
 
It was suggested to me when getting ready to do it, to use fibreglass resin, it seemed a messy option to me but could bevery strong

Subscribers  do not see these advertisements


Join us or log in to post a reply.

To join in you must be a member of MotorhomeFun

Join MotorhomeFun

Join us, it quick and easy!

Log in

Already a member? Log in here.

Back
Top