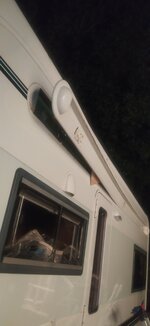
Problem - the awning carrier has become detached.

Joined
Aug 11, 2021
Posts
119
Likes collected
309
Location
North Wales, UK
Funster No
83,361
MH
AutoTrail Scout SE
Exp
Since1963 with parents
Hi All,
last outing, the roll out awning back froame moulding has become detached at the front end on our AT Scout 2006, , as per the attached pictures.
1. I cant easily see how to remove the awning and mechanism - clues please
2. I can't see what make this is, can anyone assist working out make and model?
3. I cant see any obvious fixings to the van side in the gap that has opened up!

Any pointers on how to dismount and repair would be very very helpful!!

Thanks
Jim
IMG_20220915_135121.jpg
IMG_20220915_135125.jpg
 
Last edited:
I'd look on the inside to see whether fixings are supposed to come right through?
 
No attached pictures?

I'd look on the inside to see whether fixings are supposed to come right through?
Thats just it - cant see any.
I would like to remove the awning mechainism, then peel away the backing moulding frame, which is stuck with sealant/mastic. This is what has given way. I will post another pic showing the box in the van side panel

Subscribers  do not see these advertisements

 
I have the Dakota, so basically the same van and looks to be same age etc. Defo same awning, with the mounts in the front cupboard and the cupboard in the bathroom on mine.

Watching with interest and hope it’s not too much of a hassle.
14650772-3701-422B-8487-2418420D568F.jpeg

D1F77D1C-B499-45D2-90AB-CA9574617B16.jpeg

B13DEC9D-B00F-49C6-92DB-90C9AF988257.jpeg
 
Good luck . Luckily you appear to have found the problem early enough . If this had been left over winter I can imagine the damp could have been horrific .
 
2014 Dakota -we need a new awning due to hail damage and the insurance have agreed to pay.
We are booked into the AT factory to have this done as the normal Dealer we went to found they couldn’t do it.
The awning itself is fixed to the moulding on the floor in the factory. It is then the moulding which is fixed to the van being bolted though and glued!
You apparently cannot get the awning off without taking the moulding off first.

Not sure if they did things this way in 2006 but it looks similar to ours.
They were built proper back in thems days, they were and none of this moulding glue malarkey.

Got a 2006 Dakota, excellent bit of kit 😁👍🏻
 
2014 Dakota -we need a new awning due to hail damage and the insurance have agreed to pay.
We are booked into the AT factory to have this done as the normal Dealer we went to found they couldn’t do it.
The awning itself is fixed to the moulding on the floor in the factory. It is then the moulding which is fixed to the van being bolted though and glued!
You apparently cannot get the awning off without taking the moulding off first.

Not sure if they did things this way in 2006 but it looks similar to ours.
I would hazard a guess that you may be right. We shall see when my muscle arrives to wrestle the whole shooting match to the floor this evening
 
Good luck.
Thanks. We have got the awning mech down, and sliced through the nearly knackered top bead of mastic, but the lower edge mastic is fighting us every inch. Got to the aft of the door frame, but its dark now.
Back on it tomorrow morning.
 
Thanks. We have got the awning mech down, and sliced through the nearly knackered top bead of mastic, but the lower edge mastic is fighting us every inch. Got to the aft of the door frame, but its dark now.
Back on it tomorrow morning.
Wishing you seriously good luck and its not a damp problem, or if it is, it is only minor and you have caught it early. 😊👍
 
Wishing you seriously good luck and its not a damp problem, or if it is, it is only minor and you have caught it early. 😊👍
My biggest problem is.....
IMG_20220915_203629.jpg

Subscribers  do not see these advertisements


Attachments

  • IMG_20220915_203629.jpg
    IMG_20220915_203629.jpg
    134 KB · Views: 30
Well, what a twat that was!! It took nearly 4 hours to get the mastic separated to remove the moulding frame. Carefully using a flexible Stanley blade to saw through and keeping the joint under tension with a big piece of play, moving it as it gave way.
The top mastic was easy to get off, which is a worry....
Fortunately, the inside of the moulding frame on the van side is fibre glassed (very thinly) onto the veneer back surface of the van wall. Therefore there is only 3mm of plywood and a bit of decorative paper holding the awning inside bracket. No wonder it gave way - no support from the main wall thickness at all.
My stainless reinforcing plate will take care of that, and I will replicate it at the rear end fixing too. The ABS trim cover on the inside is big enough to hide all of this.
Next job is to put some woven fibre glass mat over the damaged area and brush resin into the area. There are a couple of small areas where the resin came away from the recess exposing the wood frame in the main van wall sie sandwich, but it is all solid luckily.
The next twat of a job is to remove all the mastic sealant from the moulding itself, which will probably take all weekend as there is just over 8 metres of beaded sealant to get off. The van wall panel has virtually no mastic stuck to it, so I just need to clean it off, touch up a couple of areas where the Stanley blade scuffed the paint, but it is all superficial and wont be seen.

Next I will send an email to Auto Trail support asking for the mastic spec, as I think it is the right thing to use again, survived quite well for 16 years.

We have a Westfield 400 inflatable awning that hangs off the beading rail on the current mechanism, I am wondering if I should attach a length of Kedor C section fixed rail just under the wind out awning, as I can fix it a lot more frequently to the van side wall? Anyone done this?
IMG_20220916_132912.jpg
IMG_20220916_132749.jpg
IMG_20220916_132912.jpg
 
I fixed a length of C-section to the actual awning underside - it makes it easier to thread anything through it if the wind-out is wound out a little…….(y)
 
I fixed a length of C-section to the actual awning underside - it makes it easier to thread anything through it if the wind-out is wound out a little…….(y)
We already have a bead rail built into the wind out awning, just trying to spread the load out more
 
As it sounds like you know what you are doing, I would repair the torn fibreglass and bond on a sheet of stainless to take the structural weight, as well as oversized stainless plates inside. Then bond the fibreglass frame back in with a few tubes of Sikaflex rather than mastic. That should keep it watertight and stronger than when it left the factory

Subscribers  do not see these advertisements


Join us or log in to post a reply.

To join in you must be a member of MotorhomeFun

Join MotorhomeFun

Join us, it quick and easy!

Log in

Already a member? Log in here.

Latest journal entries

Back
Top