
Navigation
Install the app
How to install the app on iOS
Follow along with the video below to see how to install our site as a web app on your home screen.
Note: This feature may not be available in some browsers.
More options
You are using an out of date browser. It may not display this or other websites correctly.
You should upgrade or use an alternative browser.
You should upgrade or use an alternative browser.
Milenco Cab Door Deadlocks
- Thread starter DBK
- Start date
minesapint
Free Member
Hello all, I have fitted the Milenco cab and habitation door locks to my Hobby Van, which is based on a transit. They fit well and do the job "I Hope ". It was a relatively easy fit for all three locks. Pics attached, 1 -2 Cab doors 3-4 Habitation door Inside view and outside view.. Hope this helps.I am fairly sure they wouldn't. The plinth is about 50mm high. I can measure them exactly if you want - but about to rain outside so this may be delayed!
I think these are only for MHs built on a PVC or a C Class which has the Fiat cab. For any other MH, such as a Transit (which @Wombles has done) you would have to measure the distance from the door pillar to the door frame to be sure if they would fit.
For a MH with a door flush on the inside, perhaps an A class, then you would need something else, perhaps the sash window locks mentioned in the other thread here: (Post #42) http://www.motorhomefun.co.uk/forum/threads/motorhome-robbery-fiat-security.114551/page-3 You could fit blocks under the arm but it would protrude into the cab a long way if everything was flush.
")

Attachments


Excellent information/instructions. Will have a look at these for our Peugot. Thank you.A recent thread drew attention to the danger of thieves getting in through the cab doors when the occupants are asleep, even when the doors are locked. Unfortunately, I have been known not to even lock the doors when we go to sleep and as I often leave my camera gear in a rucksack in the driver's foot well I suspect it may only be a matter of time before someone helps themselves to it!
So I decided to fit some cab door deadlocks, on the assumption once we are on a pitch or aire we can close them and then just enter and leave through the habitation door, which as we have a PVC is a great big metal sliding thingy which my wife sleep against and I doubt anyone could climb over her without waking one of us so even if I do forget to lock the doors we should be reasonably secure.
We bought the locks from John Cross getting the 10% Funster discount which effectively pays for the post and packing.
The instructions are multi-lingual in that they are just pictures with no writing at all.
The locks are relatively easy to fit but getting them in the right position is tricky and moving them if you drill the holes in the wrong place would be very tricky, so you have to get it right first time.
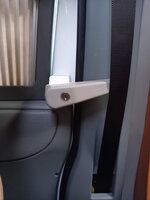
The lock consists of two main parts, an arm which swings and a squarish shaped bit the arm attaches to which I called a plinth. The wordless instructions are silent on the issue of part numbers and names. It is the plinth bit which has to be fixed accurately to the door which is the first operation. There is also a small third part which is a grey plastic cover which clips over the arm when all is fitted.
The only clue in the instructions is where it shows they are to be positioned 10mm from something, but what the something is is not obvious at first glance. I thought they meant 10mm from the edge of the door when I first looked at it but it isn't, it is 10mm from the inside of the door frame. So to get the plinth in the right place you have to work from the inside with the door initially shut.
The trick is to place the plinth so there is enough clearance for it and the swing arm to clear the door frame.

In the picture above the door has been opened slightly and as the plinth swings past it the gap which was initially 10mm closes up and by the time the arm has been added the gap was almost non-existent.
Realising getting the plinth position correct was key I first fitted it with a single screw. The instructions show a 5mm drill but I found that a bit generous after doing the first one so all subsequent holes I drilled to 4mm. Marking the door for the hole is a bit tricky, pencil didn't work so I used a fine tip marker type pen.
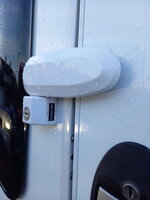
The picture below shows the plinth in position but still only fixed by a single screw in the top left corner.

Note the plinth sits on a rubber gasket. When I was sure the plinth was in the right position I used the 5mm drill through the holes in the plinth to make a spot mark on the door frame where the other holes were to be drilled though I think 6mm would be better as mentioned later. I then removed the plinth.

In hindsight I was lucky to get away with spotting all three screws as the bottom right screw actually goes though metal which is slightly sloping and when I came to do the plinth on the other door the plinth moved as the drill ran down the slope. So I advise only spot the hole directly underneath the first one, re-fit the plinth and then do the other ones and I would also suggest use a 6mm drill to do the spotting - just make sure you only mark the door of course and don't drill through! This is one place a blunt drill is useful.
Anyway, after drilling the other 3 holes - I pilot drill with a 1.5mm or 2mm first then open up to 4mm, not 5mm as the instructions suggest, you can then fit the plinth, not forgetting the rubber gasket, then fit the swinging arm using the special bolt but do remember to fit the white rubber bungs before you fit the arm for the last time. I forgot on one side and though the top two are easy to fit the bottom ones aren't - but I managed it eventually!

The hex head bolt can be seen sticking out of the arm in the picture above. Now comes a real point of no return and before making this move make absolutely certain the lock is in the right place. Then go and have a cup of tea to calm you nerves, come back and tighten the bolt so the head sheers off at the weak point machined into it.It is now fixed more or less for ever, removing the lock is not an option beyond this point without more or less wrecking it.

See how close the arm comes to the door frame as the door opens in the picture above, taken before the bolt head had been sheared off. When the plastic cover has been fitted to the arm I found it just lightly rubbed the door frame so when I came to do the other side I fitted the plinth so it was 12mm away from the door frame rubber when the door was shut.
The installation is not perfect as there are switches on my door frames which foul the arm and prevent it from easily moving to the horizontal position, where you can lock them in position.

So mine stop about where shown in the picture above, which also shows the grey plastic cover in place. They can be pushed down further but it is a bit of a struggle and I am not sure if we want to lock them anyway as this could be critical if we had say a fire and needed to get out of one of the cab doors for some reason. Even in the position shown above the doors cannot be opened more than a tiny fraction, just enough to uncompress the rubber door seal, no gap appears, so I don't see anyone being able to slide something in to move the arm out of the way.")
From the pictures it seems the fitting on a Transit front doors is the same as mine leaving a slight gap. With mine as first fitted you could open the doors about quarter of am inch giving you chance to get a pry bar in the gap.
Now it hardly moves at all with the spacers fitted.
Now it hardly moves at all with the spacers fitted.
Subscribers do not see these advertisements
Also there is an error in the fitting instructions showing placement to be directly over the corner plastic cap of the door arm. It is essential the you can remove this cover in the future if you ever need to access the inner workings of the door like locks etc.. so allow probably 12-15mm above the door corner cap, making it very tight to place the cab door lock on a totally flat surface and clearance from the door frame as the whole lock swings out with the door. Hope this helps as too late if you have placed cab lock right ontop of the cap and destroying (corner cap) it is the only way to remove it because of the plastic tabs holding it that release in an upward motion hence clearance required above.A recent thread drew attention to the danger of thieves getting in through the cab doors when the occupants are asleep, even when the doors are locked. Unfortunately, I have been known not to even lock the doors when we go to sleep and as I often leave my camera gear in a rucksack in the driver's foot well I suspect it may only be a matter of time before someone helps themselves to it!
So I decided to fit some cab door deadlocks, on the assumption once we are on a pitch or aire we can close them and then just enter and leave through the habitation door, which as we have a PVC is a great big metal sliding thingy which my wife sleep against and I doubt anyone could climb over her without waking one of us so even if I do forget to lock the doors we should be reasonably secure.
We bought the locks from John Cross getting the 10% Funster discount which effectively pays for the post and packing.
The instructions are multi-lingual in that they are just pictures with no writing at all.
The locks are relatively easy to fit but getting them in the right position is tricky and moving them if you drill the holes in the wrong place would be very tricky, so you have to get it right first time.
The lock consists of two main parts, an arm which swings and a squarish shaped bit the arm attaches to which I called a plinth. The wordless instructions are silent on the issue of part numbers and names. It is the plinth bit which has to be fixed accurately to the door which is the first operation. There is also a small third part which is a grey plastic cover which clips over the arm when all is fitted.
The only clue in the instructions is where it shows they are to be positioned 10mm from something, but what the something is is not obvious at first glance. I thought they meant 10mm from the edge of the door when I first looked at it but it isn't, it is 10mm from the inside of the door frame. So to get the plinth in the right place you have to work from the inside with the door initially shut.
The trick is to place the plinth so there is enough clearance for it and the swing arm to clear the door frame.
In the picture above the door has been opened slightly and as the plinth swings past it the gap which was initially 10mm closes up and by the time the arm has been added the gap was almost non-existent.
Realising getting the plinth position correct was key I first fitted it with a single screw. The instructions show a 5mm drill but I found that a bit generous after doing the first one so all subsequent holes I drilled to 4mm. Marking the door for the hole is a bit tricky, pencil didn't work so I used a fine tip marker type pen.
The picture below shows the plinth in position but still only fixed by a single screw in the top left corner.
Note the plinth sits on a rubber gasket. When I was sure the plinth was in the right position I used the 5mm drill through the holes in the plinth to make a spot mark on the door frame where the other holes were to be drilled though I think 6mm would be better as mentioned later. I then removed the plinth.
In hindsight I was lucky to get away with spotting all three screws as the bottom right screw actually goes though metal which is slightly sloping and when I came to do the plinth on the other door the plinth moved as the drill ran down the slope. So I advise only spot the hole directly underneath the first one, re-fit the plinth and then do the other ones and I would also suggest use a 6mm drill to do the spotting - just make sure you only mark the door of course and don't drill through! This is one place a blunt drill is useful.
Anyway, after drilling the other 3 holes - I pilot drill with a 1.5mm or 2mm first then open up to 4mm, not 5mm as the instructions suggest, you can then fit the plinth, not forgetting the rubber gasket, then fit the swinging arm using the special bolt but do remember to fit the white rubber bungs before you fit the arm for the last time. I forgot on one side and though the top two are easy to fit the bottom ones aren't - but I managed it eventually!
The hex head bolt can be seen sticking out of the arm in the picture above. Now comes a real point of no return and before making this move make absolutely certain the lock is in the right place. Then go and have a cup of tea to calm you nerves, come back and tighten the bolt so the head sheers off at the weak point machined into it.
See how close the arm comes to the door frame as the door opens in the picture above, taken before the bolt head had been sheared off. When the plastic cover has been fitted to the arm I found it just lightly rubbed the door frame so when I came to do the other side I fitted the plinth so it was 12mm away from the door frame rubber when the door was shut.
The installation is not perfect as there are switches on my door frames which foul the arm and prevent it from easily moving to the horizontal position, where you can lock them in position.
So mine stop about where shown in the picture above, which also shows the grey plastic cover in place. They can be pushed down further but it is a bit of a struggle and I am not sure if we want to lock them anyway as this could be critical if we had say a fire and needed to get out of one of the cab doors for some reason. Even in the position shown above the doors cannot be opened more than a tiny fraction, just enough to uncompress the rubber door seal, no gap appears, so I don't see anyone being able to slide something in to move the arm out of the way.
Lenny HB
LIFE MEMBER
- Oct 18, 2007
- 60,466
- 191,726
- Funster No
- 658
- MH
- Carthago Compactline
- Exp
- Since 2008 & many years tugging
John fitted them 8 years ago.Hope this helps as too late if you have placed cab lock right ontop of the cap

Thanks I did realise but just incase someone follows his link like I did yesterday and before they permanently install them as per instructions from Milenco not taking into account a gap for the corner cover on doorJohn fitted them 8 years ago.