Anybody into 3d printing???

This is a timely thread as I too have just considered getting started in 3d printing which was triggered by the Aldi offering which is now £250 - down £50 on last year. I think it's something my grandchildren will enjoy too.
Found lots of info on YouTube - one of the most useful called "13 things I wish I knew when I started" or something like that!
Lots of reviews on there too, which has got me seriously considering one of the various "Creality" models or one of the "Prusa" offerings along with "Cura" slicer software which creates the coordinates for each layer or slice.


Yes, I watched that but once again little info on what to do to get to the printing stage
 
Yes, I watched that but once again little info on what to do to get to the printing stage
Steps to making a "thing":
  1. You need a 3d model. This is the digital 3d shape that you want to make. You might have created this yourself in your favourite CAD package, or downloaded it from Thingiverse. If you are jumping in at the deep-end, you might have attempted to scan an object and created a model from the point cloud (don't expect to do this for anything that has to be dimensionally accurate and it takes a LOT of work). The most common file format to describe a 3d object is an STL file.
  2. Slice your model. You use a piece of software that understands the type of printer you have and, through some really impressive maths and algorithms (magic as far as I'm concerned), it figures out the 'tool path' that your printer will follow when creating the object. E.g. move the head from A to B, squirting goop at rate C. This creates a file that contains G-code.
  3. Run the G-code. The G-code is then fed, line by line, into your printer. It's just a list of instructions on where to move the head next and at what speed and acceleration. You might be feeding G-Code into the printer in real-time via a USB cable from your PC, or it could be on an SD card, or you could use a Raspberry Pi (OctoPi is excellent) or your printer may have a small PC built in. Your Slicer might be smart enough to communicate directly with the printer.
OK.. thanks for that.. as I have zero ability with any CAD package I have tried quite obviously 3d printing is not for me
 
What have folks made on their 3d printers?
Any photos?
 
Steps to making a "thing":
  1. You need a 3d model. This is the digital 3d shape that you want to make. You might have created this yourself in your favourite CAD package, or downloaded it from Thingiverse. If you are jumping in at the deep-end, you might have attempted to scan an object and created a model from the point cloud (don't expect to do this for anything that has to be dimensionally accurate and it takes a LOT of work). The most common file format to describe a 3d object is an STL file.
  2. Slice your model. You use a piece of software that understands the type of printer you have and, through some really impressive maths and algorithms (magic as far as I'm concerned), it figures out the 'tool path' that your printer will follow when creating the object. E.g. move the head from A to B, squirting goop at rate C. This creates a file that contains G-code.
  3. Run the G-code. The G-code is then fed, line by line, into your printer. It's just a list of instructions on where to move the head next and at what speed and acceleration. You might be feeding G-Code into the printer in real-time via a USB cable from your PC, or it could be on an SD card, or you could use a Raspberry Pi (OctoPi is excellent) or your printer may have a small PC built in. Your Slicer might be smart enough to communicate directly with the printer.
Thanks for that, no need to encourage me to buy yet another computer :)

I am going to practice with Cura before I buy a printer to ensure I can get my head around the software.

Subscribers  do not see these advertisements

 
OK.. thanks for that.. as I have zero ability with any CAD package I have tried quite obviously 3d printing is not for me
I'd guess that most 3d printer owners never touch CAD. There's so much stuff on Thingiverse, it's like picking from a library. Also, give TinkerCAD a try, it's really simple.
 
What have folks made on their 3d printers?
Any photos?
I wanted a holder/mount for my Netgear M1 and TP link travel router to mount them inside the MH. I found the files on thingverse or what ever it is and sent the files to a 3d print house £15 to £20 each and ideal for what I wanted.
 
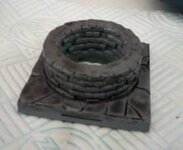
This is a well our son made (he makes war gaming scenery). The actual object is larger than the photo.
 

Attachments

  • well.jpg
    well.jpg
    7.9 KB · Views: 46
I use this 'thing' quite often with the motorhome:
filler.jpg

The one I printed isn't orange, though.

I've also printed brackets for the mi-fi and mains and battery monitors, coat hooks for the garage and odd bits and pieces for home, including brackets for an antique gun to mount on the wall.

Thngiverse is a brilliant resource, so you could print stuff (some of it useful) for years without designing anything yourself. CAD can be a bit fiddly, even if you are a bit of a techie. I've designed a few things using Autodesk Fusion 360 but it just isn't intuitive and I might give TinkerCAD a go instead next time I have something I want to design from scratch.

Cura is really simple to use. The key is tuning it for your printer. My printer came with an out of date copy which worked well with the printer and I have struggled to replicate the settings I need on a more modern version of the software. Fortunately, they will co-exist on the computer, so I can experiment while having a known good version to fall back on.

Just seen something I need to print: a screw cover designed to fit some of the fixtures used by Rapido. Can I afford a whole reel of plastic to print it in the right colour?
 
Ok, with many who know the ropes, I would love a blow by blow 'how to get started' article.
Everything I look at goes on about the machine..
I am more interested in what goes on BEFORE you get to that stage..
i.e. exactly HOW do you get the file that tells the machine what to print.
I have zero ability with any CAD package I have tried quite obviously 3d printing is not for me

That is what I thought about CAD and 3D design. I tried a few free sample programs and found that SketchUp Make did everything I wanted it to do (at the moment), is free and I found it reasonably intuitive to use. If you are ever anywhere near us you would be welcome to try it out.

Once you have drawn what you want to make you save it (usually as an STL file which is an option in your design program and nothing to get your knickers in a twist over - actually if you think you will need to fiddle with your design you will probably want to save it in the CAD package's native format and as STL because STL doesn't read back into a native program very well - like exporting a complex document as a RTF and then re-importing). Once you have saved as an SLT you open the slicer program, import the STL file and leave the slicer program to do it's work once you have decided if you want a rough print, a draft or a fine print. You can fiddle with other setting as well but that is probably best left until you know what will affect what. The slicer program (CURA, SLICR or the like) is more or less automatic and needs minimum input from you except to tell it to start and where to save the finished export file.

I generally want to make stuff that is not available elsewhere (like craft templates) so nearly always design my own things. As the things I want to make are fairly basic they are well within my skill and knowledge levels.

What have folks made on their 3d printers?
Any photos?

We have designed and made:

brackets to hold a table (for motorhome)
brackets to hold battery operated lights (for motorhome)
Model railway items
Guides for roller blinds (home)
Stuff for the garden - labels and the like.
Craft templates and guides
"Junk" jewellery things
Artificial flowers (poppies) for the memorial garden
One use cookie cutters (they don't wash in the dish washer)
also
I have downloaded and made a lot of dinosaur toys and models.

Sorry no photos at the moment but if people want to come and look at Edinburgh just ask.

I use PLA as it is waste from the food industry and is said to break down completely in the compost heap. Neilfg pointed out it could be that it just gets smaller and smaller rather than truly decomposes but one can only do one's best. I have looked at the chemistry of PLA and although there are hydrocarbon chains it does appear the bonds are weak but who really knows?

Subscribers  do not see these advertisements

 
Cura is really simple to use. The key is tuning it for your printer. My printer came with an out of date copy which worked well with the printer and I have struggled to replicate the settings I need on a more modern version of the software. Fortunately, they will co-exist on the computer, so I can experiment while having a known good version to fall back on.

Just seen something I need to print: a screw cover designed to fit some of the fixtures used by Rapido. Can I afford a whole reel of plastic to print it in the right colour?

I prefer the older version of CURA as well. Martin uses a slightly newer one but he generally gioves me the file to check over and then slice using my laptop.

Do you use Rigid Ink? They sell shorter lengths of filament so you don't need buy a full reel.
 
Do you use Rigid Ink? They sell shorter lengths of filament so you don't need buy a full reel.
Thanks, I will have a look. I have seen sets of different colours sold as a trial as well. It would be just my luck for the print to get to 90% and the filament to run out. Silver grey isn’t a bad colour to have in stock anyway, so I could buy a whole reel.

I suppose that’s a point for any new owner. You will need to budget a bit to buy a few different reels of plastic. Black is a bit boring after a while!
 
That's like buying a camera and downloading all your pictures off the internet.

I'm with you on that.. making prototype stuff is great, but I don't see the point of printing crap you find in xmas crackers, or can buy for £3. My last place had a 3D printed pineapple done in colour, which stood about £15k in time and print costs.

Subscribers  do not see these advertisements

 
It's absolutely great for making prototypes and once only print stuff and things that you just can't get anywhere else.

So I make rulers for my craft work ..... generally they are 3 mm or 6 mm thick and I will use them on one project. To design a ruler and have it laser cut in acrylic would cost from £4 up to £100 plus postage, and I wouldn't know if it was correct until it arrived a week or a month later and assuming the delivery people have managed not to smash or snap it. With the 3D printer I can design and print and be using it within a few minutes or hours (depending on the complexity). When worn out I can print another or send the file to be laser cut in acrylic.

The added benefit is that learning a new skill keeps the mind active :)
 
Thanks, I will have a look. I have seen sets of different colours sold as a trial as well. It would be just my luck for the print to get to 90% and the filament to run out.

It is possible to feed in a new length of filament as the old one is running out. Martin is better at that than I am. People who make fancy multi colour stuff change filament "on the fly".
 
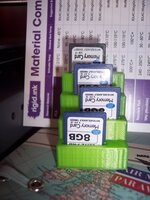
A stand I designed and made for SD cards.
 

Attachments

  • 100_8791.JPG
    100_8791.JPG
    123.3 KB · Views: 52
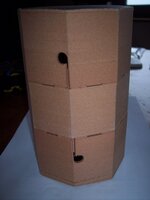
A set of containers that fit together and hold multiple balls of yarn for multi-colour knitting.
 

Attachments

  • 100_8831.JPG
    100_8831.JPG
    81.5 KB · Views: 39
Last edited:
So you can see the bits of the yarn tower - my own design 100_8835.JPG

Subscribers  do not see these advertisements

 
Last edited:
I've also made a stand to hold my boxes of sewing machine needles but can't find the photos or my camera.
 
Last edited:
An alternative to thingverse is STLfinder, some free stuff ans some you have to buy.
 
Last edited:
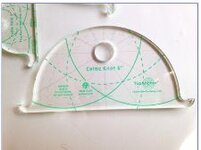
The quoted price for this in acrylic was nearly £20 plus postage and I will need several sizes. When I want it I will 3D print and leave the base rough so it grips the fabric. I won't be able to print transparent but can make it clear enough to see through with the correct filament and settings.
 

Attachments

  • knot template.JPG
    knot template.JPG
    14 KB · Views: 37
Last edited:
Not mine but someone I have corresponded with makes these and fills the spaces with plastic glass

311824
 
Last edited:
That's like buying a camera and downloading all your pictures off the internet.
More like buying a DSLR, using the kit lens and leaving the dial in Auto all the time.

Subscribers  do not see these advertisements

 
More like buying a DSLR, using the kit lens and leaving the dial in Auto all the time.

No it isn't, that would still be creating your own output. Downloading a 3D file and printing it is just like downloading an image and printing it, no personal creativity.
 
A part we made at my last job. Top clamp for a ZX10R Kawasaki
triple print.jpg
superbike.
 
It that arty or extremely clever and how long did it last ?
Extremely clever. The lattice is the load path through the part, as determined by FEA . The mega boffins who worked on it came up with it , and they printed it as you can see. Sadly they didnt think about the post print machining , and left no stock in the tube bores, And the clamp bolt holes should be drilled and tapped before they are slotted, but thats what happens when clever people dont ask experienced people.

And then you have to X-Ray it to see if there are any impurities, which takes a shit load of time and expensive equipment , to see if it has any impurities or defects. This particular build was cracked in several places , due to cooling shrinkage which is one the myriad of problems when you print in materials that actually matter. When you machine parts , the one thing you know before you start, is that it is the right stuff. All you have to do is validate the shape, which is relatively simple with the right kit. With printing , you get the shape for free, metaphorically speaking, but you then have to validate the material, and the method has to be based on the size of the powder you are using . I think that one required defects no bigger than 0.03mm , so guess what , you have to X-Ray in 0.03mm increments in both directions. Then you have to look at them, as there arent any automated packages good enough to do it, which is also part of the project.
We also did some Fork Bottoms, they were a similar story
 
We also did some Fork Bottoms, they were a similar story

If I were riding it I think I'd feel happier with a CNC cut from billet design.

Subscribers  do not see these advertisements

 
If I were riding it I think I'd feel happier with a CNC cut from billet design.

As would I, this is one of those 'just because you can , doesn't mean you should' scenarios.

We have tried many sets of clamps over the last few years, with adjustability for offset and angle built in, but getting the level of flex right is just as important. That's where the 'feel' comes from. Making them ridiculously stiff is counterproductive.
 
No it isn't, that would still be creating your own output. Downloading a 3D file and printing it is just like downloading an image and printing it, no personal creativity.
Just printing things still requires knowledge and skill (although it is easier than it used to be). You just aren't using it to it's full capability.
 
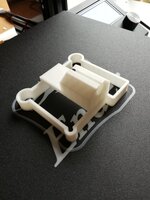
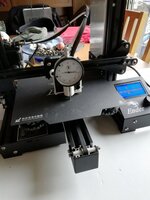
Bit the bullet and got my first 3d printer 2 days ago.
Very pleased with my first efforts but just picking up files created by other users.
Spent several hours already trying to get my head around FreeCAD and really struggling! Watched several video tutorials and tried one of their own tutorials but still struggling! ?

Most ambitious print so far and very useful for getting the table accurately levelled!
 

Attachments

  • IMG_20190619_140643.jpg
    IMG_20190619_140643.jpg
    140.6 KB · Views: 52
  • IMG_20190619_142814.jpg
    IMG_20190619_142814.jpg
    111 KB · Views: 51

Join us or log in to post a reply.

To join in you must be a member of MotorhomeFun

Join MotorhomeFun

Join us, it quick and easy!

Log in

Already a member? Log in here.

Latest journal entries

Back
Top