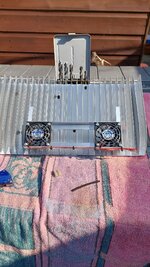
3way fridge thermal gel replacement ?

Pics attached if they help anyone to understand it more..
Thanks for this tonka
Just for clarity, your last pic shows the thermal paste in it's 'syringe ', I'm presuming you dispense it direct from the syringe on to the coolant tubes?
If so, do you aim for a specific thickness of 'bead' all the way along the tubes, or did you just back and forth until the syringe was empty?
Sorry if it's a numpty question:whistle:
Barry

Direct from the tube. I just squeezed it onto the plate following the path of the old stuff. Just used what was in the tube as once I had put on a bead it was almost empty anyway.
 
There must be a performance issue that makes people take off the fins & check the compound.
Our fridge could be untouched in its 14yr life.
I wonder if I need to replace the compound but not if it’s working well 🤔
At the moment it’s e z to get a double figure minus number in the freezer & ~4deg in the fridge section. E z in that we’re not winding the thermostat to beyond about 1/2 way.

Hmm. Probably should just store this knowledge for later.
If it ain’t broke don’t try and fix it.
Phil
 
If it ain’t broke don’t try and fix it.
Phil
If it's working well then the existing compound is OK. If performance is poor on all power sources then replacing the compound is the first thing to do.

Subscribers  do not see these advertisements

 
Direct from the tube. I just squeezed it onto the plate following the path of the old stuff. Just used what was in the tube as once I had put on a bead it was almost empty anyway.
Resurrecting a 16 x month old thread here, I did exactly the same Steve, so thanks for the info and heads up, etc. (y)

20210802_094919.jpg
20210802_101914.jpg


Note the paper tissue bung in the drain hole, to prevent any debri blocking it. ;)

20210802_101921.jpg


I forgot to take a photo of the new gold paste, but like Steve, I basically cleaned off and followed the line of the old stuff, of which there wasn't a lot. :whatthe: I used both 30g syringes.
This is the total amount of original paste, (more like a putty), from behind the fins of our 15 x year old RM7605 AES F/F.

16279013374877988455470117956308.jpg


No fins visible for the freezer, which works well anyway.
F/F turned on to gas operation at 11.15, with an internal temperature reading of 21°C. I will check cooling progress in 2 - 3 hours time.

Cheers,

Jock. :)
 
Last edited:
F/F turned on to gas operation at 11.15, with an internal temperature reading of 21°C. I will check cooling progress in 2 - 3 hours time.
At 14.15 hrs, I checked the temperatures......................

1. Room.

20210802_142947.jpg


2. Empty fridge.

20210802_142955.jpg


The freezer compartment had ice on the base of it, so would have been ready for loading with pre-frozen food.

I am very happy with the three hourly test results, and would expect a longer period to provide further cooling down. (y)

BTW, the gas setting was just over the half way mark, (3 LEDs of 4 illuminated).

Cheers,

Jock. :)
 
Last edited:
Hi guys. I had to remove the aluminium fins to fix the leaking spout on the driptray, so when I put the fins back I replaced the thermal paste, but the heatsink compound I used was different from the original stuff that was there. The original was like a grey putty. I removed it and made it into a ball. The new stuff I bought from a electronic components shop is a heatsink compound silicone grease, white and more liquid than the putty. It was a bit difficult to make a nice round bead along the pipes (vertical) as it would slump a little bit, but I did it in 2 or 3 passes to make it stay until I put in the aluminium fins plate. I hope it works!
 
Hi guys. I had to remove the aluminium fins to fix the leaking spout on the driptray, so when I put the fins back I replaced the thermal paste, but the heatsink compound I used was different from the original stuff that was there. The original was like a grey putty. I removed it and made it into a ball. The new stuff I bought from a electronic components shop is a heatsink compound silicone grease, white and more liquid than the putty. It was a bit difficult to make a nice round bead along the pipes (vertical) as it would slump a little bit, but I did it in 2 or 3 passes to make it stay until I put in the aluminium fins plate. I hope it works!

Welcome to the group.

It should be okay as the thermal paste is required as a bridge to conduct the cold between the evaporator pipework and your aluminum fins plate and normally the computer type thermal paste is a better quilty and has a better W/m-k number than the crap that the motorhome fridge/freezer manufactures use.

I re-did ours 3 or 4 years back and it made a big improvement to the performance of our fridge/freezer.
 
Hi Two on Tour
Thank you for your reply.
I was doing a bit more reasearch (I know I should have done it before doing the job...) and found that the silicone thermal grease for computers that I used has a 0.9w/m-k thermal conductivity (little electrical conductivity though). The very good metal particles thermal pastes have up to 8w/m-k (higher electrical conductivity).
Since in the fridge electrical conductivity is not an issue, probably the metal particles thermal paste would have been better. I will test it and if no good I will just replace it again. Lucky I only paid $20 for the 150g tube of thermal grease!

Subscribers  do not see these advertisements

 
Thermal paste with 8w/m-k thermal conductivity I would imagine will be prohibitively expensive for the amount that's required to use on a f/f ?
I bought some GD900 with a thermal conductivity of 4. 8 w/m-k or better via Aliexpress to do ours which was good value at about £2 for a 30g tube, and 2 tubes did the job for our Dometic 8501.
 
4.8w/m-k is pretty good.
The one I used is this:
They sell it for $53.95 on a caravan shop website for fridge repair so I thought it eas good. I found the same thing in a computer parts store for $19.95 so I thought "Bargain". But now looking at the specs they say 0.9w/m-k. Not that good!!!
 
Just use the cheap gold stuff off ebay. Cured our problem and still OK since 2017 👌
 
we did ours definite improvement
Ditto here Steve. (y)

I wish I had known about this wee job when we had the Hymer, as it's older AES Fridge/Freezer really struggled in the hotter Med climates.

Cheers,

Jock. :)

Subscribers  do not see these advertisements

 
Thermal paste with 8w/m-k thermal conductivity I would imagine will be prohibitively expensive for the amount that's required to use on a f/f ?
I bought some GD900 with a thermal conductivity of 4. 8 w/m-k or better via Aliexpress to do ours which was good value at about £2 for a 30g tube, and 2 tubes did the job for our Dometic 8501.
Yep. Cheap as chips (gold stuff off eBay) and really improves things. My freezer gets down to -15°C now
 
Just taken the diffuser off our fridge as it was only getting down to 6°C at best with the temp set on 4 bars. The freezer was fine at -17°C.
I have fitted 2 x 60mm computer fans and put the wires through the t/c hole.
Re-fitting today with new paste and trying out first without fans on and then with.
I will let you know how i get on.
 

Attachments

  • IMG-20220429-WA0002.jpeg
    IMG-20220429-WA0002.jpeg
    747.7 KB · Views: 109
Just taken the diffuser off our fridge as it was only getting down to 6°C at best with the temp set on 4 bars. The freezer was fine at -17°C.
I have fitted 2 x 60mm computer fans and put the wires through the t/c hole.
Re-fitting today with new paste and trying out first without fans on and then with.
I will let you know how i get on.

I have been using a fan mounted on the fins to circulate the air within the fridge for a few years now, and I have found that blowing the air onto the fins rather than sucking air from the fins seems to work the best.
 
Just taken the diffuser off our fridge as it was only getting down to 6°C at best with the temp set on 4 bars. The freezer was fine at -17°C.
I have fitted 2 x 60mm computer fans and put the wires through the t/c hole.
Re-fitting today with new paste and trying out first without fans on and then with.
I will let you know how i get on.
Bear in mind that blowing air across the evaporator fins will make the fridge run continuously so it will use more gas/electric.
(The thermostat phial is on the fins and is set to cut out around -5°c)
 
Bear in mind that blowing air across the evaporator fins will make the fridge run continuously so it will use more gas/electric.
(The thermostat phial is on the fins and is set to cut out around -5°c)

That does not happen with our fridge, cuts in and out as it did before fitting the fan on the fins, evident by hearing the gas ignitor clicking every now and again.

Subscribers  do not see these advertisements

 
Bear in mind that blowing air across the evaporator fins will make the fridge run continuously so it will use more gas/electric.
(The thermostat phial is on the fins and is set to cut out around -5°c)
I have decided to suck air from the fins and blow it around the fridge for better circulation. The fans are only 1250rpm so not the fastest.
I did note that while the diffuser fins in the freezer started to frost up the fridge never got there hence try with new thermal paste then try with fans.
 
Depends where you measure the temperature I find in the middle when the fridge is well loaded 6° to 7° is normal but up by the fins it's 4°.
Had an internal fan in mine for 4 or 5 years certainly helps before I fitted an internal fan I've had stuff feezing by the door latch when the middle was at 8°.
Biggest difference with the fan is recovery time after the door has been opened.

I redid the paste on mine before the trip we are on at the moment m, the old paste had gone quite hard, it's made a difference of about 1°
 
That does not happen with our fridge, cuts in and out as it did before fitting the fan on the fins, evident by hearing the gas ignitor clicking every now and again.
You need the fans then definitely, the thermostat must be way out of calibration. Unless it's just sensing cabinet temperature of course, your fridge might be different to ours.
 
I experimented with an 80mm fan & a 120mm blowing on to the fins and away from them.
Best results were with a120mm fan blowing onto the fins.

Certainly uses a lot more gas but for cold beer who cares.

Below is a link to my original results, I used plastic boxes to load the fridge it doesn't work quite as well in real life conditions.
 
Last edited:
Before the last trip i bought a wireless fridge thermometer with 2 sensors. At the top it was 5° and the bottom was 9° i tried them in various oisitions and the area opposrite the diffuser seemen the coolest.

Subscribers  do not see these advertisements

 
I have decided to suck air from the fins and blow it around the fridge for better circulation. The fans are only 1250rpm so not the fastest.
I did note that while the diffuser fins in the freezer started to frost up the fridge never got there hence try with new thermal paste then try with fans.
Air takes the route of least resistance, so you will not be pulling so much cold from the fins as air is drawn into your fans through the gaps between the fins.
If you blow your air from your fans onto the fins and back plate, then the air picks up the cold on the surface of the fins and back plate and then blows it both up and down to circulate around your fridge.
 
Before the last trip i bought a wireless fridge thermometer with 2 sensors. At the top it was 5° and the bottom was 9° i tried them in various oisitions and the area opposrite the diffuser seemen the coolest.
Surprising how the temperature varies in these fridges compared to a domestic one. Must be due to the tall thin shape and having the cooling fins right at the top.
 
What i am trying to achieve is better thermal conductivity between the cooling pipes and the diffuser hence new paste and air circulation, hence fans. I have considered the position of the fans and decided they would be out of harms way under the top shelf. Also, sucking the air away would not compromise the working capability of the thermocouple.
It is all suck it and see. I can always change things if it is not effective as i would have liked. The main thing is getting cooler beer!
 
Does anyone know of the copper coloured heat sink compound is the same as copper slip used as anti seize paste?

Subscribers  do not see these advertisements


Join us or log in to post a reply.

To join in you must be a member of MotorhomeFun

Join MotorhomeFun

Join us, it quick and easy!

Log in

Already a member? Log in here.

Back
Top