Fitting SOG into Adria 670SLT (1 Viewer)

Mar 25, 2021
213
292
Chippenham, UK
Funster No
79,991
MH
Chausson 610 Welcome
Exp
Ex Tugger saw the light in 2019
I believe there are 3 types of SOG systems, through the door via a filter, automatic venting mechanism removed. The down through the floor via a filter and a roof version are vented via the cassette automatic mechanism. I am willing to be shot down in flames. My flame proof parachute is already strapped to my back;)
 

MichaelT

LIFE MEMBER
Nov 12, 2015
3,180
5,928
Colchester
Funster No
40,159
MH
Carthago I 143 LE
Exp
Since 2016
SOG fans usually vent from the cassette cap not from beneath cassette vent. Once you have an alternative vent to relieve pressure you can close off the original smelly under cassette vent by removing the cassette’s automatic venting mechanism.
The thetford own version goes out underneath that's why there's a hole in the bottom of the housing.
 
May 7, 2016
7,351
11,891
West Sussex
Funster No
42,951
MH
Malibu Van 640 LE K
Exp
Since 2003
The thetford own version goes out underneath that's why there's a hole in the bottom of the housing.
My objection to the Thetford route is that the bottom of the cassette is not sealed to the housing allowing fumes to escape into the enclosure and beyond. With or without the Thetford fan I think of this as a weakness, some form of pressure relief is essential but surely it needs to be sealed from the interior. The SOG system achieves this allowing disabling of the automatic (leaky) Thetford cassette vent.
IMG_2612.jpeg

The plunger pushes up from below on the rocker arm when the cassette is inserted into the enclosure, which opens the valve with the white tip. Slide the rocker arm out of its mounting, taking care not to lose the spring and release the plunger which can then fall out of the bottom of the cassette. Push the arm and spring back into place holding the valve up (closed) and the valve will now not open releasing smells that can travel through this small enclosure and down the vent tube to the bottom of the enclosure.

I have read about others who have stopped the unwelcome smells without fitting a SOG but instead have provided a small vent tube from the cap direct to the outside, before disabling the automatic vent as above.
 
Mar 25, 2021
213
292
Chippenham, UK
Funster No
79,991
MH
Chausson 610 Welcome
Exp
Ex Tugger saw the light in 2019
My objection to the Thetford route is that the bottom of the cassette is not sealed to the housing allowing fumes to escape into the enclosure and beyond. With or without the Thetford fan I think of this as a weakness, some form of pressure relief is essential but surely it needs to be sealed from the interior. The SOG system achieves this allowing disabling of the automatic (leaky) Thetford cassette vent.
View attachment 894035
The plunger pushes up from below on the rocker arm when the cassette is inserted into the enclosure, which opens the valve with the white tip. Slide the rocker arm out of its mounting, taking care not to lose the spring and release the plunger which can then fall out of the bottom of the cassette. Push the arm and spring back into place holding the valve up (closed) and the valve will now not open releasing smells that can travel through this small enclosure and down the vent tube to the bottom of the enclosure.

I have read about others who have stopped the unwelcome smells without fitting a SOG but instead have provided a small vent tube from the cap direct to the outside, before disabling the automatic vent as above.

The unpleasant smell was because the Thetford Loo was located above a double floor so the odours permeated through a fine plastic mesh grill. I have attached a sketchup PDF of how I illuminated the odours seeping into the hab area. The cassette has not been modified in any way relying on the automatic vent and the SOG fan to extract fresh air from the hab area through the cassette and out at the van roof
 

Attachments

  • SOG.pdf
    327.6 KB · Views: 27

pwilmo

LIFE MEMBER
Oct 17, 2009
350
550
Kings Lynn, Norfolk
Funster No
8,936
MH
Auto Roller 747
Exp
Since 2005
Yes allowing natural venting downwards without extraction fan is inefficient ..methane gas is lighter than air, so naturally rises, so it will infiltrate the higher levels if the cassette enclosure is not sealed or the pressure vent directed outside.

That's why the vent tube should be higher than the cassette top to allow natural venting when the fan is not working.

Subscribers  do not see these advertisements

 
Mar 25, 2021
213
292
Chippenham, UK
Funster No
79,991
MH
Chausson 610 Welcome
Exp
Ex Tugger saw the light in 2019
I must qualify my last post, since fitting my roof Sog, there has been no offending smells. Does what it says on the tin
 
OP
OP
M

MisterB

LIFE MEMBER
Feb 25, 2018
6,028
13,516
Essex
Funster No
52,564
MH
Adria 670 SLT
Exp
enough to know i shouldnt touch things i know nothing about ....
Finally finished printing out the parts. Remember these are specific to an Adria 670 but will probably fit other Adria's or can possibly be used for other motorhomes.

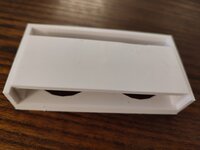
The three sections that make up the fan enclosure. They are a bracket to secure to the motorhome, a fan box and the cover enclosure into which the 10mm carbon activated filter will fit.

IMG_20240506_222739.jpg


IMG_20240506_222747.jpg


IMG_20240506_222758.jpg


IMG_20240506_222810.jpg


IMG_20240506_222929.jpg


IMG_20240506_223005.jpg


The fan box will be secure to the bracket by screws. This is so the fans can be accessed if they ever need replacing. The front of the fan box is deep enough to allow 15mm screws to be used to secure the fans without the screws protruding the front face. The cover enclosure will be secured by one screw, this is so the filter can be changed easily enough. As the cover enclosure is a right fit, it might not need the screw to hold it in place, but I will use a screw to make sure it doesn't work loose as we drive.
All the wiring will be fed back through the factory installed vent duct, through the cassette enclosure and connected to the existing wiring, using a micro switch to operate the fans when the 'hatch' to the toilet is opened (even slightly)

Additional to these parts, I have also printed a bracket for the micro switch to be mounted to. It also is a snug fit, so it can be positioned and tested before final fixing using sikafkex or other adhesive. The micro switch will be secured to the bracket by screws, so it can be replaced if necessary.

IMG_20240506_222848.jpg
 
Last edited:
OP
OP
M

MisterB

LIFE MEMBER
Feb 25, 2018
6,028
13,516
Essex
Funster No
52,564
MH
Adria 670 SLT
Exp
enough to know i shouldnt touch things i know nothing about ....
cant stop fiddling, wanted to change the design a little bit ..... BUT its up and running - will post some photos tomorrow sometime. Fitting it is really simple, deigning it was the bloody hard part, but its been fun !!! HONEST!

the wiring side should take about 45 mins, about 20 mins running the cables and 15 mins fitting the 'gizmo' and filter ! So under an hour and half in total ..... and thats with you taking your time !!

ive got some spare bits, microswitches, fans, screws, wagos ....... could even print out the gizmo - im sure it would fit most Adrias with the double floor and vent to the outside already installed

First photo shows the holding bracket

IMG_20240507_184027.jpg


Second photo shows gizmo in situ, note the 10mm thick charcoal filter. I might also add a filter in the hatch where the 40mm fan usually goes.

IMG_20240507_184229.jpg
 
Last edited:

Join us or log in to post a reply.

To join in you must be a member of MotorhomeFun

Join MotorhomeFun

Join us, it quick and easy!

Log in

Already a member? Log in here.

Funsters who are viewing this thread

Back
Top