Ultimate nightmare

Joined
Apr 9, 2022
Posts
51
Likes collected
89
Location
Swansea, UK
Funster No
87,960
MH
Elddis Eclipse 2.5d
Exp
since1998
I bought this motorhome 8 weeks ago, thought it was a bargain, only 19,800 miles even if it was 26 years old, and cost £8,500.
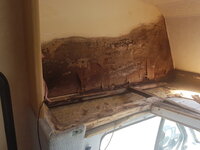
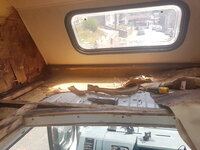
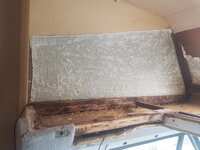
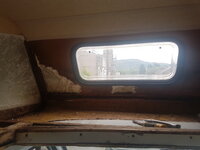
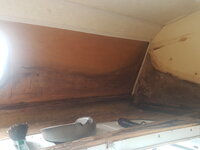
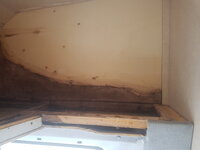
A few days ago one of my grandsons asked to go up top, he is 7. There is a funny smell up here bampi he said. I eventually managed to remove the bed part, and lifted the carpet covering the base. That was the start of my nightmare, as I carried on removing bits, it just got worse, I am at the stage now of wondering what the hell have I done, thinking my wife of 55 years and I could enjoy away times in the vehicle. Does anyone have any thoughts on if this can be repaired, or have I lost all my money to the car breakers? I still need to strip more from the front and drivers side, so I expect a lot worse to come.
 

Attachments

  • my nightmare.jpg
    my nightmare.jpg
    1.9 MB · Views: 1,131
  • 1.jpg
    1.jpg
    444 KB · Views: 1,107
  • 2.jpg
    2.jpg
    552.6 KB · Views: 1,107
That looks bad.

I can’t help with repairs but I hope you get it sorted.

Good luck.
 
Upvote 0
A lot of hard work but it can be done. A few members on here have been successful on similar type jobs.

If you are pretty good with the tools or you have some friends who are then I'd say it should be ok. If you aren't, then I'd expect quite a high repair bill from whoever you put it to.

Another problem is where you would do the work. Have you a garage or lock up where it will be sheltered from the elements?
 
Upvote 1
Hope you get it sorted. The mileage seems very low. Did you do a check on the mot website? Pop up the reg and we can look for you if not.
 
Upvote 0
I have every mot from the first, the mileage is correct, also a comprehensive history, of every penny spent.
N532 NHB

Subscribers  do not see these advertisements

 
Upvote 0
I bought this motorhome 8 weeks ago, thought it was a bargain, only 19,800 miles even if it was 26 years old, and cost £8,500.
A few days ago one of my grandsons asked to go up top, he is 7. There is a funny smell up here bampi he said. I eventually managed to remove the bed part, and lifted the carpet covering the base. That was the start of my nightmare, as I carried on removing bits, it just got worse, I am at the stage now of wondering what the hell have I done, thinking my wife of 55 years and I could enjoy away times in the vehicle. Does anyone have any thoughts on if this can be repaired, or have I lost all my money to the car breakers? I still need to strip more from the front and drivers side, so I expect a lot worse to come.
Looks bad mate, but if it is confined to just the top bit it should be easy enough to put right with some plywood, but if it's gone down the walls it could be a different story, the roof looks as it should be watertight so maybe the rooflight is leaking which again is fixable if it hasn't spread.
That's the big thing, how fars it gone?
 
Upvote 0
If your handy it can be sorted, but a lot of work.
On the plus side, there are many friendly and helpful funsters on here who will guide you, give advice and support you in you efforts to get it sorted.
It would be well worthwhile checking the rest of the van before you start though, inside cupboards, behind panels, under floor coverings to make sure you know the extent of what your taking on.

Can you tell us the make and model, that will help with advice.
Good luck 👍
 
Upvote 0
I have just replaced the rooflights with Fiamma ones, I will strip all the front and driver side vinyl off the walls to see how bad it is. It must have been starting many years ago, I would think this kind of rot would take many years to happen. Thanks for your reply.
 
Upvote 0
Time and patience will fix this, peel away carefully any parts affected by the damp, let dry completely. Check for leaks and seal them first. Try to key the aluminium and give it 2 coats of key or etching primer. For the vertical sides use balsa wood 20 x 50 coated twice with a marine varnish. Bond to the alloy with Evostick contact adhesive Be careful of the fumes?? Use rigid foam/polystyrene the same thickness of the wood 20 mm would be ideal. Bond the insulation with UPVA to the alloy. Use 3mm ply to cover again 2 coats of marine varnish both sides mark out where your battens are again use Evostick contact adhesive. And use wallpaper to give a nice finish. Be careful of any fumes these materials may give off as you will be working in a close confinement.

Subscribers  do not see these advertisements

 
Upvote 0
Believe it or not, it is nowhere near as hard to fix as some make out. Tackle one side at a time to retain the structural integrity. Carefully strip back the rotten plywood to where it is dry. Replace any rotten battens, using urethane glue to bond to the outer aluminium skin and nice tight joints between timbers. Use a foaming glue to fill any voids. Repannel with new ply and repeat on the next section. But most importantly you need to identify the leak/s and seal them before ripping out and replacing.

3 or 4 full days work if you are competent at DiY. If you can't, a local handyman would be massively cheaper than a specialist repairer
 
Upvote 1
Time and patience will fix this, peel away carefully any parts affected by the damp, let dry completely. Check for leaks and seal them first. Try to key the aluminium and give it 2 coats of key or etching primer. For the vertical sides use balsa wood 20 x 50 coated twice with a marine varnish. Bond to the alloy with Evostick contact adhesive Be careful of the fumes?? Use rigid foam/polystyrene the same thickness of the wood 20 mm would be ideal. Bond the insulation with UPVA to the alloy. Use 3mm ply to cover again 2 coats of marine varnish both sides mark out where your battens are again use Evostick contact adhesive. And use wallpaper to give a nice finish. Be careful of any fumes these materials may give off as you will be working in a close confinement.
we have not used evostick in motorhome and caravan repairs in decades, especially as due to heat build up it will fail. Modern urethane glues are far better and safe to use in confined spaces
 
Upvote 0
Is it still damp ? It looks to me like it’s dried out so either the leak is now fixed or it’s been stored inside for a while . I don’t think it’s too bad if it’s only the overcab area . You need to remove all that rotten wood and give it a good clean . Then replace the timber and you should have a solid vehicle. I know how you feel as I’ve been through a similar damp problem . Luckily I found it during lockdown so I was able to work long hours to get it sorted .
Good luck
 
Upvote 0
You think that's bad 😀 plenty of useful info in this thread and links to others 👍

Subscribers  do not see these advertisements

 
Upvote 1
When I stripped away so far, it was still damp, it has been so warm lately that it is drying out quite quickly. I do think it is the overcab area only that has been affected. I will strip out the front and driver side plastic covering and perhaps put a hose on it and watch inside.
On closer examination, some previous owner has drilled two small holes in the front, one each sideat the lowest point, may be it was to drain water build up, that would explain the extent of the rot. Damn bas------.
 
Upvote 0
I had similar but worse than your photos show with our first van due to the aluminum outer skin perforating in places due to corrosion.
I stripped out all the rotted paneling and wooden framing underneath, fibreglassed the inside of the outer aluminum skin, re-framed, insulated with styrofoam, re-paneled, and painted.
We continued using the van for another 5 years before selling it. I have just checked online and it passed its MOT just over a week ago, so hopefully, my repairs have held up making it worth keeping on the road 11 years after I repaired it.
 
Upvote 2
Thank you, you guys are making me feel better all the time. I might be 74, but I am still quite capable of doing all that you brilliant people are suggesting.
Your not the first to buy a damp van and you sure as hell won't be the last. My first was riddled.
 
Upvote 0
If when you strip a section out, you see pin holes of light showing through, you can seal it using rubberised "tanking" paint on the inside of the aluminium skin. It's the same stuff used to waterproof ponds and swimming pools. It's quite expensive as a paint goes, but contains mini strands of rubber that makes the paint remain flexible when dry.

One more thing is to change the rubbers round the windows whilst you are at it. Seals Direct of New Milton Hampshire stock everything you will need. https://www.sealsdirect.co.uk/

Subscribers  do not see these advertisements

 
Upvote 0
Your not the first to buy a damp van and you sure as hell won't be the last. My first was riddled.
Same here .
Thank you, you guys are making me feel better all the time. I might be 74, but I am still quite capable of doing all that you brilliant people are suggesting.
Well done . You will get loads of support here . If you need a hand with anything give me a shout and I will do what I can to help .
 
Upvote 0
My daughter bought a similarly wet Elddis a few years ago, replaced and resealed skylights but leak not fixed. They took down the roof lining and insulation and had a planetarium like view through the roof 😳 aluminium cancer hundreds of holes

We decided that without removing virtually everything inside we couldn’t seal from inside and decided that at 30 years old ‘H reg’ and already miles off the pretty scale 🤔 we painted the whole outside roof in sealing paint, think it has glass fibre in it, a fetching gun metal grey colour 🤔😁 but it stopped the leak 👍 and couldn’t be seen from ground level 🙂

They went all over in her, including Holland and France plus Scotland and Wales, spent a bit fixing but mainly DIY , sold her last year and made a small profit, they know the new owners and they are still having fun in her

They paid almost as much as you and theirs looked bad inside and out 🤔 before they even found the leaks 😳

Bloody kids, who are you going to blame Terry? 😁
 
Upvote 0
For what you paid for it, through a bit more cash at it and a bit of graft and you will still have a bargin.

A couple of threads here that will show what's possible.


Upvote 0
Once you have it all stripped out I would wait until dark, go inside and close all the blinds and then get someone to shine a torch on the sides to see if there are any pinholes.

Once it is done you will have a super classic camper :)

Subscribers  do not see these advertisements

 
Upvote 0
My daughter bought a similarly wet Elddis a few years ago, replaced and resealed skylights but leak not fixed. They took down the roof lining and insulation and had a planetarium like view through the roof 😳 aluminium cancer hundreds of holes

We decided that without removing virtually everything inside we couldn’t seal from inside and decided that at 30 years old ‘H reg’ and already miles off the pretty scale 🤔 we painted the whole outside roof in sealing paint, think it has glass fibre in it, a fetching gun metal grey colour 🤔😁 but it stopped the leak 👍 and couldn’t be seen from ground level 🙂

They went all over in her, including Holland and France plus Scotland and Wales, spent a bit fixing but mainly DIY , sold her last year and made a small profit, they know the new owners and they are still having fun in her

They paid almost as much as you and theirs looked bad inside and out 🤔 before they even found the leaks 😳

Bloody kids, who are you going to blame Terry? 😁
Always wondered how they got on with it.
Have they got another?
 
Upvote 0
Always wondered how they got on with it.
Have they got another?

They moved on to a VW pop up 🤔

Youngest daughter has been waiting for delivery of a new van for their own conversion, delayed like loads of others and they have just bought a shed on wheels, 🤔🙄 1999 Iveco converted by ‘affordable conversions’ clue in the name I reckon 😁 it will see them though this summer, got a huge garage as it had been converted for a motorbiker, they go mountain biking so will do them fine for now . Everything seems to work at least and as a van with minimal windows the risk of leak is much reduced 👍
 
Upvote 0
Hi guys, just about ready to replace the polystyrene 25mm sheet to the aluminium. Can anyone suggest what glue or whatever to use for a complete bond, searched online, but just got confused with all the conflicting suggestions.
Thanks,
Terry
 
Upvote 0
Use Celotex instead. It is an insulation foam that has a plastic skin both sides so you can use a contact adhesive. Available from B&Q etc. Comes in a large 8 x 4ft sheet, however I found loads of uses for the remainder, boxing around the water tanks, making a 'hay box' to keep hot food warm etc. Sometimes B&Q have damaged sheets, worth asking as may get it for free.
 
Upvote 0
You can use PU foam adhesive in a can that bonds almost any insulation boards to anything. One side foam, the other side a water spray bottle to help it key and go off fast. Plasterboard extruded polystyrene and celotex pir boards are glued in this way. Even roof insulation on flat warm decks goes down with Pu glue or foam.
 
Upvote 0

Join us or log in to post a reply.

To join in you must be a member of MotorhomeFun

Join MotorhomeFun

Join us, it quick and easy!

Log in

Already a member? Log in here.

Latest journal entries

Back
Top