Trying to access wires to move/ improve solar controller-Carthago e line

Joined
Feb 20, 2023
Posts
318
Likes collected
540
Location
South Yorkshire, UK
Funster No
94,113
MH
Carthago E line 50 D
Exp
2005
Does any know how to dismantle the inside of the tv/alde cupboard please?

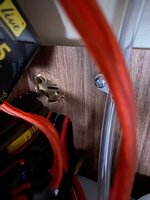
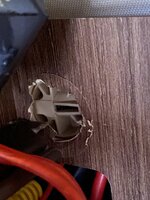
There what appears to be plastic cams , covered over with a wooded printed paper like patch.

I am trying to move/ improve the solar controller and have to get access to the rear of the alde expansion tank but don’t want to break anything.

Any help would be appreciated
IMG_1058.jpeg IMG_1059.jpeg IMG_1060.jpeg IMG_1061.jpeg
 
The 'plastic cams' I think are KD round connectors used to join pieces of wood at right angles,if you take the screws out the piece of panel should come out.🤞
 
Richard is correct, just pull those bits off carefully and keep in a safe place. You will see the screws easily.
 
The 'plastic cams' I think are KD round connectors used to join pieces of wood at right angles,if you take the screws out the piece of panel should come out.🤞
OK thanks, I will take another look tomorrow
 
I just disconnected mine and then connected to them where they come into the van above the fridge. Run new wire from there to a new solar controller in the boot. Left all the old stuff in place so that it can be easily reconnected in case of problems with my new controller.

Not sure why Carthago route from the solar panels at the back of the van to the controller at the front and then back to the batteries in the boot in my case.

Subscribers  do not see these advertisements

 
I just disconnected mine and then connected to them where they come into the van above the fridge. Run new wire from there to a new solar controller in the boot. Left all the old stuff in place so that it can be easily reconnected in case of problems with my new controller.

Not sure why Carthago route from the solar panels at the back of the van to the controller at the front and then back to the batteries in the boot in my case.
We did much the same.
 
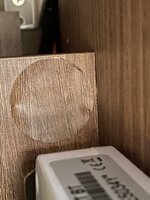
So got the first panel off, as suggested, but the panel behind the tank has different fasteners, anybody know how these unlock/come apart please?

IMG_1064.jpeg IMG_1065.jpeg image.jpg
 
Looks like it it may be part of the locker that's assembled in the factory before installing in the van 🙁
 
Looks like it it may be part of the locker that's assembled in the factory before installing in the van 🙁
Thanks for the reply, yes I am now thinking the same, maybe my best option is to do as G7UXG and Adrian Chen
 
So got the first panel off, as suggested, but the panel behind the tank has different fasteners, anybody know how these unlock/come apart please?

View attachment 828771 View attachment 828772 View attachment 828773
That looks like the back of the fitting the screw will be on the other side.
As others have said because Carthago do such a good job of running the wires neatly it's easier to fit new wires.
Always been a mistery why Carthago fit the controller right up the front.

Subscribers  do not see these advertisements

 
Last edited:
I just disconnected mine and then connected to them where they come into the van above the fridge. Run new wire from there to a new solar controller in the boot. Left all the old stuff in place so that it can be easily reconnected in case of problems with my new controller.

Not sure why Carthago route from the solar panels at the back of the van to the controller at the front and then back to the batteries in the boot in my case.
Looks like my idea has drawn a blank, I see the wires coming in above the fridge, could you tell me where/how you run the wires in the batteries at the back adjacent to the garage please?
 
That looks like the back of the fitting the screw will be on the other side.
As others have said because Carthago do such a good job of running the wires neatly it's easier to fit new wires.
Always beyen a mistery why Carthago fit the controller right up the front.
Thanks Lenny,
 
Looks like my idea has drawn a blank, I see the wires coming in above the fridge, could you tell me where/how you run the wires in the batteries at the back adjacent to the garage please?
The first one I did was an E Line 64 and I drilled a hole out of the space where the wires come in above the fridge, into the void where the light switch wires run. I took the light switches out and fed the wire down to the bottom and managed to get them out into the space where the Alde boiler is under the fridge. Then through the space between the floors to the battery compartment.

That didn’t work when I did my current van, which I think is the same as yours (E Line 50 DA on a Mercedes). They seem to have changed how that void is built and I couldn’t get the wires out of the bottom. They all run in a plastic trunk down the void now rather than loose in the void.

I drilled out through the other side of the space into where the larder unit is. Trouble is, when you’ve done that there’s not enough space for the wires to pass between the larder’s rear panel and the side of the cupboard… it’s a Carthago, it’s well designed and built.

I took out the larder unit and cut a slot in the rear panel, then fixed the wire to the wall of the cupboard in line with the slot, so the unit slides in and out without fouling the wire.

Then feed the wire down the back of the cupboard and through into the toilet cassette hatch. You can find a way from there into the space where the Alde boiler is and then through the floor space to the boot.

I’ll try and attach a photo below which I hope makes sense.

IMG_3525.jpeg IMG_3524.jpeg
 
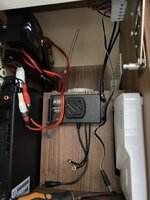
My batteries are in the front locker so I just joined the cables in the cupboard and then fitted the MPPT right by the batteries.

View attachment 828820
That was my plan to sight the controller there, and I suppose that answers why Carthago put the wires up front, but not helpful then when they put the batteries in the back

Subscribers  do not see these advertisements

 
The first one I did was an E Line 64 and I drilled a hole out of the space where the wires come in above the fridge, into the void where the light switch wires run. I took the light switches out and fed the wire down to the bottom and managed to get them out into the space where the Alde boiler is under the fridge. Then through the space between the floors to the battery compartment.

That didn’t work when I did my current van, which I think is the same as yours (E Line 50 DA on a Mercedes). They seem to have changed how that void is built and I couldn’t get the wires out of the bottom. They all run in a plastic trunk down the void now rather than loose in the void.

I drilled out through the other side of the space into where the larder unit is. Trouble is, when you’ve done that there’s not enough space for the wires to pass between the larder’s rear panel and the side of the cupboard… it’s a Carthago, it’s well designed and built.

I took out the larder unit and cut a slot in the rear panel, then fixed the wire to the wall of the cupboard in line with the slot, so the unit slides in and out without fouling the wire.

Then feed the wire down the back of the cupboard and through into the toilet cassette hatch. You can find a way from there into the space where the Alde boiler is and then through the floor space to the boot.

I’ll try and attach a photo below which I hope makes sense.

View attachment 828802 View attachment 828804
Thanks I will have to give it some thought and a good look at.
 
What size wiring are you using there; 4mm?

Ian
 
You spotted it as well it looks way too small. :LOL:

I’ve just moved two solar panels (and fitted two additional panels) on mine and the wiring used on the two existing panels was two core flex.😳 If that wasn’t bad enough the controller was mounted close to the panels with the same two core flex then running about 4m to the batteries!

A single cable of 6mm2 that I used had a larger diameter than the two core flex that I removed.

Ian

Subscribers  do not see these advertisements

 
The wire is 10mm. The original was 6mm, one of the reasons I changed it.

I’m shocked to hear that; must be the scale/perspective of the photo.

Ian
 
I’m shocked to hear that; must be the scale/perspective of the photo.

Ian
The hole the wires come through is a 25mm diameter, cut with a wide ‘spade’ drill bit.

The wire is twin 10mm2 and the run to the controller is about 6 metres.

I only have one 120watt solar panel at the moment but need to upgrade to maybe 300 watts. How easy was it to remove your existing panel? Roof space is a bit tight on my van… too many windows, satellite and air con unit. I may need to take existing panel off and reposition.
 
Last edited:
I’ve just moved two solar panels (and fitted two additional panels) on mine and the wiring used on the two existing panels was two core flex.😳 If that wasn’t bad enough the controller was mounted close to the panels with the same two core flex then running about 4m to the batteries!

A single cable of 6mm2 that I used had a larger diameter than the two core flex that I removed.

Ian
Sounds like a typical dealer install.
 
How easy was it to remove your existing panel? Roof space is a bit tight on my van… to many windows, satellite and air con unit. I may need to take existing panel off and reposition.

In the end, it wasn’t too bad. They were mounted using a full length (of the short side of the panel) aluminium bracket that was ‘bonded’ to the roof and also secured with two (waste of time) short self-tappers.

The bond with the roof was strong (they had rubbed the paint down to get a bond directly on the aluminium roof) and I used a decorating scraper and a hammer to break the bond and ease the bracket away along its length.
IMG_2732.jpeg


Ian

Subscribers  do not see these advertisements

 
When I look at yours it’s different, my original solar controller was in the same place as yours but my Alde tank is on the right.
The Alde tank looks like it is on the right. That’s the same as my E Line.
 

Join us or log in to post a reply.

To join in you must be a member of MotorhomeFun

Join MotorhomeFun

Join us, it quick and easy!

Log in

Already a member? Log in here.

Latest journal entries

Back
Top