Hi. All.
Here I am to bore the pants off you all and obviously to pick your brains too!!


My apologies if my last post / blog or Thread was too long still don't know difference between the three of them, so I will try to keep it short n to the point.
During an idle spell, I took it upon myself to start to get a relationship going with eBay, Amazon and our local suppliers and both the VAN-ELF & I was amazed how easy it was to get carried away on these internet shopping sites, you can literally buy anything. (Almost)..
At this point I was watching YouTube videos until the early hours of the morning to get ideas and tips, the VAN-ELF thought I was up to no good watching movies on my laptop or phone, I was becoming my grand child or an obsessed teenager, but without attitude.
So I took the plunge & thought whilst the van is stripped out it would be a good idea to start at the top roof and work my way to the floor and install the items such as Reversing Camera, Roof Lights, Solar Panels and Air Fans. Well with all the advice and tips I ordered my first three items.. that was my beer money gone for that month.. I think I could have supplied beer to George Best for 6 months.. Cor!! Blimey this Van Converting is an expensive addiction.
Well when these items started to arrive it was like Christmas morning every day for about 5 days, as in my previous posts I am away all week so I was forever clocking in to the VAN-ELF to ask if I had had a parcel. 


Well when I opened the Solar Panels I obviously had not really put a lot of thought into the method of fixing them to my roof, as my trade of my younger days was a Fabricator / Welder it was not really a daunting task, however I did want to ensure that I did follow the tips I had learnt watching all those YouTube videos.
The best money spent so far is 4 x 6 meters of UNISTRUT, this can get you out of lots of trouble when requiring a secure method of securing items and it is reasonably cheap.
So I cut two lengths to the full length of the roof of my van, if you purchase 40mm UNISTRUT this sits neatly in the grooves on the top of the van, so I marked off the UNISTRUT and drilled about 6 Equally spaced 10mm dia holes in the UNISTRUT, match marked the van on the top of the roof, jumped inside the van to ensure that I had missed the cross struts on the van roof, all was good so I drilled the very first hole in my van..


 yes who puts holes in the roof of the van.
Prior to purchasing the UNISTRUT I realised I needed some other items such as double sided sticky gasket tape W4 Mastic Sealing Strip, some SIKA 522 or 512 and lots of M10 S/S Pins 30mm long with 25mm x 10mm Washers luckily I have quite a lot of the latter in my shed. (Again very expensive items and WOIW how things have escalated since COVID n BREXIT)
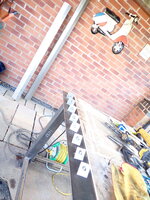
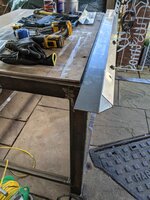
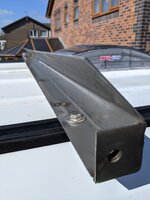
Now what do I fasten the Solar Panels on and my obvious answer because I can get my hands on Stainless Steel items I decided to put cross angles 90 degrees to the UNISTRUT & sit them on these, an ode to the Solar Panel Companies "VICTRON" please do something more user friendly on designing a clamping method for your panels.
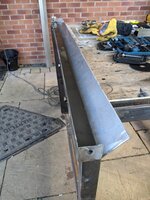
Now as my VAN-ELF (Sonia the Wife) is always critical and usually right as most wives are.. (Reverse Psychology there lads) said that my Stainless angles were too long, but there is a reason for this.. as is the M10 captivated nut on the end plates. I can fix my awning to it and not put it onto the roof directly as I have heard of so many leak issues caused by awnings causing weep holes in the roof when the winds gust in.


Well enough of it all now as I promised to keep it short tonight, there are photos showing the Solar Panels installed and I did not mention the install of the reversing camera as this was an absolute doddle.
Photos.. Reversing Camera.


Photos: Solar Panels


Well I am sure I have bored you ALL now, please tell me the truth if my Posts are too long tell me as I only want to try and explain what we (I) have done but if it is boring you ALL it is fruitless.
Now what goes on the end of the cables on the Solar Panels is beyond me, I have brought a EPEVER MPPT 40A Solar Charge Controller and 3 x Lithium Batteries 110Ah so I think I am well covered on the 12v system.
NOW if any of you have read all of this, there is a request of a WIRING DIAGRAM can someone please send me one, thanks in advance.
Hope you are ALL looking forward to tomorrows post / blog or thread again someone explain the difference..??
Regards and Good Night
Steve n Sonia.
Here I am to bore the pants off you all and obviously to pick your brains too!!
My apologies if my last post / blog or Thread was too long still don't know difference between the three of them, so I will try to keep it short n to the point.
During an idle spell, I took it upon myself to start to get a relationship going with eBay, Amazon and our local suppliers and both the VAN-ELF & I was amazed how easy it was to get carried away on these internet shopping sites, you can literally buy anything. (Almost)..
At this point I was watching YouTube videos until the early hours of the morning to get ideas and tips, the VAN-ELF thought I was up to no good watching movies on my laptop or phone, I was becoming my grand child or an obsessed teenager, but without attitude.
So I took the plunge & thought whilst the van is stripped out it would be a good idea to start at the top roof and work my way to the floor and install the items such as Reversing Camera, Roof Lights, Solar Panels and Air Fans. Well with all the advice and tips I ordered my first three items.. that was my beer money gone for that month.. I think I could have supplied beer to George Best for 6 months.. Cor!! Blimey this Van Converting is an expensive addiction.
- Reversing Camera Kit
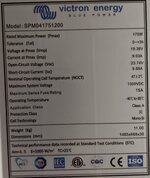
- 3 x Solar Panels (175w) + Cable + Connectors.
- 2 x Maxi Air Fans.
Well when I opened the Solar Panels I obviously had not really put a lot of thought into the method of fixing them to my roof, as my trade of my younger days was a Fabricator / Welder it was not really a daunting task, however I did want to ensure that I did follow the tips I had learnt watching all those YouTube videos.
The best money spent so far is 4 x 6 meters of UNISTRUT, this can get you out of lots of trouble when requiring a secure method of securing items and it is reasonably cheap.
So I cut two lengths to the full length of the roof of my van, if you purchase 40mm UNISTRUT this sits neatly in the grooves on the top of the van, so I marked off the UNISTRUT and drilled about 6 Equally spaced 10mm dia holes in the UNISTRUT, match marked the van on the top of the roof, jumped inside the van to ensure that I had missed the cross struts on the van roof, all was good so I drilled the very first hole in my van..
Prior to purchasing the UNISTRUT I realised I needed some other items such as double sided sticky gasket tape W4 Mastic Sealing Strip, some SIKA 522 or 512 and lots of M10 S/S Pins 30mm long with 25mm x 10mm Washers luckily I have quite a lot of the latter in my shed. (Again very expensive items and WOIW how things have escalated since COVID n BREXIT)
Now what do I fasten the Solar Panels on and my obvious answer because I can get my hands on Stainless Steel items I decided to put cross angles 90 degrees to the UNISTRUT & sit them on these, an ode to the Solar Panel Companies "VICTRON" please do something more user friendly on designing a clamping method for your panels.
Now as my VAN-ELF (Sonia the Wife) is always critical and usually right as most wives are.. (Reverse Psychology there lads) said that my Stainless angles were too long, but there is a reason for this.. as is the M10 captivated nut on the end plates. I can fix my awning to it and not put it onto the roof directly as I have heard of so many leak issues caused by awnings causing weep holes in the roof when the winds gust in.
Well enough of it all now as I promised to keep it short tonight, there are photos showing the Solar Panels installed and I did not mention the install of the reversing camera as this was an absolute doddle.
Photos.. Reversing Camera.
Photos: Solar Panels
Well I am sure I have bored you ALL now, please tell me the truth if my Posts are too long tell me as I only want to try and explain what we (I) have done but if it is boring you ALL it is fruitless.
Now what goes on the end of the cables on the Solar Panels is beyond me, I have brought a EPEVER MPPT 40A Solar Charge Controller and 3 x Lithium Batteries 110Ah so I think I am well covered on the 12v system.
NOW if any of you have read all of this, there is a request of a WIRING DIAGRAM can someone please send me one, thanks in advance.
Hope you are ALL looking forward to tomorrows post / blog or thread again someone explain the difference..??
Regards and Good Night
Steve n Sonia.


