Installing an inverter in an Exsis-i 578

Sportsnapper

Free Member
Joined
Sep 3, 2016
Posts
107
Likes collected
57
Location
Reading
Funster No
44,934
MH
Hymer Exsis
Exp
Since 2004
We're off to France in a couple of days, in our new (to us) 578. Over the last couple of weeks we've made a few changes, and outfitted the van similar to the way that our previous Hymer was. One missing essential is an inverter. I need to charge my MacBook (with a poor battery), and some camera batteries that don't have 12v charging alternatives.

I'm planning to install a Victron Phoenix 12/375 inverter. But I'm not sure where to site it. I'm trying to minimise the length of the leads between the batteries and the inverter. There is space next to the Victron MPPT 100/30 controller - though that is the other side of the van from the batteries. There may be space under the Drivers seat, though it may need some of the existing wiring to be relocated under the seat (the space is occupied by an AD 01 adapter) - see photos.

I may just connect it and let it float free for the next couple of weeks - but it will need a long term home

So any ideas or suggestions on how to do this are gratefully received.

An additional question is why three wires leave the EBL and only two are connected into the MPTT - this is the dealer installation.

MPTT installation under the banquette on the passenger side
IMG_3518.jpg


Rear of drivers seat - think this is the connection from the AD 01 to the vehicle battery
IMG_3522.jpg


Front of the drivers seat. Just about enough room for the inverter, but the AD 01 could be shifted to the left and the other mountings may need moving as well.
IMG_3521.jpg
 
My last van was an Exsis i678 I fitted a 1000 watt inverter under the passenger seat very short cable runs as it was right next to the battery well. Had to move one or two or the Schaudt relay boxes (as your pic) under there a couple of inches otherwise straight forward.
 
@Lenny HB Wired directly to the batteries, not via the EB? And did you have to remove the seat to move the other bits around?
 
Last edited:
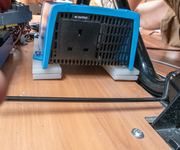
So, three and a bit weeks later, we're back from France and I can post some more images of a successful installation. The Inverter arrived from 12voltplanet at about 1330, and was fitted by 1730. We then packed for France departing at about 1030 the next morning!

I bought the Victron Phoenix inverter, which is about 300w. We don't really use that much mains powered stuff, but I needed a pure sine wave for the MacBook.

I moved the AD01 and made enough room to slot the inverter in. Testing the position it became clear that it would need to be mounted on a platform, as the plug socket doesn't clear the baseboard by enough to allow 13amp plugs to be easily plugged in (with the added complication of the seat rail shown in the second picture). If Victron mounted the socket the other way up this would be a much better solution!

I made some spacers by cutting up an IKEA chopping board, then the inverter is mounted on them. It needs to be refitted properly as I didn't bother with pilot holes and screwed directly into the wood - challenging under the seat.

I had the Battery cables made up, and they're routed through an existing gap under the seat to the battery compartment. I used the biggest cable that the inverter would take.

In use it's great. It has Bluetooth functionality, so I'll be getting a second dongle to power it up and down (and set alarms etc. - see the Victron app/site for more detail). We used the dongle we had on the MPPT during our trip to see how much solar we were getting - switching on /off required pulling the rear cover off the seat - not too difficult. I could also just add a switch and mount it into the seat mouldings - but I really like the ability to switch on/off remotely.

If I did it again I'd probably choose the IEC socket option, and wire and extension into that.

untitled_IMG_3532.jpg
untitled_IMG_3531.jpg
untitled_IMG_3533.jpg
untitled_IMG_3536.jpg
 

Attachments

  • image.png
    image.png
    1.6 MB · Views: 37
Something horrible & hairy has crawled in next to it.:D

Did you remember to fit a fuse at the battery end?

Subscribers  do not see these advertisements

 
Thanks @Lenny HB - No I didn't - it says this in the manual
The inverters are fitted with an internal DC fuse (see table above for rating). If the DC cable length is increased to more than 1,5m, an additional fuse or DC circuit breaker must be inserted close to the battery.
cable length is 1.25m - do I need to do this? Suggestions for a suitable fuse holder and fuse rating welcomed.

Also wasn't sure if the earth needs connecting - or where to connect it if it does. Again the manual says
The AC output is isolated from the DC input and the chassis. Local regulations may require a true neutral. In this case one of the AC output wires must be connected to the chassis, and the chassis must be connected to a reliable ground. Please note that a true neutral is needed to ensure correct operation of an earth leakage circuit breaker.


I would still fuse it at the battery end.
If you are not fitting an RCD better to leave it floating.
 
OK - so after a bit of research I think I need a midi link fuse, and as it's 375 VA (300W) then I need a 25A fuse - though I can't find a 25A Midi-link fuse, smallest is 30A. I'm saying a midi link as I'm using 10mm2 cable to the inverter so need something that's going to take those nice big cables.
 

Join us or log in to post a reply.

To join in you must be a member of MotorhomeFun

Join MotorhomeFun

Join us, it quick and easy!

Log in

Already a member? Log in here.

Latest journal entries

Back
Top