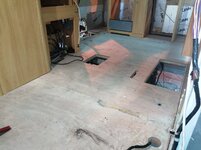
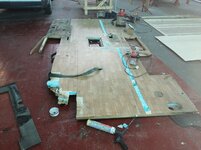
Dampness project - Floor now

No mate don’t give up, don’t let Bessie win. Seriously you have gone too far down the road now to give up.
I have every confidence that you will find the problem and sort it and hopefully it will be an easy fix.

Good luck and keep us posted
 
Wash the roof, mask off, apply two coats of liquid EDPM rubber. It is a two part mixture that sets chemically. Really does work with a thin skin of rubber making it totally waterproof. I used it on an old Swift Sundance. It is expensive but works.

www.alltimescoating.co.uk
I was going to message you to ask what the finish looked like after applying the product mate? Will direct message you!
 
No mate don’t give up, don’t let Bessie win. Seriously you have gone too far down the road now to give up.
I have every confidence that you will find the problem and sort it and hopefully it will be an easy fix.

Good luck and keep us posted
Cheers!
I know I’m far to far down the line, my wife is more annoyed than me. I apply my engineer knowledge and go into problem solving mode looking for a solution. Her solution let’s cut our losses, take the hit and get rid of her :LOL:
Well let’s see what today brings, thinking that 68c’s rubber roof maybe the final shot!
 
DJL220. I'm really sorry to hear about the roof leaking again, but I can't see the problem being the area you have just sealed with Eternabond, as it is excellent stuff. I reckon that now the water has been deflected away from around the roof light, has possibly tracked and come in somewhere else. ☹️
I once used a food dye/water mix over a jointed area of the roof above the shower unit, which I suspected was leaking. It proved to me that I was wrong to suspect that area, and looked elsewhere, only to find a leaky hot water joint behind a shroud in the shower room. :doh: It wasn't a strong enough mix to cause staining, and I used one of those nose drop applicators.

Good luck finding the source of the new leak.

Cheers,

Jock. 🙂
 
DJL220. I'm really sorry to hear about the roof leaking again, but I can't see the problem being the area you have just sealed with Eternabond, as it is excellent stuff. I reckon that now the water has been deflected away from around the roof light, has possibly tracked and come in somewhere else. ☹
I once used a food dye/water mix over a jointed area of the roof above the shower unit, which I suspected was leaking. It proved to me that I was wrong to suspect that area, and looked elsewhere, only to find a leaky hot water joint behind a shroud in the shower room. :doh: It wasn't a strong enough mix to cause staining, and I used one of those nose drop applicators.
Good luck finding the source of the new leak.

Cheers,

Jock. 🙂
Just for you Jock :cool:
IMG_7131.jpg

Subscribers  do not see these advertisements

 
Sunday update: -
Another day working flat out on the MH today, so busy I even roped in my wife to give a hand!
Removed the Eternabond tape which was a right pig of a job and took many hours to complete. Here is one of the corner before removal.

IMG_7112.jpg

I had lapped the sides over one another and for good measure placed a piece over the corners. It became apparent that water had somehow managed to bypass the tape and was running next to the skylight seal. From another project when the roof was leaking previously I had brought and fitted new skylights. Well someone didn't listen to the advice given to him and fitted this using Sika 512. Pretty sure that has come back and bitten me in the rear end, pushing down on the corner nearest to the leak and I could see bubbles. This could have been due to the amount of white spirt I had been using to remove the tape. However when I cut through and lifted the skylight it came away a little to easy for my liking. Could this be the cause of the leak???
Anyway several more hours spent cleaning up and I refitted the skylight using Seamseal on the inside and for good measure I treated the outside to a seal using it too.
Whilst cleaning and searching around on the roof I managed to find the following spider cracks near to the skylight
FA9B52F7-F8BB-44DE-A99C-BE7256127663.JPG

Two in this picture.
E651D494-BBA6-43BF-83FF-94EA0DB77C9C.JPG

So I sanded these down a little and filled using a gel coat filler. This only needs to survive until I purchase the rubber roof sealant (thanks 68c).
This is what the roof looks like now
IMG_7127.jpg

These two covered a total of 5 spider cracks

This is my favourite picture of the day, see if you can guess why?
IMG_7124.jpg

Yep it's not the fresh sealant, it's the beer can ::bigsmile:

Just to ensure she stays dry (hopefully!) I finished by covering Bessie in case of the forecasted rain
IMG_7130.jpg


Thanks for the support and encouragement everyone, it was much needed today (y)
 
Morrisons? Blooming Morrisons? 😮😮😮

As good as any I suppose. 😂

What's the latest on the roof please?

Cheers,

Jock. 🙂

As per the above update I have fixed some cracks and resealed the roof light. Didn’t get a chance to check with the food dyes as yet 😂
Also wanted the sealant to cure for a while. Will try the dyes tomorrow and let you know how I get on.
 
Sunday update: -
Another day working flat out on the MH today, so busy I even roped in my wife to give a hand!
Removed the Eternabond tape which was a right pig of a job and took many hours to complete. Here is one of the corner before removal.

View attachment 410395
I had lapped the sides over one another and for good measure placed a piece over the corners. It became apparent that water had somehow managed to bypass the tape and was running next to the skylight seal. From another project when the roof was leaking previously I had brought and fitted new skylights. Well someone didn't listen to the advice given to him and fitted this using Sika 512. Pretty sure that has come back and bitten me in the rear end, pushing down on the corner nearest to the leak and I could see bubbles. This could have been due to the amount of white spirt I had been using to remove the tape. However when I cut through and lifted the skylight it came away a little to easy for my liking. Could this be the cause of the leak???
Anyway several more hours spent cleaning up and I refitted the skylight using Seamseal on the inside and for good measure I treated the outside to a seal using it too.
Whilst cleaning and searching around on the roof I managed to find the following spider cracks near to the skylight
View attachment 410396
Two in this picture.
View attachment 410397
So I sanded these down a little and filled using a gel coat filler. This only needs to survive until I purchase the rubber roof sealant (thanks 68c).
This is what the roof looks like now
View attachment 410398
These two covered a total of 5 spider cracks

This is my favourite picture of the day, see if you can guess why?
View attachment 410399
Yep it's not the fresh sealant, it's the beer can ::bigsmile:

Just to ensure she stays dry (hopefully!) I finished by covering Bessie in case of the forecasted rain
View attachment 410400

Thanks for the support and encouragement everyone, it was much needed today (y)
Sorry, I didn't realise you had already removed, replaced, and resealed the roof lights with Sikaflex 512, as I would have expected that to be sufficient, without the need for Eternabond as well.
You truly have been unlucky with the roof project, and I really do admire your perseverance with it all. 👍

Cheers,

Jock. 🙂
I think it was the BigOne who advised against Sika 512 at the time of installing. Well leason learnt Jock, non setting mastic or W4 will be used if I ever need to replace a roof light again (y)
It's last chance salon time for her, if this and the rubber roof doesn't cure the leaks she is getting sold on or scrapped :LOL:

Subscribers  do not see these advertisements

 
Hi Funsters

Following on from my previous damp project (https://www.motorhomefun.co.uk/forum/threads/dampness-project-roof-first.205004/) I am now about to resolve the floor dampness issues on our Bessacarr E795.

I am reaching out to the wealth of knowledge in this forum and will again show pictures and progress in case anyone else feels like saving money and having a go! This is going to be split into two projects "side" and "rear". How lucky am I to have two more projects!

Side Project
The floor under the O/S from front to rear is showing signs of the dreaded moisture ingress approx 2.4m in length. The dampness is around 6-12" away from the side skirts depending on area. The floor in question is a single ply flooring and access can be had from underneath and in certain areas above. looks like I will need to remove the side skirts and reseal this when refitting.

Lets tackle the questions I have which regarding the damp/spongy floor: -

1) The ply has been painted black and I will need to match this on the replacement flooring. Searching the forums has thrown up more questions than answer including a reply from Swift saying use any black water proof paint.
Anybody have an idea of what to use?

2) The current sheets of ply run across from side to side. I do not need to replace the whole sheet so I was planning on joining the plywoods together using a water proof glue, sealing the cut edges and then biscuits or dowels for extra strength. As the damage is only approx 6-12" will a small piece say 12" wide by 2.4m joined to the existing wood be suitable and strong enough?

3) What to use on resealing the skirts on re-assemble. My favorite Sika 512 or Hodgsons Seamseal CV? I used the later on the top of the skirts but have found it to discolour really quickly, any advice on any other product on the top?

4) Which ply to use on replacement external grade, WBP, marine etc

Rear Project
This is a smaller project and should only require part of the side ply replacing around the rear external door/water tank area. I will tackle this at a later stage ;-)

Thanks in advance

Darren
 
Sounds like the floor is all sorted..I can only imagine how you are feeling now. You have come so far with this. I am really hoping that tomorrow, you get it all sorted once and for all.

My finger are crossed for you...but I think you will crack it and get her watertight.

Take it easy matey
 
Hi Funsters

Following on from my previous damp project (https://www.motorhomefun.co.uk/forum/threads/dampness-project-roof-first.205004/) I am now about to resolve the floor dampness issues on our Bessacarr E795.

I am reaching out to the wealth of knowledge in this forum and will again show pictures and progress in case anyone else feels like saving money and having a go! This is going to be split into two projects "side" and "rear". How lucky am I to have two more projects!

Side Project
The floor under the O/S from front to rear is showing signs of the dreaded moisture ingress approx 2.4m in length. The dampness is around 6-12" away from the side skirts depending on area. The floor in question is a single ply flooring and access can be had from underneath and in certain areas above. looks like I will need to remove the side skirts and reseal this when refitting.

Lets tackle the questions I have which regarding the damp/spongy floor: -

1) The ply has been painted black and I will need to match this on the replacement flooring. Searching the forums has thrown up more questions than answer including a reply from Swift saying use any black water proof paint.
Anybody have an idea of what to use?

2) The current sheets of ply run across from side to side. I do not need to replace the whole sheet so I was planning on joining the plywoods together using a water proof glue, sealing the cut edges and then biscuits or dowels for extra strength. As the damage is only approx 6-12" will a small piece say 12" wide by 2.4m joined to the existing wood be suitable and strong enough?

3) What to use on resealing the skirts on re-assemble. My favorite Sika 512 or Hodgsons Seamseal CV? I used the later on the top of the skirts but have found it to discolour really quickly, any advice on any other product on the top?

4) Which ply to use on replacement external grade, WBP, marine etc

Rear Project
This is a smaller project and should only require part of the side ply replacing around the rear external door/water tank area. I will tackle this at a later stage ;-)

Thanks in advance

Darren
So hope you have better luck than we did. IMG_20200108_142501.jpgIMG_20191031_184842.jpg
 

Attachments

  • IMG_20191128_115743.jpg
    IMG_20191128_115743.jpg
    235.8 KB · Views: 202
  • IMG_20191206_124602.jpg
    IMG_20191206_124602.jpg
    202.5 KB · Views: 205
Well leason learnt Jock, non setting mastic or W4 will be used if I ever need to replace a roof light again (y)
I had a similar experience with a guttering strip which came adrift from the Hymer joint between the front GRP cap, and the aluminium sidewall. Despite my insistence for Sikaflex bonding sealant, I was persuaded to go for some form of non setting mastic by a caravan workshop employee. WRONG. It didn't last a week, and I ended up digging it all out and cleaning up the joint again. 😠
I used a well recommended Wurth bonding sealant, and it was "Job Done". 👍

My favoured non setting mastic experience, is with W4 sealing tape on roof lights and side skirts. It is far superior to the tube product offered by that caravan dealership. ☹
The accessories do need to be re tightened a short time after the application has bedded down.

Cheers,

Jock. 🙂

Subscribers  do not see these advertisements

 
These MH's need lots of looking after!
I do appreciate that this may not be the time nor the place to query that statement, however, it doesn't apply to all marquees of MHs, but it sadly applies to most British built MHs. 😥
I am ashamed to say, that I would never buy a British built MH, knowing what I have learned over the last thirty plus years of leisure vehicle ownership. ☹️

They do all need TLC in the way of maintenance and cleaning. 😉

Cheers,

Jock. 🙂
 
Roofing update: -
Tested the roof earlier today with some food dyed water. Did it in segments and differing colours (just to be precise). No leaks found during the test run. Then brought out the hose and directed this at the roof light and repair areas, still no leaks. It then started to rain and did so for a while. Glad to report it’s still looking good. Will wait and see if this is a done deal after moving her!
Pretty sure if it is solved then it’s down to my choice of sealants and installation previously :rolleyes:
oh well you live and learn!
 
Last edited:
One thing to check is either driving in heavy rain or very wet and windy weather when its parked and water getting forced in that way. This happened to me with a mystery leak, we discovered it was the inner seal of the rooflight not seating properly because of crud having got under it. Cleaned it all out and its been fine ever since. Just a thought. Hope you have nailed it now mate.
 
Fill the fridge with beer and Prosecco and you and your wife get yourself off for a few days and chillax. Clear your head and then go at it again with focus.
I do admire your determination and wish you many years in this van seeing as you know it very intimately.
 
What he said.

Fill the fridge with beer and Prosecco and you and your wife get yourself off for a few days and chillax. Clear your head and then go at it again with focus.
I do admire your determination and wish you many years in this van seeing as you know it very intimately.

Well done mate, hopefully all.sorted now.

You have not only sorted your own issues, you have helped me out with my repairs and no doubt this thread will help many more people going forward.

👍🏻

Subscribers  do not see these advertisements

 
Looks like you have won at last, no need for that EDPM rubber now. Well done.
I think I may still go for the rubber roof, pretty sure all of the damage on the roof was due to the previous owner. To get to his parking spot on his drive he had to drive under a big willow tree!
Not such a rush to do it instantly, it can wait until after the hols plus I can get a break from Bessie for a week!
 
Reading this with nothing but admiration for you, I would have found that *something* had overloaded and *perhaps* caused fire damage , not saying I would but with the damp issues it would not have been within the realms of possibility, enjoy the van and if we ever meet up, the drinks are on me!
 
I never use Sikaflex on anything with plastic. I learned about 20 yes ago that it let's go of lots of plastic things(also been posting on here since 2007 that it doesn't stick 😉 ) I also don't like using the butal tape that also leaks !
The best stuff I have found that doesn't leak or let go is Puraflex 40 👍 Been using that for about 10 yrs plus and never had a leak or anything drop off. ( Yet 😀 )
Why do so many Brit vans leak ? Because they use the shit butal tape 😀😞

Subscribers  do not see these advertisements

 
Well after many hours and days have passed, I can confirm that Bessie once again looks like this: -

IMG_7140.jpg


IMG_7141.jpg


A really hard slog which has been most evenings and every weekend for the past month or so :LOL:

Glad to say I even managed a quick test drive round the block and everything stayed on her :cool:

Time for a week off before I return to finish the interior and fit the remaining shocks!

Thanks for the positive comments and all of you postings which have been grateful received.
Enjoy the summer

ATB
Darren
 
Well after many hours and days have passed, I can confirm that Bessie once again looks like this: -

View attachment 411631

View attachment 411632

A really hard slog which has been most evenings and every weekend for the past month or so :LOL:

Glad to say I even managed a quick test drive round the block and everything stayed on her :cool:

Time for a week off before I return to finish the interior and fit the remaining shocks!

Thanks for the positive comments and all of you postings which have been grateful received.
Enjoy the summer

ATB
Darren
You should be proud. You have just created a mine of information that people will be referring to for years to come. And you will have peace of mind for years that what you are driving is solid, your thread is worth its weight in gold. Thanks.
 
I have a question about joining plywood to the existing ply underneath the MH once I have cut out the rot. After further inspection the ply top and bottom of the sandwich is only 6mm thick and so rules out biscuit joints or dowelling.
The top ply is only going to be cut back by approx 300mm from the wall and underneath around 500mm. Thought it would be best to stagger the cuts too.
What is the best way to join without losing too much strength in the floor? The only good thing is that the area of floor is under the sofa and not a walkway.

Options I can think of are: -
simple butt joint
Butt joint and bond in thin aluminium under both sides of the joint (that's the method on the top side)
Lap joint ( difficult to do well underneath the MH)
Attach aluminium plates underneath and bolt through the floor (risk of dampness!)
Dish out the wood and use fibreglass and/or epoxy
Worse case replace the whole floor 😡

Someone out there must have done this before and I really could use a steer on this one.
Thanks guys
I think when repairing wooden gliders they use a scarf joint its on the net. Should have read the rest of the post first again!!!......Well done!
 
Last edited:
I never use Sikaflex on anything with plastic. I learned about 20 yes ago that it let's go of lots of plastic things(also been posting on here since 2007 that it doesn't stick 😉 ) I also don't like using the butal tape that also leaks !
The best stuff I have found that doesn't leak or let go is Puraflex 40 👍 Been using that for about 10 yrs plus and never had a leak or anything drop off. ( Yet 😀 )
Why do so many Brit vans leak ? Because they use the shit butal tape 😀😞
But Puraflex 40 is a Sikaflex product, you just need to use the correct grade Stkia for the type of plastic, people just don't bother to check.
German vans use Butal sealants but there are an enormous range of Butal sealants Brit manufacturers are famous for using the cheapest.

Subscribers  do not see these advertisements


Join us or log in to post a reply.

To join in you must be a member of MotorhomeFun

Join MotorhomeFun

Join us, it quick and easy!

Log in

Already a member? Log in here.

Latest journal entries

Back
Top