Following on from requests on another thread
http://www.motorhomefun.co.uk/forum/threads/those-chinese-7-sat-navs.105211/page-2#post-1364302
here's some details on how I converted the Ducato's pop up clipboard to be a satnav holder.
Firstly, I can't take credit for the idea, I found it on an old thread on another forum, although with no instructions.
Secondly, I did this on an X244 Ducato - i.e. old shape cab. I don't see any reason why it won't work on the newer post 2007 models, so long as you definitely have the pop-up type clipboard, as I believe some vans with passenger airbags have fixed clipboards. Basically all you're doing is using the space that the folding mechanism usually occupies to store the sat nav.
Thirdly, apologies for the dodgy photo quality, all taken in the dark with the flash which makes the dash look really tatty - It isn't at all in daylight!
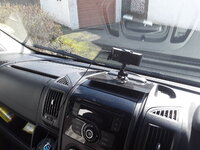
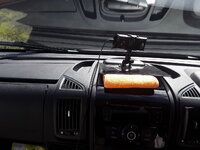
This is the clipboard folded down after the modification - looks pretty much standard.


But with the hinged end reversed and the folding mechanism removed, there's space to store a satnav - just enough room for mine, which is one of the 7" Chinese jobs:-


Which then in use sits very neatly just trapped by the end of the lid - the springs keep it gripped quite tightly, no mods to either satnav, lid or base required.


The springs are under tension even when the lid is shut, so it keeps it shut tight and it doesn't rattle.
So, how is it done? Unfortunately, I didn't think to take any pictures whilst I was doing the adaptation, but I'll describe it as best as I can.

I glued grip mat to the underside of the lid, and put a loose base in. I also fitted a hardwired power supply for the satnav, as you can see, which was about £10 from Ebay. This is wired to a switched feed, so it is only on when the ignition is on - alternatively you could put a switch in and connect to a permanent live feed so you can have the satnav on with the engine off, but I was concerned about forgetting it and leaving it on.
So there you go - if you're a fairly confident DIY'r then it's not too bad a job. I'd suggest cutting a slot in the base of the radio fitting cage so you can refit the cage before you put the whole housing back on the dash, but can still get the screws done up - fitting the cage tightly is much easier out of the dash. Refitting the radio may make you come up with a few new swear words, they are always a tight fit to get back in with the wiring behind!
Hope this is of use to someone.
http://www.motorhomefun.co.uk/forum/threads/those-chinese-7-sat-navs.105211/page-2#post-1364302
here's some details on how I converted the Ducato's pop up clipboard to be a satnav holder.
Firstly, I can't take credit for the idea, I found it on an old thread on another forum, although with no instructions.
Secondly, I did this on an X244 Ducato - i.e. old shape cab. I don't see any reason why it won't work on the newer post 2007 models, so long as you definitely have the pop-up type clipboard, as I believe some vans with passenger airbags have fixed clipboards. Basically all you're doing is using the space that the folding mechanism usually occupies to store the sat nav.
Thirdly, apologies for the dodgy photo quality, all taken in the dark with the flash which makes the dash look really tatty - It isn't at all in daylight!
This is the clipboard folded down after the modification - looks pretty much standard.


But with the hinged end reversed and the folding mechanism removed, there's space to store a satnav - just enough room for mine, which is one of the 7" Chinese jobs:-


Which then in use sits very neatly just trapped by the end of the lid - the springs keep it gripped quite tightly, no mods to either satnav, lid or base required.


The springs are under tension even when the lid is shut, so it keeps it shut tight and it doesn't rattle.
So, how is it done? Unfortunately, I didn't think to take any pictures whilst I was doing the adaptation, but I'll describe it as best as I can.
- Get some radio removal keys for your make of radio (very cheap on Ebay), slide the radio out and disconnect all it's connectors.
- If the radio has a metal fitting cage in the hole in the dash, this will need to come out. Usually these are held in place by little tags in the metal cage being bent in to grip the plastic dash housing, gently bend them back with a small screwdriver and slide the cage out.
- You'll now see 2 torx headed screws below where the radio was, and further 2 on top of the dash at the back of the clipboard. With an appropriate torx bit, remove all 4 and lift the clipboard and radio holder assembly away.
- Next stage is to disassemble the lid and sprung folding mechanism inside. This is all held in place with metal rods - they are a tight fit but they are not glued or plastic welded into place, they will all slide out with some persuasion and you don't need to cut any.
- From memory the first one to remove is the one that joins the sprung folding mechanism to the lid. The lid has a hole in one side to allow it to slide out - a good grip with some long-nosed pliers and it will, with some effort, slide out.
- The lid will now open a little bit further and you can grip and slide out the one at the base of the folding mechanism.
- Last and most difficult, as access is tightest, are the 2 rods at the front of the lid that form it's hinge.
- Now the lid is free, remove the two parts of the catch at the back from the lid and base. Don’t worry about the holes, you don’t see them when the job is done. Also remove the 2 little rubber buffers that the lid closed onto.
- The lid and base can now be drilled at the back to form the new hinge, using the same rods that formed the hinge before. The lid will need to sit fractionally further forward than before, and the back very slightly higher, to give enough clearance at the new hinge end. There’s a nice plastic “lump” either side at the back of the lid that the perfect place to drill into.
- Hardest part is deciding where to drill – at the back and fairly high up. I got it wrong first time, but if you have re-drill the base no one will see it.
- Whilst the lid is off, drill a couple of holes at the front and put the little rubber buffers in there, so the lid won’t rattle.
- Attach springs – I bought a selection pack off Ebay for about £3 – to the original hinge mounts under the lid.
- Fix your hinge pins in place. I put a fibre washer between the lid and the base on each side to stop the side float in the hinges, which makes the lid shut better and not catch if it’s off-centre
- I araldited the hinge pins on the outside of the base to make them secure, then cut the excess pin off with a Dremel
- The springs can now be located at the bottom using the rod that originally retained the opening mechanism, as below.

I glued grip mat to the underside of the lid, and put a loose base in. I also fitted a hardwired power supply for the satnav, as you can see, which was about £10 from Ebay. This is wired to a switched feed, so it is only on when the ignition is on - alternatively you could put a switch in and connect to a permanent live feed so you can have the satnav on with the engine off, but I was concerned about forgetting it and leaving it on.
So there you go - if you're a fairly confident DIY'r then it's not too bad a job. I'd suggest cutting a slot in the base of the radio fitting cage so you can refit the cage before you put the whole housing back on the dash, but can still get the screws done up - fitting the cage tightly is much easier out of the dash. Refitting the radio may make you come up with a few new swear words, they are always a tight fit to get back in with the wiring behind!
Hope this is of use to someone.
Last edited:


